Pizza bread!

OK, I think I’m officially on board with the bread-baking phenomenon. It just took me a little longer to get there than everyone else.

I’ve long liked the calming effects of kneading and the comforting aroma of bread rising, so I’m surprised I haven’t satisfied my soul sooner. Besides, as I have shown, I’ve long loved being a baker.

Even better, after making Serious Eatsfocaccia, I perused their other bread options and was delighted to find the double comfort of pizza and bread.

Pizza bread ingredients!

It sounded pretty easy, and because it called for a pound of pizza dough, and my measurements for my favorite dough don’t lead to exactly a pound, I just made a double batch and hoped there would be some leftover to have a homemade pizza later in the week. I was not disappointed.

With ingredients like garlic, dough, pepperoni, Parmesan, and red pepper flakes, it’s impossible for it to have turned out bad.

My only issue was pre-cooking the pepperoni with the garlic resulted in slightly crunchy pepperoni pieces in some cases after baking. It still didn’t taste bad, but I question if it’s totally necessary to pre-cook the meat, or maybe I’d just cook it for the barest minimum amount of time or on a lower setting to ensure the garlic gets cooked into the butter and crisps a little.

Still, we had no problem eating all 24 knots in just a few days.

Pizza bread!

Here’s what I did, mostly sticking to the recipe, only making my own dough:

Ingredients

  • 2 T. butter
  • 2 T. olive oil, plus more for drizzling
  • 4 oz. pepperoni, cut into ¼ in. squares
  • Red pepper flakes, to taste
  • 6 cloves garlic, minced
  • ¼ c. chopped fresh parsley leaves
  • 2 T. chopped fresh chives
  • ¾ c. Parmesan cheese, grated, divided
  • Flour, for dusting
  • 1 lb. homemade or store-bought pizza dough (I used about ⅔ of a double recipe of my favorite dough recipe here and reserved the rest for a thin-crust homemade pizza)
  • Pizza/Pasta sauce, for serving

Directions

Heat butter and oil in a 9- to 10-inch cast iron skillet over medium heat until butter melts. Add pepperoni and cook until it starts to crisp, about 2 minutes (see note above about doing this for slightly less time). Add pepper flakes and garlic, and cook for about an additional 1 minute. Remove from heat and add the parsley and chives, and stir to combine. Transfer mixture to a large bowl and stir in ½ c. of the Parmesan. Do not wipe out the skillet.

On a lightly floured surface, divide the dough in half. Take one piece and roll or stretch into a rectangle about 8 in. long by 4 in. wide. Use a bench scraper or sharp knife, and cut crosswise into 12 strips. Repeat with the other half, to yield 24 total strips.

Tie each strip into a knot and transfer to the bowl with the pepperoni, etc. mixture. Use your hands to toss and fold to coat the knots in the mixture. Place the knots in the skillet in a single layer, and drizzle with more olive oil.

Cover the skillet with plastic, and set aside until doubled, about 4 hours. Or, do as I did, and refrigerate for about 12 to 16 hours.

When ready to bake, heat the oven to 425 degrees, and place oven rack in the center. Remove the plastic wrap. Sprinkle on the remaining ¼ c. cheese. Place skillet in the oven and bake until golden brown and crisp, about 25 to 30 minutes. Brush on additional olive oil and enjoy with pizza sauce!

Christinia’s first cooking class

One thing that has become a staple of vacationing with my mom’s side of the family is taking a cooking class. Though I was not there, I will not soon forget the pictures my mom sent of my Polish maternal grandma learning to make sushi.

We’re nothing if not adventurous.

Pappa al pomodoro ingredients. Decidedly not sushi.

As I’m about to embark on a girls trip with my mom and aunt to a new foreign land, including a cooking class of course, I’m reminded again of the first time our family’s first time taking a class. The poor souls who had to wrangle about 10 of our clan did not have an easy task, especially as the wine flowed freely.

But 12 years later, I still make the recipes that we learned that day, and I still remember the wines that we tasted. Thankfully for the purposes of this blog, the recipe I make most often, pappa al pomodoro, (and was also one of the first dishes I shared with my sweetheart whom I’ll be missing dearly), can be made in a Dutch oven.

I haven’t made many changes over the years. Why mess with this Italian classic?

BRB, there’s more in the fridge right now.

Here’s what I did on my most recent venture:

Ingredients

  • 4 ½ lbs. tomatoes
  • 2 leeks, sliced
  • 1 garlic bulb, about 20 cloves, peeled minced
  • 1-2 packages fresh basil, chopped
  • Red chili flakes, to taste (about 2 pinches is what I use)
  • 1 loaf bread, preferably stale
  • Olive oil
  • Salt and pepper

Directions

Peel the tomatoes — my method is to cut a cross in the bottom and put them in boiling water for a minute or less before transferring them to an ice bath. (I didn’t say it was easy, just a way to use tomatoes!) Then, chop roughly and use a food processor or blender to puree the tomatoes.

Separately, in a large Dutch oven, heat olive oil over medium heat and then add the leeks and cook for about 5 minutes until translucent. Add the garlic and pepper flakes and cook for about another 1 minute.

Add the tomato puree to the Dutch oven, and bring to a boil. Cover and cook for about an hour. Add the chopped basil and salt and pepper to taste.

Continue to cook for about another half-hour. When the tomatoes are cooked, chop or tear off pieces of bread and place in the soup until it is thickened to taste. (I used about ⅔ of a small French loaf.)

Ladle the soup into bowls and top with additional olive oil and salt and pepper, if desired, and enjoy!

Programming note: I will be traveling, mostly out of the country, for the next few Fridays, BUT I will still be keeping my blogs updated as I worked in advance to ensure I kept up with posting weekly. However, if any technical difficulties or best laid plans do not work out and I go without posting, please be understanding and know that I’ll fix anything when I return.

Cassoulet casserole!

This week’s recipe is another that has been on my list for years. I almost made it during my casserole year, but ended up *shrug emoji.*

This year, however, after reading that cassoulet is the ultimate Dutch oven dish, I figured I had to try it, and try it early this year.

Cassoulet ingredients.

Another hold up in my mission was, well, the ingredients in cassoulet. Not only are many of them hard to find, and therefore, not all that cheap, those ingredients are also extremely fatty meats that are not all that appetizing.

To make up for this fact, I mercifully found a vegetarian cassoulet. Only that seemed pretty boring.

So, I did what anybody — well, one other notable foodie at least — would do, I reverse engineered the vegetarian cassoulet to add the amounts and types of meats I wanted. I settled on pancetta and andouille sausage.

For the vegetarians, these can easily be skipped and my assumption that it would be boring was wrong. For the meat eaters, feel free to add duck fat, duck legs, salt pork, pork shoulder, chicken thighs, or any of the variety of meats that appear in the multitude of recipes for this French classic.

I did what tasted best to me, and dear reader, it was amazing.

I won’t lie, it’s time consuming, and the recipe can be tweaked in hundreds of ways to suit one’s tastes, but I can definitely see why cassoulet has the reputation it does, especially in a Dutch oven.

This cassoulet only gets better with the addition of garlicky bread crumbs (not pictured).

Here’s what I did, adapting the Epicurious vegetarian recipe:

Ingredients

For the cassoulet

  • 8 oz. pancetta
  • 3 medium leeks, white and pale green parts, sliced
  • 4 medium carrots, cut into 1-inch pieces
  • 4 celery ribs, cut into 1-inch pieces
  • 4 garlic cloves, chopped (I used more)
  • 1 T. dried thyme
  • 2 parsley sprigs
  • 1 bay leaf
  • ⅛ t. ground cloves
  • 12 to 16 oz. andouille sausage, sliced
  • 16 oz. dried cannellini or great northern beans, soaked overnight
  • 1 quart broth, vegetable or chicken

For topping

  • 4 c. fresh bread crumbs from a baguette (about 1 baguette) (I actually did this and it was much better, and the bread can be days old as well; just tear bread into chunks and blend well for about a minute)
  • ⅓ c. olive oil
  • 1 T. chopped garlic (I didn’t measure)
  • ¼ c. chopped parsley (I used about half a bunch)
  • Salt and pepper, to taste

Directions

For the cassoulet

Fry up the pancetta in a large Dutch oven. Once mostly cooked, add in the leeks, carrots, celery, garlic, and herbs and spices, and cook stirring occasionally for about 15 minutes until the vegetables are softened and lightly golden.

Add the beans, and broth, and bring to a boil. Cook partially covered, for about 30 minutes, stirring occasionally. Add the sausage after about 30 minutes, and continue to cook for another 15 to 30 minutes, until beans are fully cooked through.

For the topping

Meanwhile, while the cassoulet cooks, make the garlicky bread crumbs. Heat the oven to 350 degrees.

In a medium bowl, toss the bread crumbs with oil, garlic, and salt and pepper, until the crumbs are coated. Spread on a sheet pan and cook for about 12 to 15 minutes, stirring halfway through, until the mixture is crisp and golden. Cool the crumbs in the pan, and then return the bread crumb mixture to the medium bowl and stir in the parsley.

To finish

Mash some of the beans in the pot with a potato masher to thicken the broth. Season with salt and pepper, if desired. Just before serving, sprinkle the cassoulet with the bread crumbs, and enjoy!

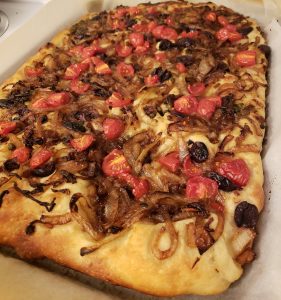
Beautiful briny bread

The checkout girl at Target told me not to tell anyone that the bread I made this week had anchovies on it. I didn’t have the heart to tell her that I’d be telling everyone through this blog post. So, let me get it out of the way at the front.

This bread is not for the faint-hearted.

If you can think of everything flavorful and potentially off-putting, this bread has it. Anchovies. Capers. Kalamata olives. Onions (lots of ‘em). Garlic.

Briny bread* ingredients. *Actually called “pissaladiere.”

It’s also got tomatoes, a butt-load of olive oil, and a no-knead yeasty bread.

Basically, me and my sweetie thought it would be perfect. And the recipe didn’t let us down. It’s been amazing.

The recipe comes from the cookbook my brother turned me on to about bread: “Bread, Toast, Crumbs” by Alexandra Stafford. I finally got myself a copy.

Unlike last time, my deviations from the original recipe worked just fine. I mostly stuck to it — including all those delicious toppings — but I have regular yeast, not instant, and I figured there was no harm in swapping. Especially since I spent a year making bread.

To correct, I just upped the amount of yeast and added a little honey to get it kickstarted, but otherwise I stuck close to the original.

My only complaint — and it’s expected — is that it took a long time and dirtied quite a few dishes, including the pain-in-the-ass-to-clean food processor. But I knew all that going in, and a lot of the time is pretty passive and a great time to rewatch this amazing season of “Doctor Who.”

It looks so pretty, and it’s tasty too.

Here’s what I did (with notes to use instant yeast):

Ingredients

For the dough

  • 4 c. all-purpose flour
  • 2 t. salt
  • 2 ½ t. active dry yeast (1 t. If using instant)
  • 2 c. lukewarm water
  • 1 T. honey, optional

For the bread

  • 6 T. olive oil, divided
  • 3 medium onions, halved and thinly sliced
  • 2 cloves garlic
  • 4 anchovies
  • 1 T. capers (I didn’t measure, I love capers)
  • ½ c. kalamata olives, halved
  • 1 c. cherry tomatoes, halved or quartered

Directions

Make the dough. If using active dry yeast, mix together the yeast, warm water, and honey, and let sit for about 10 minutes before stirring in the flour and salt. If using instant, the recipe says to mix together the dry ingredients, and then add the water (and honey). Either way, use a rubber spatula to stir until the mixture combined and you have a sticky dough that’s sort of ball-shaped. Cover the mixture with oiled plastic wrap, and let rise for about 1 ½ hours until the dough has doubled in size.

Just before the dough is ready, heat a large pan on high heat. Add 1 T. olive oil, and then add the onions. Cook on medium heat, stirring every few minutes, until the onions are golden, about 15 minutes. Set aside.

In a food processor, mix together the garlic and anchovies with 2 T. olive oil until pureed. Add the capers and pulse till chopped. Set aside.

Heat the oven to 425 degrees, and set the rack in the middle of the oven. Line a large rimmed sheet pan with parchment paper, and pour on the remaining 3 T. olive oil. Use two forks to deflate the dough by releasing it from the sides of the bowl and pulling it toward the center until you get a rough ball. Lift the dough with the forks or pour it onto the oiled sheet pan. Roll the dough ball in oil to coat it all over, and then let it rest for 20 minutes.

With greased hands, push the dough to stretch it to the edges of the sheet pan, and use fingers to dimple it. When the dough resists stretching, let it rest for about 5 minutes and then stretch again until it fits most of the sheet pan.

To assemble, spread the anchovy paste on the dough. Scatter on the olives, and then the carmelized onions. Top with the tomatoes. Use fingers again to dimple the dough and stretch more if necessary.

Bake for 25 to 30 minutes until the underside of the dough is golden and crisp. Transfer to a cutting board and let cool for at least 10 minutes before cutting into squares, and enjoy!

Everything sucks about these everything bagel crackers

I’ve been wanting to make this week’s recipe for a few years now, ever since I spent a year making breads. Somehow these crackers never made the cut, but I’ve saved the link to the recipe for a time when I had the chance to make them.

Of course, I’ve had opportunities but when you like to make food as much as I do, the list of things you wish to make — while still making time for old favorites — is quite long.

But, still, these are everything bagel crackers. Everything bagels were my first and favorite bagel love.

Everything bagel crackers ingredients. If you dare to make them.

If I’m only getting a single bagel, it will be an everything bagel (with a plain shmear, if you’re wondering). If I’m getting a dozen, a quarter to half of them will be everything. Almost all of the remainder will be one of the toppings from an everything bagel — poppy seed, sesame seed, garlic, maybe onion. I might make an addition of an asiago.

Point is, it’s a little weird I haven’t made these crackers yet.

So, even though I didn’t have a lot of time this week, I love to make bread and I thought this was the perfect week to finally whip together this treat.

It didn’t go well from the start, which should have been a sign.

Most of it was my fault. I had to go get some ingredients so I got off to a late start; it went more slowly than I had anticipated; I misread the directions slightly so I got even more flustered; and it made more of a mess in our already messy kitchen than I had hoped.

But not all hope was lost. After all, these were topped with “everything.” It’d all work out.

And initial signs indicated it’d be OK. The first few that crisped at the edges got taken out a little early while the rest baked, and after slight cooling, they tasted pretty good.

Then, when I was putting them away, my spirits got totally crushed and I’ve vowed to get revenge on this recipe if it’s the last thing I do (OK, not really, I’m just feeling dramatic.).

The parchment paper lining, I thought, made for an easy way to wiggle the crackers into a Ziploc bag for safe storage.

But when I poured, all of the topping mix just came right off the crackers and sunk to the bottom of the bag.

The only thing that made them good sat in a layer so so so far away from the crackers. I could have saved the effort of brushing the crackers with oil and carefully sprinkling on the topping mix, and instead just dumped them on some plain wheat crackers.

A second batch was placed more carefully but it only salvaged a couple of poppy seeds. Plus, who wants to make crackers that have to stay right-side up for their toppings to stay on?

Ugh.

As for the crackers, they were merely OK. The salt stayed on, which meh. Mostly, I made it work by pouring the topping mix onto hummus and then scooping up everything hummus onto plain wheat crackers.

If you’re still brave enough to make this recipe after my rant, and not dissuaded, I do have two thoughts to make it work. First, mix the everything topping mixture *into* the cracker dough, or do most of it in the dough and sprinkle on some, and then *press* it into the dough with wax paper or more parchment paper. Second, just do it all on top, but *press* it into the dough.

Me, I’m just going to hit up an Einstein’s or make the mix and put it on something else.

They look pretty good, sure. But if you turn them upside down, that topping just slides right off.

Here’s what I did, mostly following a recipe from The Chew:

Ingredients

For the crackers

  • 2 c. all-purpose flour
  • 2 c. whole wheat flour
  • 2 t. sugar
  • 1 t. salt
  • 1 ¼ c. water
  • 5 ½ T. olive oil (plus more for brushing if you put the topping mix on top)

For the topping mix

  • 2 t. dried minced onion, or onion flakes
  • 2 t. dried minced garlic, or garlic flakes
  • 2 t. poppy seeds
  • 2 t. sesame seeds
  • 2 t. Kosher salt
  • 1 t. caraway seeds (optional)
  • 1 t. fennel seeds (optional)
  • 1 t. black sesame seeds (optional)

Directions

Heat oven to 375 degrees.

Line two large rimmed sheet pans with parchment paper.

In a large bowl, mix together the flours, sugar and salt. Stir in the oil and water. Mix together until well incorporated. (Add the topping mix here, if desired.) Turn out dough onto a lightly floured surface and knead to combine completely, without overworking the dough.

Divide the dough into three discs and cover two with plastic.

Roll one disc at a time to ⅛ inch thickness, and then cut into 2” pieces. (The recipe says to cut into triangles but TBH, I couldn’t figure out how to make discs make triangles of that size without a lot of effort. I thought at first cutting like a pizza but they were too big.)

Transfer the pieces to the parchment paper-lined sheet pan. (Here’s where I misread. The recipe has you do this in batches so you do one disc, bake, then the next disc. I missed that, but I’d rather get it done quicker by fitting it all on 2 sheet pans and baking at the same time.)

Repeat with the next two discs.

Just before baking, brush the triangles (or whatever) with oil and top with topping mix. PRESS into the dough.

Bake for 30 to 35 minutes until crispy.

Let cool completely, and try to enjoy!

Mom recipes combine to make for delicious sheet pan dinner

So sue me, my first fish recipe comes too late for Lent. But I think this tilapia and asparagus dinner is delicious any time of year.

The recipes come from my mom, and as far as I know she doesn’t necessarily make them together; they just happen to combine the same flavor base that make them work well together. They also just happen to combine some of the best flavors out there — garlic, cayenne, butter, and olive oil. That’s right, two kinds of fat. Yummy!

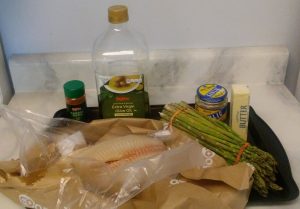
Tilapia and asparagus sheet pan ingredients.

Mom gave me the tilapia recipe when I was first starting out to cook. Frozen tilapia isn’t overly expensive, it keeps, and this makes for an easy meal when you’re just starting to learn to cook. The asparagus recipe is a long time favorite, as it combines the above flavors with a good deep roasting that makes them impossible to resist. If I ever have any extra asparagus lying around, which is rare, this is how I make ‘em. So, it seemed obvious to combine them into one simple and healthy-ish meal.

Just add some stove-top grain dish, and you’ve got a full meal that tastes great.

So much yummy goodness.

Here’s what I did:

Ingredients

  • 4 fillets tilapia (fresh is best but costly)
  • 1 bunch asparagus
  • 4 T. butter, divided
  • 4 T. olive oil, divided
  • 4-5 cloves garlic, minced, divided (I was lazy and used the jarred stuff but whatever works)
  • Cayenne pepper, to taste
  • Salt, optional (I used salted butter so skipped it, but you may want to add more or definitely add some if you use unsalted butter)

Directions

Heat oven to 350 degrees.

Remove woody ends of asparagus, and spread out over about half the sheet pan. Top with half the olive oil, half the butter, and half the garlic. Sprinkle with cayenne if desired. Bake for 8 to 10 minutes.

Remove the sheet pan. On the other half of the sheet pan, dot half the remaining butter and half the remaining olive oil on the sheet pan. Add the tilapia fillets on top. Top with the remaining butter and olive oil, and the garlic; sprinkle generously with cayenne pepper, to taste. Bake for 12 to 15 minutes until the tilapia is cooked through.

Serve over a grain, spooning on the garlic, butter, oil mix as desired, and enjoy!