Christinia’s Test Kitchen: Thanksgiving side edition

I’m very much a traditionalist when it comes to Thanksgiving. By that I mean, I’d prefer to have the classic sides I grew up with and/or adopted years ago rather than getting overly experimental the one time of year I make most of these dishes.

The one year I tried alternative takes, I was disappointed for an entire year that I didn’t just make my favorites and enjoy them. I’m sure cornbread stuffing is fine, and in fact, when I made it at not-Thanksgiving, it was quite good. But when I made it in place of my usual bread and sausage stuffing, it was just wrong.

Since declaring myself a traditionalist, I have been in control in the kitchen and gotten accustomed to my meals and have everything timed just right.

That is, until this year. We have for the first time in years planned to spend time with my family out of state, and I won’t be making my full array. I may still try to sneak in one side or dessert.

But because of that, it’s giving me a chance to experiment with things that I most definitely would not be making at Thanksgiving. So, digging into Food & Wine’s Thanksgiving edition, I was excited to find things that I could now try without ruining my own traditional dishes.

Of course, what stuck out most was the thing that looked like it was basically my sausage stuffing stuffed into artichokes.

Sausage stuffed artichokes ingredients.

It was not a meal to make mid-week and not one to make on the night of the most recent Democratic debate but between volunteering for my preferred caucus candidate, taking care of aging cats, and work and life in general, it was the only time I had.

The stuffing, however, was much more like a meatball, even with my addition of way more bread material than called for. But if you’re like me and can eat an entire artichoke on your own, it at least had artichoke-sized servings.

The additions of potatoes, while tasty, are not necessary considering the amount the artichokes make but if you are an experimenter at Thanksgiving, it’s a great way to make two sides at once.

For me, it won’t replace my usual stuffing recipe any time soon, but it was quite delightful and I’m glad I made it.

Not only tasty but it looks pretty good if you’re looking for a fancy side dish.

If you’re more experimental or just want to save it for later, here’s what I did, making some slight alterations to the original:

Ingredients

  • 4 large fresh artichokes
  • 1 lb. fresh pork sausage (recipe recommends bratwurst with casings removed, but as I’ve mentioned, I love Beeler’s breakfast sausage for any sausage needs; it’s perfect)
  • 1 c. ¼ in.-cubed baguette
  • 1 c. panko, or other dried bread crumbs
  • 1 c. Chardonnay, divided
  • ¼ c. fresh flat-leaf parsley, chopped
  • 1 T. garlic paste
  • 2 large egg yolks
  • 1 T. Dijon mustard, plus more for serving, if desired
  • Salt and pepper, to taste
  • 1 ½ lb. small gold potatoes (optional)
  • Melted butter, for serving (optional)

Directions

Bring a large pot (or pots, in my case, and definitely not my too-short-for-stemmed-artichokes Dutch oven) of water to a boil over high heat on the stove top. Add salt, if desired, and add the artichokes. Place a heatproof dish on top of the artichokes to keep them submerged, and boil on high for about 15 minutes until a paring knife can easily be inserted halfway through the stems. Remove the artichokes from the water and let drain in a strainer, stem sides up, until they’re cool enough to handle.

Meanwhile, heat the oven to 325 degrees. In a large bowl, mix together the sausage, bread cubes, panko, ¼ c. of wine, parsley, garlic, egg yolks, Dijon mustard, and pepper. Use your  hands to combine until roughly meatball texture.

When artichokes are cool enough to handle, remove the stems and loosen the leaves at the center of the artichokes. (While it’s good to be careful, I found the artichokes to be fairly pliable so it was easiest to push out the tougher pieces to be sure to remove the prickly center chokes. A spoon helped but fingers still worked best, even if it was painful.) Stuff the sausage mixture evenly into each cleaned artichoke center.

Place the artichokes, stem sides down, in a large Dutch oven. Arrange the potatoes, if using, around the artichokes. Add water to a depth of about 1 inch (I didn’t measure, just guessed, and reused the water from the initial boiling.), and then add the remaining ¾ c. of wine to the Dutch oven. Over medium-high heat, bring the liquid to a simmer. Once boiling, cover the Dutch oven and place in the preheated oven.

Bake for about 55 minutes, or until the artichokes and potatoes are tender and the sausage cooked through. Remove from heat and let stand about 10 minutes, and then enjoy with additional mustard and butter, as desired.

Programming note: I’ll post my next pseudo-Thanksgiving dish on Wednesday, ahead of the holiday, and it’ll be a dessert that can be made any time over the holiday, or likewise saved for later.

Last week redux

I enjoyed last week’s recipe so much that I couldn’t stop thinking about it, and one of my thoughts was how so many of the ingredients would work really well in a Greek/Middle Eastern recipe. Olives, roasted red peppers, onions, and tomatoes all would work perfectly.

Then, of course, I got to thinking about the other things that I would have to adapt. And before I knew it, I had a nearly completely different recipe using nearly the same template.

Greek-ish casserole ingredients.

I’ll admit some ingredients were easier to replace than others. I could have still used barley, but pearl couscous was sitting right there being perfect.

I thought about going full vegetarian, since ground sausage wouldn’t work. That’s when I remembered that gyro slices exist and are practically a perfect meat.

The sauce did take me awhile. Well, I thought of something pretty early, but it took awhile to convince myself it was the best option. Of course, it was a simple yogurt sauce.

Anyway, the results were absolutely fantastic.

Not only was it a delight but it also didn’t taste like I’d made the same thing two weeks in a row. Double bonus.

So much feta, gyro meat, and pepperoncinis. Delicious.

Here’s what I did:

Ingredients

  • 1 c. dried pearl couscous (cooked to package instructions, to yield about 3 c. cooked)
  • Oil, for coating
  • 1 lb. gyro meat slices, chopped
  • 1 medium onion, chopped
  • 1 (12 oz.) jar roasted sweet red peppers, chopped
  • ½ c. pitted green olives, chopped
  • 1 (14.5 oz.) can quartered artichoke hearts
  • 1 c. plain yogurt
  • ~⅛ c. lemon juice
  • Fresh dill, to taste (I used the entire package, but I love dill)
  • ¼ c. chopped parsley
  • 1 T. oregano
  • Pepper, to taste
  • 3 cloves garlic, minced (I used the jar stuff, sorry)
  • ½ c. mozzarella, shredded
  • 1 ½ c. crumbled feta, divided
  • 1 c. cherry tomatoes, halved
  • 1 c. pepperoncinis, sliced, optional

Directions

Heat the oven to 350 degrees.

Meanwhile, on the stove top, coat a large Dutch oven and heat over medium. Brown the gyro meat, stirring occasionally, and soon after add the onions, and cook continuing to stir until the onions are translucent.

Add the roasted red peppers, olives, artichoke hearts, and cook for a minute or two to just meld flavors.

Meanwhile, in a small bowl, mix together the yogurt, lemon juice, garlic, dill, parsley, orgeano, and pepper.

Remove the Dutch oven from the heated stove top, and add the cooked pearl couscous, tomatoes, the mozzarella, about half the feta, and the yogurt sauce. Stir to combine.

Cover the mixture and bake for 30 minutes. Remove from oven, take off cover, add the remaining feta to the top, about half the pepperoncinis if using, and then continue to bake uncovered for about 10 minutes more until the cheese is melty. Add the remaining pepperoncinis just before serving for an extra kick, and enjoy!

Bring on the barley weather

I love barley, so much so that it is a totally fall ingredient that I have definitely eaten during the summer. In the words of Icona Pop, I don’t care, I love it.

Now that it’s officially barley season, though, I was so excited to find a new, fun way to use it. In an Italian casserole, no less.

Italian barley casserole ingredients.

The recipe my sweetie found online randomly from Better Homes & Gardens had all the right ingredients, but the amounts seemed way off, and it included mushrooms, ick. So, I took the ingredient list, sans “fresh button mushrooms,” and ran with my own amounts.

The recipe also called for dividing it into cute, tiny casserole dishes, and even if it weren’t for my Dutch oven theme, I can’t imagine dividing this into single-serve sizes. This is a casserole, dammit. It needs to be big, right?

I want to say I really thought about the proportions, but I really just threw in amounts that made the most sense (who uses a quarter of a package of sausage?!) and hoped for the best. It turned out pretty damn good, because it turns out it’s usually pretty hard to screw up a casserole. Even better, it made a lot more than the four single-serve dishes. A lot being like six servings.

I should note, however, that barley does take a long time to cook, so I recommend preparing in advance or making this dish on a weekend when you have more time.

Alas, it’s all gone now. So much cheese and sausage goodness.

Here’s what I did:

Ingredients 

  • 1 c. dry barley, cooked to package instructions (best prepared in advance)
  • Nonstick cooking spray
  • 16 oz. Italian sausage, or other sausage (I love Beeler’s breakfast sausage so much that that’s what I used)
  • 1 medium onion, chopped
  • 3 cloves garlic, minced (I used the jar stuff, sorry)
  • 2 c. tomato sauce (I actually used actual pasta sauce, and went for arrabbiata)
  • 2 c. mozzarella, shredded, divided
  • ½ c. Parmesan, shredded
  • 1 c. cherry tomatoes, halved
  • 1 (12 oz.) jar roasted sweet red peppers, chopped
  • ½ c. pitted green olives, chopped
  • Fresh basil, to taste

Directions

Heat the oven to 350 degrees.

Meanwhile, on the stove top, coat a large Dutch oven and heat over medium. Brown the sausage, stirring occasionally. Just before the sausage is cooked through, add the onions and cook an additional 3 to 5 minutes, and continuing to stir. Add the garlic and cook another minute.

Remove from heat. Add in the cooked barley, pasta sauce, half the mozzarella, the Parmesan, the roasted red peppers, olives, tomatoes, and basil to taste.

Cover the mixture and bake for 30 minutes. Remove from oven, take off cover, add the remaining mozzarella, and then continue to bake uncovered for about 10 minutes more until the cheese is melted. Add extra basil to the top before serving, if desired, and enjoy!

Ghoul-ash!

I know it’s a day past Halloween, but I couldn’t resist a terrible pun. That’s right, I made goulash, or ghoul-ash for the spooky set.

Goulash ingredients.

My friend and gaming buddy Jenny made goulash in a crock pot earlier this year for one of our epic Pathfinder games, and I immediately fell in love. And, more importantly, I thought that it would be an amazing dish for my Dutch oven year.

It just took about half a year to get to it. Thankfully, she was able to track down the recipe and then remember what she actually did for the most part, and then, I took that and adapted it yet again and added some ingredients she omitted and some ingredients from another recipe.

Authentic Hungarian it probably is not. But Jenny’s recipe was so good I wanted to eat it again, and none of the other recipes were nearly as inspiring as hers.

Also, spooky it is not. I just happened to make it this time of year. Maybe it’s just dressed up as a ghoul? I tried. Sorry.

There was so much. There was so much paprika. It was great. Sorry it’s gone.

Here’s what I did:

Ingredients

  • 1 (16 oz.) box rotini (or medium pasta), cooked according to package directions
  • 1 ½ lb. ground beef, lean
  • 2 T. vegetable oil
  • 2 medium onions, diced
  • 2 medium carrots, chopped
  • 1 bell pepper, chopped
  • 1 (14.5 oz.) can diced tomatoes
  • 1 (28 oz.) can crushed tomatoes
  • 4 to 5 T. paprika (a mix of smoky and spicy if you’ve got it, or whatever you like, to taste)
  • 2 cloves garlic (I used the jar stuff)
  • 2 bay leaves
  • Salt and pepper, to taste
  • 8 oz. shredded cheddar

Directions

Heat the oven to 350 degrees.

Meanwhile, brown the meat in a large Dutch oven on the stove top over medium heat, about 10 minutes. Add the oil and onions, carrots, and bell pepper, and cook another 5 to 7 minutes until the vegetables are softened. Add the diced and crushed tomatoes, garlic, bay leaves, paprika, salt and pepper, and bring to a boil, which shouldn’t take long.

Remove from heat, and stir in the cooked pasta and cheddar.

Cover the goulash, and bake in the oven for about 20 to 25 minutes until bubbling. Let cool slightly, and enjoy!

Crappy week calls for comforting soup

I had plans to make something else this week, but something about the best laid plans of mice and men.

Bear with me as I get personal for just a second before getting into the recipe (I know, it’s widely mocked), but on Sunday night one of my two oldest cats had his first seizure and it was rather traumatic for us (he seems to be doing OK but it probably isn’t good news in the long run). This comes on the heels of learning less than two weeks ago that my other oldest cat has chronic health issues. So not only have I not been sleeping well but we’ve upped our medication routine lately, and of course, my anxiety.

This all means that while I had a vague idea of what I was going to make, I didn’t get around to it yet. Thankfully, my sweetie had plans to make one of his favorite seasonal soups, beer cheese soup. More importantly, he had the ingredients on hand. So, while he did some household chores, I made the soup.

Amy Thielen’s beer cheese soup recipe ingredients.

It’s from Amy Thielen’s The New Midwestern Table, one of my favorite cookbooks, and the beer cheese soup recipe in it is one of our family favorites. It’s not the healthiest but its simple and quality ingredients make it seem kinda OK.

Because I trust Amy Thielen, I mostly follow her recipes with little alteration. The same is true in this case, except as it was approaching 9 p.m., I decided to skip the blending step. I know, it’s sacrilege to have chunky beer cheese soup, but it works for me. Mostly, I don’t love smooth soups. But also, after realizing that my diced veggies — as the recipe called for — weren’t that chunky, I figured I’d save myself the effort.

After all, it’s been the kind of week that calls for easy, comfort food.

See those chunks. Yum.

Here’s what I did:

Ingredients

  • 1 stick (8 T.) butter (I used unsalted even though the recipe calls for salted)
  • 2 medium carrots, diced (dicing is less critical if you plan to puree)
  • 1 large red bell pepper, diced (dicing is less critical if you plan to puree)
  • ¾ c. all-purpose flour
  • 4 c. broth (chicken or vegetable, preferably homemade)
  • 1 (12 oz.) can/bottle of beer (the recipe calls for a pale ale, I used my staple of Hamm’s)
  • 1 ½ c. half and half
  • 12 oz. white cheddar, grated (good-ish stuff preferred)
  • ½ T. Worcestershire sauce
  • Hot sauce, to taste
  • ⅛ t. ground nutmeg
  • 2 T. Dijon mustard
  • 2 T. lemon juice
  • Salt and pepper, to taste
  • Mustard oil, for serving (optional but a delight)
  • Thyme, for serving (fresh preferable but dry also works)

Directions

In a large Dutch oven over medium heat, melt the butter. Add the carrots, peppers, and a pinch of salt, and cook until the vegetables are softened, about 5 minutes. Add the flour and cook, stirring regularly until well incorporated, about 5 minutes more.

Add the stock, beer, and half and half, and cook, stirring often, at a slow simmer over medium low heat. Cook for about 15 minutes.

Add the cheese by the handful, stirring after each addition until the mixture is smooth. Add in the Worcestershire sauce, hot sauce, nutmeg, mustard, and lemon juice, and stir to combine.

Puree the soup in batches, if desired, being careful not to get hurt by the hot soup.

Just before serving, add salt and pepper, as needed, to taste. Ladle into bowls and garnish with a small swirl of mustard oil and a sprinkle of fresh thyme, and enjoy!

Springing into fall with super soup

I set out this week to make a soup. This is partially weather-related and mostly due to the fact that I had a head cold for about half the week and wanted my cozy hot comfort food.

The recipe that stood out most to me was a light spring soup called a brodo. But this is fall, dammit. Of course, I’m sure it’s possible still to find asparagus in the grocery store, either fresh or frozen, but it just didn’t feel right.

Brodo ingredients, sans broth. Isn’t it ironic, don’t ya think?

Also, because this soup had some cream and gnocchi, I thought it’d work as a fall dish.

So, I did some swapping and some additions, and boy, did I make a good, and pretty easy soup. The biggest difficulty was that I made my own broth. However, it’s not entirely necessary, and stupid me, I had some broth in the freezer that I realized to late. So, good reminder to make broth way ahead of time and freeze it, but yeah, try to remember it’s there when needed. Or, just buy some high-quality broth.

To fully fall this soup, I changed asparagus for Brussels sprouts and added bacon. It wasn’t even that many changes, but it sure felt perfect for autumn.

Soup is gone. So sad.

Here’s what I did, adapting from my Soup Nights cookbook (one of too many/not enough soup cookbooks I own):

Ingredients 

  • 2 T. vegetable oil
  • 1 lb. Brussels sprouts, sliced
  • 8 c. vegetable or chicken broth (store bought or pre-made)
  • ⅓ c. heavy cream
  • 4 to 5 oz. blue cheese crumbles, divided
  • 4 t. cornstarch
  • 4 t. tap water
  • 16 oz. pre-made potato gnocchi
  • Salt and pepper, to taste
  • Cayenne pepper, to taste (I like it spicy so I used closer to 1 t. but very taste dependent and a little goes a long way)
  • 1 to 1 ½ bunches green onions, sliced, to taste
  • 8 slices bacon, cooked to package directions, for serving
  • Chives, to taste, for serving

Directions

In a large Dutch oven over medium-high heat, add the oil and then the Brussels sprouts. Cook until softened and starting to brown. Add the vegetable broth and heat to boiling.

Meanwhile, mix together the blue cheese and heavy cream in a small bowl. Once the broth is boiling, add the cheese and cream mixture.

In the same bowl (or separately), mix together the corn starch and water, and then add that mixture to the soup mixture. Stir often for about 3 minutes until the soup begins to thicken.

Add the salt and pepper, cayenne, green onions, and the gnocchi, cooking another 3 to 5 minutes until the pre-made gnocchi is cooked through. Season more, as needed.

Ladle soup into bowls, serve with cooked bacon, any additional blue cheese crumbles as desired, and chives, and enjoy!

Decadence defined

Mistakes were made in the creation of this week’s recipe, but because it all turned out to be fine in the end, I’ll parrot the great Bob Ross in saying that it was a happy little accident.

Since my sweetie was out of town for the week, I didn’t want to make any hefty meal that I’d have to eat all on my own. That’s kind of a challenge when it comes to making things in a Dutch oven.

So, I thought a safe thing to make might be bread. Sure, it’d make a lot but it’d be easier to freeze and share. Even better, I found a recipe for dinner rolls in my Cook It In Your Dutch Oven cookbook so I could make mini-sized bites.

But I didn’t need dinner rolls for light solo dinners. Breakfast rolls sounded better.

This is where things went off the rails. I started looking in another cookbook for sweet breads, decided on cinnamon rolls, saw a recipe for bacon maple bread, and then amended my plan to make bacon maple cinnamon rolls.

A quick Google search confirmed that I wasn’t the only one who’d had this idea so there was a good chance my idea wasn’t totally crazy.

I tracked down a cinnamon roll recipe I made a few years ago and then updated it to what I thought would work for my tastes. The Googled recipes also offered some hints but I wanted to do it my way.

It was a little difficult to fit in my Dutch oven, and the center did not hold as it baked, but it hardly mattered once I tasted it.

It turned out to be about the most deliciously decadent thing I’ve made. And totally inappropriate for me to eat all by myself.

Thank goodness my sweetie is back to share them tomorrow.

Bacon maple cinnamon rolls. So decadent.

Here’s how I made the happy little accidents:

Ingredients

For the dough

  • 1 c. warm milk
  • 1 stick butter
  • ½ c. sugar
  • 2 ½ t. active dry yeast (or one package)
  • 1 egg
  • 2 t. salt
  • 4-5 c. all-purpose flour

For the cinnamon center

  • 1 stick butter, softened
  • 3 t. cinnamon
  • 4 T. brown sugar
  • 4-5 T. maple syrup
  • 10 slices bacon, cooked, cooled, and chopped
  • ½ c. chopped pecans (pecan chips, if available)

For (optional) cream cheese topping

  • 4 T. butter, softened
  • 4 oz. cream cheese, softened
  • 4 T. maple syrup
  • ½ t. vanilla
  • ¾ c. powdered sugar
  • 1 t. ground cardamom (optional)
  • ½ c. pecans, for topping (optional)

Directions

In a small saucepan, melt the butter and add the milk. Heat the milk to just warm but not too hot so it doesn’t destroy the yeast. Add the sugar and yeast to the butter and milk mixture. Let activate for about 15 minutes.

Add the mixture to a large bowl and stir in the remaining dough ingredients. Add flour until a dough forms, and then knead for 5 to 10 minutes until springy and smooth, adding flour as necessary.

Shape into a round, place back in bowl and cover. Let rise for about 2 hours. (I opted to do this over two week nights, so I refrigerated the dough after this rise, and then let warm back up for about an hour after getting home the next night; also possible to do once its in roll form in the Dutch oven.)

Meanwhile, mix together the cinnamon center ingredients. In a small bowl, stir together butter, cinnamon, brown sugar, and maple syrup. Prepare the bacon and pecans, if not already ready. Prepare the Dutch oven by making a foil sling by folding in half to long sheets of aluminum foil, so you have 2 long, roughly 7 inch sheets. Place sheets perpendicular to each other, like a lowercase t, and carefully smooth down into the bowl. Spray with a little bit of oil.

When the dough is ready, roll out into about an 18 inch by 9 inch rectangle on a lightly floured surface. Spread with the cinnamon mixture, and then place the bacon pieces and pecan pieces on top.

Roll the coated dough along the long end into a log. Cut into about 14 even pieces. Turn and place the pieces in the Dutch oven, starting with the outside adding about 9 to 10 pieces along the edges and then placing the remaining rolls in the center.

Cover and let rise for about an hour to an hour and a half. Meanwhile, heat the oven to 350 degrees. Once dough has risen, uncover and place the rolls in the oven, and bake for about 20 to 30 minutes until golden on top.

Meanwhile, mix together the ingredients of the cream cheese topping, if using. Let rolls cool for at least 5 minutes but while still warm, add the frosting, and then cool a little longer before enjoying!

Lazy, lovely layered lasagna

I was scrolling through Twitter one fine day keeping up on the shitshow that is our current American political system when I was distracted by something not actually terrible, an Epicurious video.

The short clip I watched without sound was a recipe for slow-cooker lasagna. I thought it sounded amazing, except, you know, I wanted to make it in my Dutch oven.

Lasagna ingredients.

Now, I’ve made lasagna a lot and I have a couple of favorites, so instead of watching the video again, I just sort of guessed/remembered/assumed what I should do to put together my own dish.

Except for the fact that I did a terrible job of evenly distributing my filling, the lasagna was amazing. I mean, most times I make lasagna, there’s too many noodles to fit but this time, oof, I really distributed poorly for the layers. But all was not lost. I just made sure to take from the better filled areas and the less filled areas and made it work.

However, if you, dear reader, try the same, be sure to go light on the filling as you roll up the noodles.

Now, having made lasagna a few different ways during my time, starting with the traditional-ish, I have to say my favorite is still actually the sheet pan recipe because I like my lasagna crispy. But if you really like the saucy bits, this one is for you. And either way, good lasagna is good lasagna, so this was quite good.

BRB, there’s more in the fridge.

Here’s what I did:

Ingredients

  • 1 box lasagna noodles, cooked to package directions
  • 32 oz. jar of arrabbiata sauce, or red pasta sauce to your liking
  • 1 (15 oz.) tub ricotta
  • 3 c. mozzarella, shredded, divided
  • 1 c. Parmesan cheese, shredded, divided
  • 4 oz. feta, crumbled
  • 1 egg
  • 1 (10 oz.) box frozen chopped spinach, thawed
  • 10 oz. marinated artichokes, chopped
  • ½ T. basil, chopped
  • ½ T. dried oregano
  • ½ T. dried rosemary
  • 1 t. red pepper flakes, optional
  • Pepper, to taste

Directions

Heat the oven to 325 degrees.

In a large bowl, mix together the ricotta, 1 c. mozzarella, ⅓ c. Parmesan, egg, spinach, artichokes, and the herbs and spices, until well mixed. EVENLY spread the mixture onto about 14 lasagna noodles, more if necessary, and roll the noodles lengthwise.

Poor about ¼ of the sauce onto the bottom of a Dutch oven. Add about half the rolled noodles to the Dutch oven; sprinkle with 1 c. mozzarella, ⅓ c. Parmesan, and half the feta, and about half the remaining sauce. Place the remainder of the rolled noodles on top, and then top with the remaining sauce, and cheeses.

Cover the Dutch oven and bake for about 30 minutes; then, remove from heat and remove the lid. Bake another about 20 to 30 minutes, uncovered, until the cheese is browned on top. Let cool slightly, and enjoy!

You do udon

I’m slowly getting back into the groove of things since being back from vacation. I imagined it would be quicker but exhaustion got the better of me as did the daily grind.

So I decided to start back up with the kind of weeknight dinner that takes little effort and barely follows a recipe. I went with udon noodles with chicken and broccoli, or the more vague “Asian noodles,” which was the not-the-most-culturally-sensitive Google search I did to get the vague idea of ingredients for a sauce.

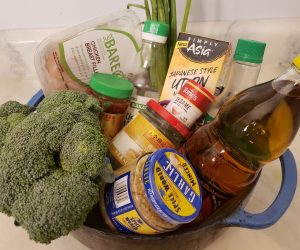
Udon noodles ingredients.

That blog post, like my own, makes clear that this recipe can be adapted to anyone’s tastes. Don’t like broccoli? Try carrots or spinach or a combination of veggies. Want to add peppers? Go ahead. Don’t want chicken or are vegetarian? Skip it or add tofu.

The same is essentially true of the sauce. I went heavy on the sesame oil because I love it and I have it. I also added a bunch of ginger (from a jar because I was lazy) that wasn’t in the recipe; I just like a lot of ginger. I skipped out on the cilantro to save my sweetie, but I think it would have been pretty tasty as an addition.

That’s to say, you do udon.

To hurry things along, I cooked the udon separately while I prepared the chicken, vegetables, and sauce, but if you’re in no rush and want this to be a one-pot dish, you can cook the noodles in the Dutch oven and leave to drain while preparing the rest of the dish.

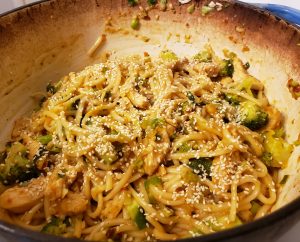
I still want more; it disappeared too fast.

Here’s what I did:

Ingredients

  • 14 oz. udon noodles, cooked to package directions
  • 1 lb. chicken, sliced or chopped
  • 3 c. broccoli (or about one grocery store package with 2 to 3 heads), chopped
  • 1 bunch green onions, white and light green parts sliced
  • ⅓ to ½ c. soy sauce (less sodium is good)
  • ¼ c. toasted sesame oil
  • 1 ½ T. ginger, minced (I used the jar stuff)
  • 3 cloves garlic, minced
  • 1 T. rice vinegar
  • Sambal oelek (chili paste), or Sriracha, to taste (I used about ½ T.)
  • 3 T. sesame seeds
  • Vegetable oil, for sauteing

Directions

Heat the oil in the Dutch oven over medium heat, and saute the chicken until mostly cooked through before adding the broccoli and green onions, stirring occasionally. Meanwhile, mix together the soy sauce, sesame oil, ginger, garlic, rice vinegar, and sambal oelek or sriracha, and stir to combine.

Once the chicken is cooked through and the vegetables are cooked to desired consistency, turn off stove top and add the sauce. Stir to combine and then add the cooked noodles, and continue stirring. Remove from heat and add the sesame seeds, stirring again. Taste and add more soy sauce or sesame oil as desired, and enjoy!

Cooking class in absentia

As I mull over what dishes I ate on my recent Portugal vacation — and there were so many and such good food — that I can make in my Dutch oven, I thought I’d share a recipe from an exotic vacation that I didn’t get to go on. So we can be in the same boat for this week.

The best part about not getting to go on an international trip with my family is that they’ll bring back and share the recipes from their cooking class.

So, when my mom got back from her eastern European vacation last year, I got a PDF of the Hungarian dinner they had one night. Perfect since I’ve always wanted to make chicken paprikash.

Chicken paprikash ingredients.

I’d say it was almost like being there … but obviously not. Still, it was great to be able to try authentic food without leaving the house (other than to get groceries). Mom even was kind enough to buy extra paprika and send me some, so I had plenty on hand for the paprikash and an extra side dish (the Hungarian salsa!) I decided to make.

The paprikash was a delight. It was a little too saucy for me, but the chicken was slightly spicy and extra creamy, as I expected and hoped, and the really ugly dumplings I made based on the recipe to go with the chicken turned out good if incredibly ugly.

All in all, it was a good substitute for being there and a chance to enjoy some authentic Hungarian food without a lot of effort or the airfare. Now, you can too.

So much paprika (and sour cream). So good.

Here’s what I did:

Ingredients

For the paprikash

  • 2 large onions, chopped
  • 4 T. oil
  • 4 t. salt (I probably used less!)
  • 1 t. ground pepper (I probably used more!)
  • 5 t. paprika powder (I split the mixture between smoky and spicy, but you do you)
  • ~10 boneless, skinless chicken thighs (the recipe calls for 6 bone-in legs but I like boneless)
  • 12 oz. sour cream
  • 1 T. flour
  • Water

For the nokedli (dumplings)

(or use egg noodles or similar if feeling lazy)

  • ~1 c. flour
  • 3 eggs
  • 1 t. Salt
  • Water, as necessary (if mixture is dry)

Directions

Heat the oil in the Dutch oven over medium heat, add the onions, and cook until translucent, about 5 minutes. Take off heat and add salt, pepper, and paprika. Add about ½ c. water to keep the powder from burning. Place mixture back on heat, add the chicken, and pour water on top until just covered. Cover and cook on medium heat for about 1 hour until the chicken is cooked through (can probably check earlier if using boneless — I think I did about 35 minutes). Meanwhile, mix the flour and sour cream together.

Once the chicken is cooked through, stir in the sour cream mixture. Bring to a boil again.

Meanwhile, prepare the dumplings by bringing a separate pot of water to a boil. In a medium bowl, mix together the eggs, flour, and salt, and adding water if necessary until a hard dough forms. Tear dough pieces and place in the boiling water, removing pieces as they float and are cooked through. Serve the chicken (and the sauce) with the nokedli, and enjoy!