When the moon hits your eye …

No big pizza pie this week, but don’t worry, there’s still amore with these little pizza pies I made in my small skillet.

Pizza pie ingredients

One of my favorite summer meals is homemade pizza. It doesn’t take a lot of prep or cooking time, so I neither spend a lot of time in front of a hot stove nor heat up the house baking for hours. Plus, who doesn’t love pizza anytime?

Homemade pizza also means I can put anything on it without having to pay specialty prices.

This last time I made my homemade crust adapted from Betty Crocker, I made an extra serving to see how well my homemade pizza would taste and work in a 9- to 10-inch skillet.

As I’d hoped and expected, about half of one crust flattens into a 9- to 10-inch skillet. Thus, as hoped and expected, you need about half your typical pizza topping ingredients for a smaller skillet.

Or, if you’re me, you use both your 9- and 10-inch skillets and have two options for toppings, and you and your sweetie have your Book-It-style personal pan pizzas. No reading required. (Though obviously recommended, as reading is fun!)

Like with most of my homemade pizzas, I don’t really keep track of the amounts of toppings so my guide below will be both based on a full-size pizza so halve accordingly and also will be estimates. However, feel free to use your own toppings to your desired levels, though I have loved my adapted Betty Crocker crust for years and highly recommend adopting it as your own go-to crust recipe.

Now that’s what I call amore.

Here’s what I did:

Ingredients

For the crust:

*Will make 2 pizzas in 9- to 10-inch skillet

  • 2 ¼ t. active dry yeast (1 package)
  • ½ c. warm water
  • 1 t. honey
  • ¾ c. whole wheat flour
  • ½ to ¾ c. all-purpose flour
  • 1 T. olive oil
  • ½ t. salt

For the toppings:

*Will make 2 of the same pizza, so halve or have a variety of toppings available

  • Oil or oil spray
  • ¼ c. tomato paste or tomato sauce (I use either, depending on my mood)
  • 3 c. mozzarella, shredded
  • ½ small bell pepper, chopped
  • 4 pepperoncinis, chopped
  • 8 slices salami
  • 1 t. basil
  • 1 t. oregano
  • ½ t. garlic powder

Directions

For the crust:

In a medium bowl, mix together the warm water and honey, and add the yeast. Let sit for 5 to 10 minutes until the yeast has started to activate.

Add the oil and salt, and then the whole wheat flour. Use a large spatula or your hands to begin to mix together the dough, adding all-purpose flour as necessary until the dough comes together into an easy-to-handle mixture. Turn the dough out onto a (all-purpose) floured purpose, and begin to knead, adding more flour as necessary. Knead until the dough is smooth and springy.

Place into a clean, greased medium bowl, turning to coat all sides of the dough in grease. Cover and let rise about 20 minutes until roughly doubled in size.

Punch down, and divide. Place smaller dough balls into Ziploc bags or smaller covered bowls, preferably greased, and refrigerate at least 2 hours but no longer than 48 hours (I actually like it better if it is at least overnight but it works fine after 2 hours.)

For the pizza:

Heat the oven to 425 degrees.

Lightly oil a 9- to 10- inch skillet, or if you have two, oil them both.

Take 1 dough ball, and slowly press into the skillet. It at first will not stretch well, but as you keep pressing and working to form a flat surface that covers the skillet, it will begin to give more. Once it covers the bottom, with a little lip around the edges, spread about half of the sauce. Top with ½ the peppers and ½ the salami. Cover the toppings with half the cheese. Add half the herbs and spices.

Bake for about 15 minutes until the crust and cheese are lightly browned. Remove from heat, and enjoy your personal pan pizza.

Repeat with the remaining ingredients after the skillet has cooled, or use a second similarly sized skillet, and enjoy a second personal pan pizza!

5 ingredients, 10 minutes prep, 1 hour till dinner

I’ve sung the praises many times before of Jamie Oliver’s “5 Ingredients” cookbook that my brother gifted me. I wasn’t expecting that it’d be super useful in this year of Dutch ovens. After all, how many things could you make in a Dutch oven with so few ingredients?

I should have known better than to doubt. It turns out, there’s plenty enough.

What caught my eye this week was his salami risotto.

Salami risotto ingredients.

Not just because I love salami and was looking for something without a lot of work. But also because I just needed two ingredients of the 5 (technically 8, because there’s also pantry items salt, pepper, and olive oil that I always have on hand) to make this meal happen.

With the salami and arborio rice acquired, I was ready to go.

I added more salami than called for, and probably same for the Parmesan and sour cream so it’s not quite as healthy as Jamie Oliver would like but meh. I also replaced the mascarpone with sour cream because I had it on hand and it wasn’t worth buying a tub of mascarpone for just one heaping tablespoon. It worked fine, and of course, it’s easy to boot.

Delightfully, even the chopping is easy, as it’s just cutting onions into wedges. I still cried, but it was short.

A short time on the stove-top later, the mix went into the oven and I didn’t think about it again until it was ready to eat. Ah-mazing.

salami, onions, cheese, perfection.

Here’s what I did:

Ingredients

  • 3 oz. salami
  • 2 onions, wedged
  • 300 g. arborio rice
  • 1 heaping T. sour cream
  • ⅓ to ½ c. grated Parmesan
  • ~2 T. olive oil
  • Salt and pepper, to taste
  • 1.2 L. boiling water

Directions

Heat the oven to 350 degrees. Heat the Dutch oven on high heat on the stove top.

Cook the onions on high heat for 3 to 5 minutes until browning. Add the oil, salami, salt and pepper, and arborio rice and cook for a minute more. Add the water, sour cream, and cheese.

Stir to combine, and then carefully place in the oven, uncovered.

Bake the risotto for 40 minutes. Add more olive oil, stir to combine, and then enjoy!

A mostly muffaletta

I had been thinking about ways of making a grilled sandwich on a sheet pan when I came across the perfect recipe. As in, Delish had a recipe for sheet pan subs.

But, of course, I wasn’t content with the ingredients that made up the Italian submarine. I waffled for a few days over whether to make it anyway or do reubens/rachels instead, or a combination of each since the sheet pan could fit both. That’s when I remembered the Italian meat-using New Orleans favorite that my brother is enamored with: the muffaletta.

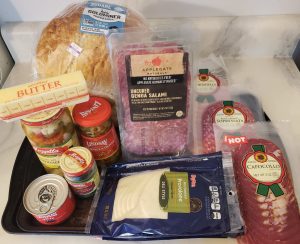
Sheet pan muffaletta ingredients.

It was like the Italian sub, what with Italian meats, some pickled relish, and cheese. But, you know, better. And while the bread appropriate for sheet pans wouldn’t be the traditional muffaletta kind, it was at least pressed to mimic the scooped out recipe of the original. Either way, it’d really let the insides of the sandwich shine.

So, with a pound and half of meat, a pound of cheese, and more than enough pickled items, I set about making the sandwich. I otherwise mostly followed the recipe, using a second sheet pan and an oven-proof weight to press the sandwich together.

It turned out almost perfect. I would say in hindsight that the sandwich could have cooked a while longer just to get the tops more browned. But otherwise, the cheese was melted, the meat was warm, and the sammies tasted great.

I did bring it to a friendly get-together because, well, look at how much meat and cheese it used. Even with eight people eating it — admittedly with other snacks and drinks throughout the day — I still took home about half. I’d say you could skimp on some meat, but the whole point of the sheet pan sandwich seems to be overindulgence, so go ahead and live a little.

Oh, but if the muffaletta doesn’t strike your fancy, I do truly believe this would have worked as a reuben/rachel or any grilled sandwich, just replace the meats and cheeses with your favorites and skip the relish or replace it with something more to your liking.

You mostly see bread, but trust me, there’s a whole lotta delicious meat and cheese inside.

Here’s what I did:

Ingredients

  • 1 stick of melted butter, divided
  • 1 ½ to 2 loaves of sliced bread, I opted for sourdough but pick what works best with your sammy (like, I’d use a seeded rye if making a reuben)
  • 1 ½ lbs. Italian meats, sliced (I did a combination of salamis, capicola, and mortadella, which is traditional, but I’m already stepping on tradition so who am I to judge?)
  • 1 lb. provolone, sliced
  • 8 oz. (about half a jar) of giardiniera, chopped
  • 6 to 8 oz. mix of capers, sliced black olives, and sliced green olives

Directions

Heat an oven to 400 degrees.

Brush about half the butter onto a large rimmed sheet pan. Top with bread, it can be slightly overlapping like shingles, and use your fingers to press it down slightly. Add the giardiniera to the top of the bread. Add half the cheese on top of that. Top the cheese with the meat slices. Add the remaining cheese on top, and then top with the olive, caper mixture, to taste. Place bread on top until covered, again can be slightly overlapping. Brush the bread with the remaining butter.

Place another large baking sheet on top (mine was slightly smaller, which worked fine), and use a cast-iron skillet or the like on top to press down on the bread.

Bake for about 10 minutes until the sandwich is starting to brown. Then, remove the weight and the top sheet pan. Bake for another 15 to 20 minutes or so until the top bread is golden too. Let cool slightly and then cut into sandwich-size servings (friends suggested a pizza cutter would work well here) and enjoy!