Given how close we are to year’s end, I have the rest of this small skillet year planned at this point, and I know that next week’s recipe is going to be time-consuming. So, I went with something simple this week.
I realized after the fact that though it was called “skewerless stovetop kabobs” from Taste of Home that it’s basically just fajitas with a few more vegetables. But, you know what, it’s been a long year and it’s fine.
Skewerless kabobs ingredients.
This was in the vein of some of my favorite simple recipes, in that it uses fewer ingredients by including salad dressing. Easy flavor works for me.
I did change the recipe in one notable way: it called for pork tenderloin as the meat but that seemed like an expensive and fancy cut for something that was ultimately going to be smothered in Italian dressing. So, I just went with chicken, making it even more like a fajita. I also left off mushrooms, and added a little more vegetables.
While it wasn’t the most exciting of dinners, it did the job. It fed us, it was healthy enough, and it was quick and easy to pull together.
Simple and scrumptious.
Here’s what I did:
Ingredients
1 lb. chicken breast, cut into ¾ in. cubes
½ c. Italian dressing, divided
1 large green pepper, chopped
1 medium zucchini, chopped
1 onion, chopped
1 c. cherry tomatoes, halved
Salt and pepper, to taste
Directions
In a medium skillet, 8- to 9-in., cook the chicken over medium-high heat in half the dressing until cooked through. Remove from pan.
In the same skillet, cook the vegetables in the remaining half of the salad dressing until the vegetables are tender. Return the chicken to the skillet, heat through, and enjoy!
I have heard the calls on the left warning against simply going back to brunch now that Trump has been defeated. And there is still so much work to do, starting with gains in Georgia and then working to achieve actual progress.
However, we are now approaching eight months of living with the pandemic, and I am really missing going out to eat. Being immunocompromised, and not willing to risk my life for a meal, I don’t dare enter a restaurant. Especially after this week, just for once, it’d be really nice to go out to brunch or, frankly, to a bar and kvetch with friends and loved ones. And a girl’s gotta eat sometimes.
Denver omelet ingredients.
Though delivery is an option (if not the same as seeing friends), there are few options for round-the-clock breakfast items, and eggs and hashbrowns, etc., just don’t keep as well once in a plastic container. On top of that, it takes out the spontaneity of deciding to go out to breakfast when you just really have a craving or really need to grumble over biscuits and gravy.
Thankfully, I found a semi-solution.
One of my favorite foodie sites Serious Eats had a Denver omelet recipe I found recently, and I could finally taste the joy of round-the-clock brunch, straight from the kitchen.
I still think my technique could be improved, and it’s still not the same as being able to wait 20 minutes (I’m a late riser, which considerably cuts down on waiting!) to sit at a booth to get diner food, but boy is it still a comfort in these times.
Not that pretty, but pretty effing tasty.
Here’s what I did, perhaps overdoing it on the meat and veggies and cheese but still enjoying my monstrosity:
Ingredients
5 large eggs
Salt and pepper, to taste
2 oz. shredded pepper jack pepper (I’m sure I used more)
2 T. butter, divided
3 oz. ham slices, cut into ½ in. pieces (I didn’t precisely measure)
½ large bell pepper, stemmed, seeded, and diced
½ medium yellow onion, diced
Pinch of smoked paprika
Directions
In a medium bowl, beat together the eggs and add salt and pepper to taste. Whisk until the eggs are homogeneous and frothy. Set aside.
Meanwhile, in a 9- to 10-in. Skillet (cast iron or nonstick) melt half the butter over medium-high heat, swirling until lightly browned. Add the bell pepper and onion, and season with salt. Cook, stirring occasionally, until softened and beginning to brown. Add the ham and cook further until the ham slices are browned in spots. Stir in the smoked paprika and some additional ground pepper. Scrape vegetables into a medium bowl (glass, or otherwise heatproof) and add the cheese, stirring to combine.
Wipe out skillet and set over medium heat. Add the remaining half of the butter and cook until melted and lightly browned. Re-whisk the eggs until foamy, and then add to skillet and cook, using a spatula to push the edges toward the center and tilting the pan to spread the uncooked egg underneath. Continue the process around the skillet until the eggs are almost set. Sprinkle the ham and cheese mixture over half the omelet, remove from heat, and cover, letting the omelet sit until mostly or fully cooked through on the top, about one minute. Use the spatula to loosen the edges and carefully fold the omelet in half to enclose the filling. Split in half and serve, preferably with some hash browns and coffee, and enjoy!
Taco nights are a wonderful weekday staple in our household, as I suspect they are in many. It’s so simple to whip up, especially when so much already comes pre-packaged and ready.
Our taco nights have become slightly less simple once we reduced our salt intake and therefore actually realized how much salt is contained in those pre-packaged items.
The low sodium beans are easy enough to come by, and a homemade taco seasoning mix can be made in bulk. Skipping out on my salty Spanish or Mexican rice, however, has been a source of frustration.
Mexican rice ingredients.
My sweetie has mostly taken up the duties of making Mexican rice so it’s still a no-fuss process for me. And if I’m being totally honest, the work that goes into homemade, healthier Mexican rice is only slightly more than dumping box contents into boiling water. After all, the rice part takes equally long to cook and is equally easy to ignore.
The worst part of the homemade rice is cutting a carrot and an onion; in other words, not all that much work.
My sweetie has kept the rice flavorful, without the salt, by adding a homemade broth. He has also started cutting out the addition of tomato and tomato paste. Since I was on duty this time, I made it my way.
So tasty, and less salty.
Here’s what I did:
Ingredients
2 T. olive oil
1 medium onion, chopped
1 medium carrot, chopped
2 cloves garlic, minced
1 medium tomato, chopped, optional
1 c. medium grain rice
2 c. homemade vegetable or chicken broth (or water)
1 c. frozen peas
2 to 3 T. tomato paste
Directions
Add the oil to a Dutch oven on medium heat. Saute the onion and carrot for 3 to 5 minutes until just starting to soften. Add the garlic, tomato, if using, and the rice. Saute for another 3 to 5 minutes.
Add the broth and bring to a boil. Cover and cook on low heat for 12 to 15 minutes, until the rice is nearly done and the broth is absorbed. Add the peas and tomato paste, stir to combine, re-cover and cook until the peas are cooked through and rice is ready, about another 3 to 5 minutes.
Fluff the rice and enjoy with tacos … or next week’s recipe.
My sweetie and I had what we thought would be a fun idea when we were ordering meats earlier this year. We should try all these random non-chicken birds available from our favorite sustainable meat supplier, we thought. How bad could they be, we thought.
Well, I am here to tell you that there’s a reason we as meat-eaters dine on chicken more often than wild game birds. There’s the buck shot for one, and the feathering, but mostly it’s the strong and not altogether pleasant taste.
We made it through the birds, but in the future, I’m probably not going to eat too much partridge, wood pigeon, or pheasant. Unless the apocalypse comes sooner than I hope.
But to go along with these fowl, I thought I’d make a nice vegetable gratin to go with our meat-heavy dinner.
Vegetable gratin ingredients.
While the preparation went more smoothly than for the birds, the end result was a similar level of meh. It was easy but at the cost of being pretty bland.
It was less offensive than the birds to my taste buds but it also made a lot more and we’re still slowly going through the leftovers. I much prefer the similar vegetable dish I made last year on a sheet pan — marinated artichokes add so much, I guess (probably mostly salt) — than this Dutch oven gratin.
It looks pretty good, but it’s just not bad.
If you’re looking for a plain dish, or have ideas of sprucing up my adaptation of a The Kitchn recipe, here’s what I did:
Ingredients
2 small fennel bulbs, sliced*
3 medium leeks, halved and thinly sliced
¾ to 1 lb. potatoes, sliced*
1 medium onion, thinly sliced*
1 bunch of asparagus, cut into ½ inch pieces
4 cloves garlic, minced (I used the jar stuff, and didn’t measure)
1 ½ c. sour cream
1 ½ c. Parmesan
½ t. ground nutmeg
Salt and pepper, to taste
*Note: A mandoline is recommended for slicing these vegetables, so they can be evenly thin. I used ⅛ inch.
Directions
Heat an oven to 400 degrees.
Add all the sliced vegetables to a large Dutch oven. Add in the sour cream, Parmesan, nutmeg, and salt and pepper, and stir well to lightly coat the vegetables with the cream mixture.
Bake, covered, for 45 minutes. Carefully remove the lid/cover, and bake for another 15 minutes uncovered so the top can brown. Cool for about 10 minutes, and (try to) enjoy!
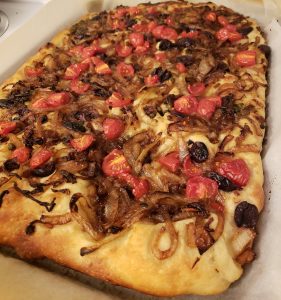
The checkout girl at Target told me not to tell anyone that the bread I made this week had anchovies on it. I didn’t have the heart to tell her that I’d be telling everyone through this blog post. So, let me get it out of the way at the front.
This bread is not for the faint-hearted.
If you can think of everything flavorful and potentially off-putting, this bread has it. Anchovies. Capers. Kalamata olives. Onions (lots of ‘em). Garlic.
Briny bread* ingredients. *Actually called “pissaladiere.”
It’s also got tomatoes, a butt-load of olive oil, and a no-knead yeasty bread.
Basically, me and my sweetie thought it would be perfect. And the recipe didn’t let us down. It’s been amazing.
The recipe comes from the cookbook my brother turned me on to about bread: “Bread, Toast, Crumbs” by Alexandra Stafford. I finally got myself a copy.
Unlike last time, my deviations from the original recipe worked just fine. I mostly stuck to it — including all those delicious toppings — but I have regular yeast, not instant, and I figured there was no harm in swapping. Especially since I spent a year making bread.
To correct, I just upped the amount of yeast and added a little honey to get it kickstarted, but otherwise I stuck close to the original.
My only complaint — and it’s expected — is that it took a long time and dirtied quite a few dishes, including the pain-in-the-ass-to-clean food processor. But I knew all that going in, and a lot of the time is pretty passive and a great time to rewatch this amazing season of “Doctor Who.”
It looks so pretty, and it’s tasty too.
Here’s what I did (with notes to use instant yeast):
Ingredients
For the dough
4 c. all-purpose flour
2 t. salt
2 ½ t. active dry yeast (1 t. If using instant)
2 c. lukewarm water
1 T. honey, optional
For the bread
6 T. olive oil, divided
3 medium onions, halved and thinly sliced
2 cloves garlic
4 anchovies
1 T. capers (I didn’t measure, I love capers)
½ c. kalamata olives, halved
1 c. cherry tomatoes, halved or quartered
Directions
Make the dough. If using active dry yeast, mix together the yeast, warm water, and honey, and let sit for about 10 minutes before stirring in the flour and salt. If using instant, the recipe says to mix together the dry ingredients, and then add the water (and honey). Either way, use a rubber spatula to stir until the mixture combined and you have a sticky dough that’s sort of ball-shaped. Cover the mixture with oiled plastic wrap, and let rise for about 1 ½ hours until the dough has doubled in size.
Just before the dough is ready, heat a large pan on high heat. Add 1 T. olive oil, and then add the onions. Cook on medium heat, stirring every few minutes, until the onions are golden, about 15 minutes. Set aside.
In a food processor, mix together the garlic and anchovies with 2 T. olive oil until pureed. Add the capers and pulse till chopped. Set aside.
Heat the oven to 425 degrees, and set the rack in the middle of the oven. Line a large rimmed sheet pan with parchment paper, and pour on the remaining 3 T. olive oil. Use two forks to deflate the dough by releasing it from the sides of the bowl and pulling it toward the center until you get a rough ball. Lift the dough with the forks or pour it onto the oiled sheet pan. Roll the dough ball in oil to coat it all over, and then let it rest for 20 minutes.
With greased hands, push the dough to stretch it to the edges of the sheet pan, and use fingers to dimple it. When the dough resists stretching, let it rest for about 5 minutes and then stretch again until it fits most of the sheet pan.
To assemble, spread the anchovy paste on the dough. Scatter on the olives, and then the carmelized onions. Top with the tomatoes. Use fingers again to dimple the dough and stretch more if necessary.
Bake for 25 to 30 minutes until the underside of the dough is golden and crisp. Transfer to a cutting board and let cool for at least 10 minutes before cutting into squares, and enjoy!
One of the best cookbooks I got when I was first learning to cook was a collection of recipes from the sides of boxes, cans, etc. It wasn’t fancy, but that’s sort of the point of those types of recipes. Sure, it’s product-related, but it also is usually a quick, easy way of putting together something edible.
Aside from the best vanilla cream pie recipe (from Argo and Kingsford’s corn starch packaging), one of my favorite recipes from the book is a sausage and vegetable mix wrapped in puff pastry. And I knew from when I started this blog that it would be one of the recipes for my sheet pan year.
Sausage puff pastry ingredients.
There was just one problem. I couldn’t find it anywhere in the cookbook.
I scoured all relevant sections, and nothing.
I started to think it was one of those invented memories, like “Shazaam.”
So, I did what any totally normal and sane person would do; I went through the g-d damn book page by pain-staking page to find it. And buried near the end of the sandwich section of all flippin’ places, I found the recipe I remembered from before.
While I might like to complain about the delay, it actually worked out pretty well because we had a nice hot Italian sausage from the farmer’s market from Lucky George Farm that worked perfectly with the recipe. And if I’d made it sooner, I wouldn’t have used this excellent meat.
It was every bit as good — OK, a little better, because did I mention the awesome sausage?! — as I remembered, even if I forgot one ingredient (oops!).
So yummy and it looks pretty to boot.
Here’s what I did, with said forgotten ingredient included as optional:
Ingredients
1 sheet puff pastry (Pepperidge Farm, if you wanted to know which box this originated from)
1 lb. ground sausage
1 small to medium onion, chopped
1 bell pepper, chopped
1 large tomato, chopped (optional)
1 ½ c. shredded Swiss cheese
3 T. parsley, chopped
Flour, for rolling out pastry dough
Directions
Thaw the puff pastry at least 20 minutes, and up to overnight.
Heat the oven to 425 degrees, and line a large sheet pan with parchment paper.
In a large skillet, cook the sausage until browned (about 10 minutes), and then add the pepper and onion and cook until the vegetables are tender (another 5 minutes or so).
Remove from heat (pour out fat if there’s a lot but my meat was as lean as you’d want sausage), and add the tomato, if using, cheese, and parsley. Set aside.
Meanwhile, unfold and roll out the puff pastry on a lightly floured surface until it reaches approximately 14 inches by 10 inches. Transfer the puff pastry to the lined sheet pan (I do this by rolling up the dough around my rolling pin and then unspooling).
Spread the sausage mixture along the 14 inch side, near the edge. Roll up along the long side, like you’re making a jelly roll (this is what the ingredients in the book say too!).
Pinch the dough together to seal and then curve into an oval or horseshoe shape. Cut the dough about halfway through every 1 ½ inches.
Bake for about 20 minutes, or until the puff pastry is golden, and enjoy!
In an effort to keep building up my confidence, I found another nearly impossible-to-fail, easy-peasy sheet pan recipe. This week, it’s steak fajitas.
Aside from the ease, it was also a rare treat in this household. I almost never eat beef anymore (I know, blasphemy in Iowa … but fear not, I love pork), so I wasn’t even sure how easy it would be to find flank steak, or even how to cut it if I did find it.
I forgot my fancy compiling of ingredients, but you can see almost all of them here, steak, a variety of peppers, onion, garlic, chili powder. I’ll do better next time.
Thankfully, the local co-op had a nice big slab that allowed me to make this meal with another night of leftovers, and I have a wonderful sweetie who researches things so I accidentally learn things like to cut against the grain with flank steak.
And I have to say, it was quite delightful to bring beef back into my world. If I’m honest, it’d have been nice to do a lime-based marinade ahead of time if I’d thought of it (maybe next time!), but for ease, this can’t be beat.
There’s about five ingredients involved in baking, not counting the staples oil and salt. Frankly, the hardest part was cutting the beef, and all those peppers.
While I got the recipe from the unlikely source of Williams Sonoma, a fancy cookware store, I may just have to add it to my list of places to scour when I’m short on recipes.
Steak fajitas, fresh out of the oven.
In the meantime, here’s what I did:
Ingredients
1.5 lb. flank steak, cut into half-inch slices
1 red bell pepper, seeded and thinly sliced
1 yellow bell pepper, seeded and thinly sliced
1 orange bell pepper, seeded and thinly sliced
1 large yellow onion, thinly sliced (or 2 medium)
5 garlic cloves, chopped
3 T. canola oil
1.5 T. chili powder
1-2 t. salt (I don’t measure, just add a couple of pinchfuls)
6 to 8 flour tortillas
Guacamole, for serving(optional)
Sour cream, for serving (optional)
Hot sauce, for serving (optional)
Directions
Heat oven to 425 degrees.
In a large bowl, mix together the steak, peppers, onion, garlic, oil, chili powder and salt until coated. Spread the steak and vegetables on a nonstick sheet pan (I used aluminum foil for easier cleanup on an aging pan). Bake for 12 to 15 minutes, stirring halfway through, until the steak is cooked through.
If desired, in the last five minutes, wrap the tortillas in aluminum foil and bake in oven so it’s nice and warm to serve with the fajita mix. Then, assemble the fajitas as you desire, and enjoy!