Christinia’s first cooking class

One thing that has become a staple of vacationing with my mom’s side of the family is taking a cooking class. Though I was not there, I will not soon forget the pictures my mom sent of my Polish maternal grandma learning to make sushi.

We’re nothing if not adventurous.

Pappa al pomodoro ingredients. Decidedly not sushi.

As I’m about to embark on a girls trip with my mom and aunt to a new foreign land, including a cooking class of course, I’m reminded again of the first time our family’s first time taking a class. The poor souls who had to wrangle about 10 of our clan did not have an easy task, especially as the wine flowed freely.

But 12 years later, I still make the recipes that we learned that day, and I still remember the wines that we tasted. Thankfully for the purposes of this blog, the recipe I make most often, pappa al pomodoro, (and was also one of the first dishes I shared with my sweetheart whom I’ll be missing dearly), can be made in a Dutch oven.

I haven’t made many changes over the years. Why mess with this Italian classic?

BRB, there’s more in the fridge right now.

Here’s what I did on my most recent venture:

Ingredients

  • 4 ½ lbs. tomatoes
  • 2 leeks, sliced
  • 1 garlic bulb, about 20 cloves, peeled minced
  • 1-2 packages fresh basil, chopped
  • Red chili flakes, to taste (about 2 pinches is what I use)
  • 1 loaf bread, preferably stale
  • Olive oil
  • Salt and pepper

Directions

Peel the tomatoes — my method is to cut a cross in the bottom and put them in boiling water for a minute or less before transferring them to an ice bath. (I didn’t say it was easy, just a way to use tomatoes!) Then, chop roughly and use a food processor or blender to puree the tomatoes.

Separately, in a large Dutch oven, heat olive oil over medium heat and then add the leeks and cook for about 5 minutes until translucent. Add the garlic and pepper flakes and cook for about another 1 minute.

Add the tomato puree to the Dutch oven, and bring to a boil. Cover and cook for about an hour. Add the chopped basil and salt and pepper to taste.

Continue to cook for about another half-hour. When the tomatoes are cooked, chop or tear off pieces of bread and place in the soup until it is thickened to taste. (I used about ⅔ of a small French loaf.)

Ladle the soup into bowls and top with additional olive oil and salt and pepper, if desired, and enjoy!

Programming note: I will be traveling, mostly out of the country, for the next few Fridays, BUT I will still be keeping my blogs updated as I worked in advance to ensure I kept up with posting weekly. However, if any technical difficulties or best laid plans do not work out and I go without posting, please be understanding and know that I’ll fix anything when I return.

Ratatouille any which way

I’ve talked about my love of Ratatouille before, both the movie and the food item. The movie has the message of “Anyone can cook,” which is to say not everyone can do it but that one’s station in life — even as a rat — can’t dictate whether one is a great chef.

Ratatouille ingredients.

A great chef I am not but I take comfort in that, and many other, life lessons offered by the Pixar classic.

As I’ve come to love the French dish almost as much as the move, I’ve also come to realize it’s an appropriate recipe to highlight the movie’s message and theme. The dish is a humble stew that also can be made to be served at the top restaurant in Paris.

If anyone can can cook, ratatouille shows that simple ingredients can make for an impressive meal no matter which way you make it.

I found last year that I loved making this traditional stew-like dish as a tian on a sheet pan. But in making it in my Dutch oven this year, I was reminded that it also works really well in its stew-ish form. While it mirrors a hearty stew, it is still exclusively vegetables and herbs and spices, with a little bit of (OK, a lot of) olive oil, which makes it light even on a summer night. Also, it doesn’t need to cook for hours upon hours. It’s a half hour or so in front of a stove top, not bad in the air-conditioned house.

It’s practically perfect, especially for the upcoming Bastille Day!

So healthy and yet so scrumptious.

Here’s what I did:

Ingredients

  • 5+ T. olive oil
  • 2 medium onions, chopped
  • 7 garlic cloves, chopped
  • 1 large eggplant (1 1/2 to 2 medium), chopped
  • 2 medium zucchinis, chopped
  • 2 medium summer squash, chopped
  • 1 red bell pepper, chopped
  • Salt, to taste
  • 1 T. thyme (the recipes often recommended whole sprigs to be removed; I just used dried)
  • 2 T. dried basil  (I’d prefer fresh but I had some dried on hand)
  • 1 T. dried oregano
  • ½ T. red pepper flakes (optional)
  • 4 to 5 medium tomatoes, chopped
  • 3 T. tomato paste

Directions

Add about 2 T. of oil to a large Dutch oven on medium heat. Add the onions and cook for 3 to 5 minutes until beginning to turn translucent, stirring occasionally. Add the garlic and cook for another 2 minutes. Add another about 2 T. of oil and the eggplant. Cook, stirring occasionally, for about 8 to 10 minutes, until beginning to soften. Add another about 2 T. of oil, the zucchini, summer squash, and bell pepper. Cook, continuing to stir occasionally, for another 5 to 10 minutes until the zucchini and squash are mostly cooked through. Add the tomatoes, herbs and spices, and tomato paste, and cook for another 5 minutes, covered, until all the vegetables are cooked through and the mixture looks stew-ish.

Let cool slightly (it stays hot for awhile), and enjoy with some fancy bread!

Beautiful briny bread

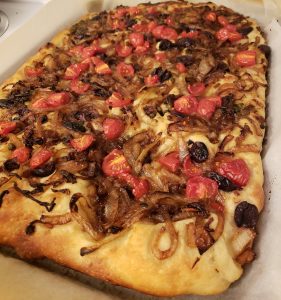
The checkout girl at Target told me not to tell anyone that the bread I made this week had anchovies on it. I didn’t have the heart to tell her that I’d be telling everyone through this blog post. So, let me get it out of the way at the front.

This bread is not for the faint-hearted.

If you can think of everything flavorful and potentially off-putting, this bread has it. Anchovies. Capers. Kalamata olives. Onions (lots of ‘em). Garlic.

Briny bread* ingredients. *Actually called “pissaladiere.”

It’s also got tomatoes, a butt-load of olive oil, and a no-knead yeasty bread.

Basically, me and my sweetie thought it would be perfect. And the recipe didn’t let us down. It’s been amazing.

The recipe comes from the cookbook my brother turned me on to about bread: “Bread, Toast, Crumbs” by Alexandra Stafford. I finally got myself a copy.

Unlike last time, my deviations from the original recipe worked just fine. I mostly stuck to it — including all those delicious toppings — but I have regular yeast, not instant, and I figured there was no harm in swapping. Especially since I spent a year making bread.

To correct, I just upped the amount of yeast and added a little honey to get it kickstarted, but otherwise I stuck close to the original.

My only complaint — and it’s expected — is that it took a long time and dirtied quite a few dishes, including the pain-in-the-ass-to-clean food processor. But I knew all that going in, and a lot of the time is pretty passive and a great time to rewatch this amazing season of “Doctor Who.”

It looks so pretty, and it’s tasty too.

Here’s what I did (with notes to use instant yeast):

Ingredients

For the dough

  • 4 c. all-purpose flour
  • 2 t. salt
  • 2 ½ t. active dry yeast (1 t. If using instant)
  • 2 c. lukewarm water
  • 1 T. honey, optional

For the bread

  • 6 T. olive oil, divided
  • 3 medium onions, halved and thinly sliced
  • 2 cloves garlic
  • 4 anchovies
  • 1 T. capers (I didn’t measure, I love capers)
  • ½ c. kalamata olives, halved
  • 1 c. cherry tomatoes, halved or quartered

Directions

Make the dough. If using active dry yeast, mix together the yeast, warm water, and honey, and let sit for about 10 minutes before stirring in the flour and salt. If using instant, the recipe says to mix together the dry ingredients, and then add the water (and honey). Either way, use a rubber spatula to stir until the mixture combined and you have a sticky dough that’s sort of ball-shaped. Cover the mixture with oiled plastic wrap, and let rise for about 1 ½ hours until the dough has doubled in size.

Just before the dough is ready, heat a large pan on high heat. Add 1 T. olive oil, and then add the onions. Cook on medium heat, stirring every few minutes, until the onions are golden, about 15 minutes. Set aside.

In a food processor, mix together the garlic and anchovies with 2 T. olive oil until pureed. Add the capers and pulse till chopped. Set aside.

Heat the oven to 425 degrees, and set the rack in the middle of the oven. Line a large rimmed sheet pan with parchment paper, and pour on the remaining 3 T. olive oil. Use two forks to deflate the dough by releasing it from the sides of the bowl and pulling it toward the center until you get a rough ball. Lift the dough with the forks or pour it onto the oiled sheet pan. Roll the dough ball in oil to coat it all over, and then let it rest for 20 minutes.

With greased hands, push the dough to stretch it to the edges of the sheet pan, and use fingers to dimple it. When the dough resists stretching, let it rest for about 5 minutes and then stretch again until it fits most of the sheet pan.

To assemble, spread the anchovy paste on the dough. Scatter on the olives, and then the carmelized onions. Top with the tomatoes. Use fingers again to dimple the dough and stretch more if necessary.

Bake for 25 to 30 minutes until the underside of the dough is golden and crisp. Transfer to a cutting board and let cool for at least 10 minutes before cutting into squares, and enjoy!

Mom recipes combine to make for delicious sheet pan dinner

So sue me, my first fish recipe comes too late for Lent. But I think this tilapia and asparagus dinner is delicious any time of year.

The recipes come from my mom, and as far as I know she doesn’t necessarily make them together; they just happen to combine the same flavor base that make them work well together. They also just happen to combine some of the best flavors out there — garlic, cayenne, butter, and olive oil. That’s right, two kinds of fat. Yummy!

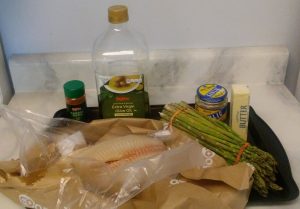
Tilapia and asparagus sheet pan ingredients.

Mom gave me the tilapia recipe when I was first starting out to cook. Frozen tilapia isn’t overly expensive, it keeps, and this makes for an easy meal when you’re just starting to learn to cook. The asparagus recipe is a long time favorite, as it combines the above flavors with a good deep roasting that makes them impossible to resist. If I ever have any extra asparagus lying around, which is rare, this is how I make ‘em. So, it seemed obvious to combine them into one simple and healthy-ish meal.

Just add some stove-top grain dish, and you’ve got a full meal that tastes great.

So much yummy goodness.

Here’s what I did:

Ingredients

  • 4 fillets tilapia (fresh is best but costly)
  • 1 bunch asparagus
  • 4 T. butter, divided
  • 4 T. olive oil, divided
  • 4-5 cloves garlic, minced, divided (I was lazy and used the jarred stuff but whatever works)
  • Cayenne pepper, to taste
  • Salt, optional (I used salted butter so skipped it, but you may want to add more or definitely add some if you use unsalted butter)

Directions

Heat oven to 350 degrees.

Remove woody ends of asparagus, and spread out over about half the sheet pan. Top with half the olive oil, half the butter, and half the garlic. Sprinkle with cayenne if desired. Bake for 8 to 10 minutes.

Remove the sheet pan. On the other half of the sheet pan, dot half the remaining butter and half the remaining olive oil on the sheet pan. Add the tilapia fillets on top. Top with the remaining butter and olive oil, and the garlic; sprinkle generously with cayenne pepper, to taste. Bake for 12 to 15 minutes until the tilapia is cooked through.

Serve over a grain, spooning on the garlic, butter, oil mix as desired, and enjoy!