New year, new knowledge

One of my favorite things about doing this blog is regularly challenging myself to try something new. Sure, I like getting my favorites written down and sharing them, and of course, eating my creations, but that’s not all!

This week’s joy, after a whole year of making breads, was learning about tangzhong. It’s a technique to get softer bread and doesn’t take much time or effort. And, well, it works really well. It didn’t hurt that this week’s recipe — in my new equipment for the year, the ever-useful 9 x 13 in. casserole dish — was full of butter and sour cream, as well as chives: sour cream and chive dinner rolls from Bon Appetit

Sour cream and chive dinner roll ingredients.

Spoiler: they’re so good, they were not just eaten at dinner. They were anytime rolls, and they’re already nearly gone after making them a few days ago. 

I didn’t do much to alter the original recipe, but for once, I wish I would have read the comments in an article. At least before I ran into the exact same issue and could have saved myself some time, and a little bit of yeast and milk. The recipe says to use the same saucepan from the tangzhong steps to warm a little milk and add yeast until it dissolves; mine clumped. I, instead, ended up using a small bowl and microwaving the milk for a short bit until it was warm, then adding a pinch of sugar, and then the yeast. Worked like a charm on the second go.

Otherwise, while it was time-consuming, nothing was difficult and about all of it was expected for a yeast bread, so it was a nice way to kick off the new year. And stay away from the news for a few hours. 

Such yum, much tasty.

Here’s what I did: 

Ingredients 

  • ½ c. plus 2 T. whole milk
  • 5 ⅓ c. bread flour (667 g), divided, plus more for dusting
  • 1 ½ t. active dry yeast
  • 1 c. sour cream, room temperature
  • ¼ c. sugar, plus a pinch more for yeast
  • 2 ½ t. kosher salt
  • 3 large eggs, divided
  • 1 stick (8 T.) unsalted butter, room temperature, divided
  • ½ c. finely chopped chives
  • Salt and pepper, to taste

Directions

Make the tangzhong: whisk together ½ c. milk, ½ c. water, and ⅓ c. flour in a small saucepan until smooth. Cook over medium heat, whisking constantly, until a stiff paste forms (per the directions: it should resemble mashed potatoes), about 2 minutes. Remove from heat and scrape the mixture into the bowl of a stand mixer, which is fitted with a dough hook. 

Warm the remaining 2 T. milk until lukewarm. Add a pinch of sugar and the yeast, and whisk until dissolved. Let sit about 5 minutes until the mixture is foamy. 

Meanwhile, add the sour cream, salt, 2 eggs, 4 T. butter, and 5 c. bread flour to the tangzhong. Scrape in the yeast mixture, and mix the dough together on low speed until it’s shaggy. Increase the speed to medium and mix, scraping as necessary and adding any more flour by the tablespoon if needed, until the dough is smooth, about 8 minutes. 

Dust the dough with flour and shape into a smooth ball. Place the dough inside a large bowl and cover. Let sit at room temperature until doubled in size, about 1 to 1 ½ hours. 

Meanwhile, coat a 9 x 13 in. casserole dish with 2 T. butter.

Punch down dough and turn it onto a lightly floured surface and stretch into a square. Roll out into a 12 in. square, dusting with more flour as needed. Sprinkle chives evenly on top of the dough. 

Starting at one end, loosely roll up dough, and flatten into a long rectangle using your hands. Roll out dough again, dusting with flour as needed, into about a 6 x 16 in. rectangle. Cut into 24 squarish pieces, in a 3 x 8 grid. 

Working 1 piece at a time, pinch the corners together to form a teardrop shape. Then, seam side down, roll the dough into a round ball. Place in prepared casserole dish and repeat with the remaining pieces of dough, making about a 4 x 6 grid. Cover with plastic wrap and let sit at room temperature until doubled in size, about 45 to 60 minutes. 

Meanwhile, place a rack in the middle of the oven and heat to 375 degrees. 

Whisk remaining egg in small bowl, uncover the dish and gently brush the tops of the rolls with egg, and then sprinkle with salt and pepper. 

Bake rolls until tops are deep golden brown, about 25 to 30 minutes. 

Remove from oven and immediately brush tops with remaining 2 T. butter. Let cool about 5 minutes and then slide the entire grid of rolls onto a wire rack. Serve warm or let cool and enjoy!

Fat, fluffy focaccia

Since the pandemic began, apparently people have been getting into bread baking. Not only are there the news stories but I have the anecdotal evidence that my sweetie had trouble finding active dry yeast during one of his recent weekly grocery trips.

However, for once, I was ahead of the curve. I have been making bread on the regular for years. And since my sweetie did go to a second store for the yeast, I am back in business now after nearly using up my stash when I made pizza a couple weeks ago.

I do get why it’s picked up in popularity, as it’s often cheaper especially than some fancier breads, and it’s a good distraction for a few hours. Those brave souls who nourish sourdough starters — which I did for a while during my bread year and beyond but didn’t survive the move to Ames — are even giving themselves ongoing time commitments.

What I’m saying is, like Oprah, I love bread.

Rosemary and olive focaccia bread ingredients.

One of my favorites is focaccia. What’s not to love about a lot of olive oil, and for me, the addition of olives and/or rosemary. While I’ve made this many times before, I couldn’t recall ever making it in a small skillet.

Thankfully, the wonderful Serious Eats had a no-knead (even better!) recipe that was designed for a 10-inch skillet. I figured my 9-inch Le Creuset would work after reading the directions. It did, but barely. I ended up with a much poofier loaf than anticipated; however, another thing I did wrong among expert breadmakers is I neglected the preferred weight measurements and instead went with the also provided cup measurements. In the end, I needed more water than the recipe called for, which likely means I used too much flour and ended up with a bigger loaf than I would have otherwise.

I could beat myself up about it … but in the end, there’s just more bread to love.

Though I’m sure weighted measurements are preferred (and given) for all but my additions, this still-somewhat-lazy baker would probably worry mostly about the flour and the water measurements in weights.

Crispy, crunchy bread.

Here’s what I did, adding my own tweaks:

Ingredients

  • 500 g. bread flour or all-purpose flour (~3 ¼ c.)
  • 10 g. kosher salt (~2 ½ t.)
  • 4 g. active dry yeast (~1 rounded t.)
  • 400 g. room temperature water (1 ½ c. plus 3 T.)
  • 68 g. olive oil (~5 T.), divided
  • ~3 sprigs rosemary, divided
  • ½ c. pitted kalamata olives, chopped
  • Coarse sea salt

Directions 

Combine the flour, salt, and yeast in a large bowl and whisk to blend. Add the water and stir with a wooden spoon until no dry flour remains, about 2 minutes (if you measured by cups, you may need to add additional water to combine). Add about 1 ½ T. (20 g.) olive oil and stir to incorporate, using hands if necessary to work into the dough. Cover with plastic wrap and let rest at room temperature for 1 hour.

Remove plastic wrap (but keep!), and add about 2 sprigs worth of rosemary leaves, chopped if desired and all the olives. Then, use a lightly greased bowl scraper to fold the dough over itself by lifting and folding the edge of the dough toward the middle. Turn bowl and repeat the motion another 5 times (which should also help combine in the rosemary and olives). Re-cover with the plastic wrap and let rest for 15 minutes. Repeat the folding process one more time, and re-cover with the plastic wrap.

Then, refrigerate for at least 18 hours and up to 3 days.

To bake, remove the dough from the refrigerator and let sit at room temperature for 10 minutes. Sprinkle the top of the dough lightly with flour, and then transfer to a work surface, and shape holding it with well-floured hands, tucking the dough underneath itself and rotating until it forms a tight ball.

Add about 2 T. (27 g.) olive oil into a 9- to 10-inch cast iron skillet and spread the oil over the entire inner surface using your hands. Transfer the dough to the pan, turn to coat it in the oil, and then position seam-side down. Spread gently with your hands to mostly fill the pan. Cover tightly and let rise at room temperature until dough is soft and puffy, about 1 ½ hours to 2 hours.

Heat oven to 500 degrees and position the rack in the lower third of the oven, when the dough is nearly ready.

Use your fingertips to gently press and stretch the dough to evenly fill all corners of the pan, lifting up the edges of the dough to let air bubbles underneath escape, and then create small dimples in the top of the dough. Drizzle the remaining 1 ½ T. (20 g.) olive oil over the top of the dough, and then sprinkle with coarse sea salt and the leaves from the remaining sprig of rosemary.

Transfer skillet to oven and bake for about 20 to 25 minutes, rotating the skillet about halfway through the baking. (It seems hot, and I deviated from the directions here since I didn’t have a baking stone, but it works with some light charring on top but perfectly golden on the bottom; however, keep a closer eye on times given the high heat.) Remove from heat and let the focaccia cool in the skillet for 5 minutes, and then use a spatula to carefully remove the focaccia from the still-hot skillet and transfer the bread to a wire rack. Let cool at least 10 minutes before serving, and enjoy!

Bless you, bing bread

As I scoured for recipes that may work in my little Le Creuset, I was so grateful to come across the first one that I noticed that specified an exact size for a skillet. Now, sure, it said 10 inches, but 9 inches is close enough for comfort.

So, I tried my hand at bing bread.

Bing bread ingredients.

In addition to its specified size, it is bread (good) stuffed with potatoes (good), scallions (good), bacon (amazing), and cheese (amazing), and then slightly fried and also baked. It was also supposed to incorporate sesame oil, which I love, but I forgot to put it in the rolled-up dough, and stupidly thought it’d be OK to add it with the frying oil. Don’t do that. It didn’t ruin it, but it didn’t help any either.

If I make it again, and I will make it again, I will be remembering to brush the dough with sesame oil and skimping on the frying oil. Also, I need to remember that a smaller pan is going to reduce cooking time.

Since this makes two bread rounds, I was lazy and made one in my Le Creuset and the other in the 10-inch Lodge skillet, and (I am loathe to admit) the larger pan definitely worked better. However, I think it’s mainly because I failed to account for the fact that smaller pans could cook faster.

While the fried side of both definitely looked a bit charred, they both ended up tasting just fine. I think the extra oil mostly made the edges a little chewier, but it didn’t taste burnt at all. Proof that presentation isn’t everything, especially when you have bacon and can top it with sour cream butter.

Deliciously decadent. And not too burnt.

Here’s what I did, following the thankfully specific Bon Appetit recipe:

Ingredients

  • 2 ¼ t. active dry yeast (1 package)
  • 2 T. plus 2 t. honey, divided
  • 2 ½ t. salt, divided
  • 2 c. plus 2 T. warm water, divided
  • 4 c. all-purpose flour, plus more for coating
  • 1 large potato, baked and diced
  • 3 T. vegetable oil, divided
  • 1 lb. bacon, cooked (I baked mine on a grate) and diced
  • 2 T. toasted sesame oil, divided (sort of optional since I mostly forgot, but it is delicious)
  • 8 oz. white cheddar, grated (about 2 c.)
  • 1 bunch scallions, thinly sliced
  • 1 T. soy sauce
  • 2 T. sesame seeds, divided

For sour cream butter (not strictly necessary but recommended)

  • 1 stick butter, room temperature
  • 2 T. sour cream
  • Scant 1 t. salt

Directions

Combine the yeast with the 2 T. honey, 2 t. salt, and 2 c. warm water in a large bowl, and whisk to dissolve the honey. Let sit until the yeast activates and becomes foamy, 5 to 10 minutes. Add 3 c. of water and mix with a wooden spoon until a dough begins to form, adding flour (up to about another cup) until a shaggy ball begins to form. Cover and let rise until doubled, about 50 to 70 minutes.

Meanwhile, prepare the bacon and potatoes if you haven’t already (I did mine early and just chopped while I waited). Also, while waiting, whisk together the soy sauce, 2 t. honey, and 2 T. water in a small bowl until the honey is dissolved.

Heat oven to 400 degrees.

Once dough has doubled in size, gently push it down and transfer to a floured surface, kneading and adding flour as necessary until a sticky, smooth dough is formed. Divide the dough in half, and cover one half in plastic wrap so it doesn’t dry out while you prepare the first.

Roll out the half of a dough into about a 13-inch round that’s about ¼ inch thick. Brush with 1 T. sesame oil (don’t forget!), and then sprinkle on the round half the potato, bacon, cheese, and scallions. Roll dough up like a jelly roll, and then pinch ends and seams together to seal. Then, squeeze and press from the center toward the ends to elongate the roll slightly and even out the thickness. Then, starting from one end, coil like a rope to form a large spiral. Flatten the spiral to form a 9-inch round.

Cover the round and repeat with the remaining dough, using up the rest of the sesame oil, potato, bacon, cheese, and scallion.

Heat a 9- to 10-inch cast iron skillet over medium heat. Add 1 T. vegetable oil, swirling to coat. Carefully place one spiral in the hot skillet, and brush with the soy glaze. Cover with lid (or aluminum foil) and cook until the underside is golden brown between 5 and 10 minutes. Uncover and carefully flip bread over. Brush the browned top with soy glaze and sprinkle with 1 T. sesame seeds. Transfer to oven and cook, uncovered, until underside is also golden brown, about 15 minutes. Remove to wire rack and let cool 15 minutes.

Repeat with second round (or use 2 9- to 10-inch skillets), and don’t forget the glaze and seeds. Once cooled, cut into wedges and serve with sour cream butter, which can be made ahead, and enjoy! To make butter, whisk 1 stick room temperature butter, 2 T. sour cream, and scant 1 t. salt.

Christinia’s first cooking class

One thing that has become a staple of vacationing with my mom’s side of the family is taking a cooking class. Though I was not there, I will not soon forget the pictures my mom sent of my Polish maternal grandma learning to make sushi.

We’re nothing if not adventurous.

Pappa al pomodoro ingredients. Decidedly not sushi.

As I’m about to embark on a girls trip with my mom and aunt to a new foreign land, including a cooking class of course, I’m reminded again of the first time our family’s first time taking a class. The poor souls who had to wrangle about 10 of our clan did not have an easy task, especially as the wine flowed freely.

But 12 years later, I still make the recipes that we learned that day, and I still remember the wines that we tasted. Thankfully for the purposes of this blog, the recipe I make most often, pappa al pomodoro, (and was also one of the first dishes I shared with my sweetheart whom I’ll be missing dearly), can be made in a Dutch oven.

I haven’t made many changes over the years. Why mess with this Italian classic?

BRB, there’s more in the fridge right now.

Here’s what I did on my most recent venture:

Ingredients

  • 4 ½ lbs. tomatoes
  • 2 leeks, sliced
  • 1 garlic bulb, about 20 cloves, peeled minced
  • 1-2 packages fresh basil, chopped
  • Red chili flakes, to taste (about 2 pinches is what I use)
  • 1 loaf bread, preferably stale
  • Olive oil
  • Salt and pepper

Directions

Peel the tomatoes — my method is to cut a cross in the bottom and put them in boiling water for a minute or less before transferring them to an ice bath. (I didn’t say it was easy, just a way to use tomatoes!) Then, chop roughly and use a food processor or blender to puree the tomatoes.

Separately, in a large Dutch oven, heat olive oil over medium heat and then add the leeks and cook for about 5 minutes until translucent. Add the garlic and pepper flakes and cook for about another 1 minute.

Add the tomato puree to the Dutch oven, and bring to a boil. Cover and cook for about an hour. Add the chopped basil and salt and pepper to taste.

Continue to cook for about another half-hour. When the tomatoes are cooked, chop or tear off pieces of bread and place in the soup until it is thickened to taste. (I used about ⅔ of a small French loaf.)

Ladle the soup into bowls and top with additional olive oil and salt and pepper, if desired, and enjoy!

Programming note: I will be traveling, mostly out of the country, for the next few Fridays, BUT I will still be keeping my blogs updated as I worked in advance to ensure I kept up with posting weekly. However, if any technical difficulties or best laid plans do not work out and I go without posting, please be understanding and know that I’ll fix anything when I return.

Breaking babka

During my year of bread, babka — or the similar povitica — was always on my list but I was too afraid to spend the time needed to make this beautiful treat.

Fate tempted me back when I found a wonderful looking babka recipe in my Cook It In Your Dutch Oven cookbook from America’s Test Kitchen.

I won’t lie, it’s a multi-day affair. That bothers me less now that I work your standard 9 to 5 with weekends free. But it does take some planning, say, when you’re scheduled to have 3 hours of your afternoon spent at the theater with Avengers: Endgame.

Forgot an ingredients photo but here’s my table with the 18 x 24 dough covered in filling, pre-roll.

Even with that, I found it to be worth the effort. So much so that I made it two weeks in a row. (I may have also seen Endgame two weeks in a row.)

Mostly I just wanted to try to redo the recipe with my favorite filling. I know, I know it’s sacrilege to think there’s something better than chocolate, but I frickin’ love cream cheese filling.

The second time worked slightly better in some ways, but I think that’s mostly just the nature of breads. Sometimes the mix needs some tweaking.

My first attempt had the stand mixer get the dough perfectly concocted in well short of the 10 to 12 minutes recommended, so I stopped it. But that meant that I had to let my dough rise for longer because the yeast didn’t activate as well. The second time it was sticky and slow like it was supposed to so everything rose well.

The second time my filling was softer because I probably could have used a little more cream cheese. (I replaced 12 oz. of chocolate chunks/cocoa with 8 oz. cream cheese, and I think 12 oz. may have made a better, thicker consistency, but it still worked.) The first time it was smooth and just stiff enough to spread and keep a nice firm shape.

Either way, as long as you’ve done a handful of breads before, I think anyone can make this one. It wasn’t even *that* hard to make it look pretty.

The creamy cream cheese one.

The gooey chocolate one.

Here’s what I did:

Ingredients

For Dough

  • 4 c. all-purpose flour
  • 1 T. yeast (The recipe calls for instant or rapid-rise, which I didn’t use. If you knead well in the stand mixer, it didn’t seem to matter. I had a good rise the second time.)
  • 1 t. salt
  • 1 c. whole milk (I used 2% the second time and didn’t notice any major differences.)
  • ½ c. granulated sugar
  • 4 large egg yolks
  • 2 t. vanilla extract
  • 2 sticks (16 T.) butter, softened

For Chocolate Filling

  • 4 oz. bittersweet chocolate, chopped
  • 1 stick (8 T.) butter
  • 6 T. unsweetened cocoa powder
  • ½ c. confectioners’ sugar
  • 2 large egg whites

For Cream Cheese Filling

  • 8 to 12 oz. cream cheese, softened
  • 1 stick (8 T.) butter
  • ½ c. confectioners’ sugar
  • 2 large egg whites

For Finishing

  • 1 large egg, lightly beaten, with 1 T. water and pinch of salt

Directions

For Dough

Whisk together flour, yeast, and salt, in the bowl of a stand mixer. In a separate bowl (that holds at least 4 c.), mix together the milk, sugar, egg yolks, and vanilla, until the sugar has dissolved. Use a dough hook attachment on low, and begin to slowly add the milk mixture to the flour mixture, and continue to mix until the dough starts to form.

Increase the speed on the stand mixer to medium-low, and add the 2 sticks of butter 1 T. at a time, until the butter is fully incorporated, about 3 to 4 minutes. Continue to knead in the stand mixer for another 10 to 12 minutes until the dough is smooth, elastic, and clears the sides of the bowls. (Like I said, this happened within a couple minutes the first time, and I should have kneaded by hand for longer instead of stopping when a clump formed, but the second time it was definitely too sticky to handle until about 10 to 12 minutes, and I even added a titch more flour.)

Transfer the dough to a lightly floured counter and knead by hand for about 30 seconds and form a smooth, round ball. Place the dough, seam side down, in a large greased bowl. Cover and let rise by about half for 1 ½ to 2 hours. Once risen, refrigerate dough until it is firm, at least 1 hour to up to 24 hours (an ideal time to go watch a long action-packed superhero movie). Let rest at room temperature for 15 minutes if you refrigerate for much longer than an hour.

For (either) Filling

Microwave the chocolate chunks, cocoa, and butter OR the cream cheese and butter in a medium bowl for about 3 minutes at 50 percent power, stirring often, until the mixture has melted and a smooth, soft filling forms. Add the confectioners’ sugar, and then let cool for about 30 minutes. Then, whisk in the egg whites, until fully combined and the mixture looks glossy (less noticeable with the cream cheese filling, so mix well).

To Combine

Press the dough down to deflate, and then transfer to a lightly floured counter (I had to use my whole damn kitchen table so make sure you have space). Roll dough into an 18 inch by 24 inch rectangle, keeping the shorter side parallel to the counter. Once rolled out, spread the filling on the dough, leaving about a ½ inch border around the edge.

Roll the dough away from you into a firm, taut cylinder. Pinch to close the seam. Wrap in plastic and refrigerate (on a large baking sheet if possible but mine weren’t big enough so I just cleared a space on a shelf) for about 30 minutes.

To Finish

Meanwhile, make a foil sling for the Dutch oven by folding in half 2 long sheets of aluminum foil, so you have 2 long, roughly 7 inch sheets. Place sheets perpendicular to each other, like a lowercase t, and carefully smooth down into the Dutch oven bowl. Spray with a little bit of oil.

When dough is ready, transfer the log back to the lightly floured counter with the short end facing you. Carefully cut the dough in half lengthwise so that you will have the swirls of filling facing up to you. Pinch together the two dough halves and then braid end over end, as tightly as possible. Pinch the second end together, and then wrap into a spiral with the ends tucked underneath.

Put the dough in the prepared Dutch oven, and let rise for another 1 ½ to 2 hours.

Heat the oven to 350 degrees, and brush the egg mixture on top of the dough.

Cover pot, and bake for about 20 minutes. Uncover, rotate pot, and continue to bake for another 35 to 45 minutes, until the loaf is a deep golden brown.

Lift dough out of pot using the foil overhang, and let cool completely (about 3 hours) on a wire rack, and then finally, enjoy!

Making homemade bread even better

Like Oprah, I love bread.

I love it in all its forms, but one of my favorites is the one I made earlier this year, since it’s so simple and yet so tasty. I also love the store-bought jalapeno-cheddar bread, but I’d never thought to make it myself.

Then, I came across a recipe from 50 Campfires that pretty much combined the two. It basically took the recipe I used earlier this year, and then just added jalapenos and cheddar.

I forgot to snap a pic before I started, but picture the ingredients from my earlier bread recipe and then picture them mostly combined to look like this floury dough ball.

I decided to give it a shot.

My only concern as I was making it was the sheer amount of jalapenos. I like spicy but I have my limits, and this bread includes two in the dough (and rises for nearly 24 hours with them in it) and then one on top.

Mercifully, if you follow the instructions to remove the seeds from the two that go in the dough and just keep them for the one on top, it’s not overly spicy. There’s a little kick from the top slices but otherwise, it’s pretty mild. I’m sure the yeast and cheese help.

It’s more effort than store-bought but even better, and considering how quickly this stuff disappeared, I’ll be making it again (and again).

The cutest and tastiest little ball of bread ever.

Here’s what I did:

Ingredients

  • 3 c. all-purpose flour
  • 1 t. active dry yeast
  • 1 t. salt
  • 1 c. grated sharp cheddar, divided (I didn’t really measure but this is a good reference amount)
  • 3 jalapeno peppers, divided
  • 1 ½ c. warm water

Directions

In a large bowl, mix together the flour, salt, and yeast. Add in all but 4 T. of the grated cheddar cheese. Seed and chop two of the jalapenos, and add into the flour mix. Stir to combine all.

Add the water, and stir until a shaggy, sticky dough forms (a dough scraper works really well for this).

Cover the bowl, preferably with plastic wrap (grease it if you expect it to rise to touch the wrap). Let the dough rise in a cool, dry place (not the refrigerator) for 12 to 24 hours.

Heat oven to 450 degrees.

Place the Dutch oven in the oven, covered, for 30 minutes. Meanwhile, transfer the dough to a heavily floured surface and shape it into a rounded loaf, but don’t knead it.

When the Dutch oven is ready, carefully remove from oven and remove lid. Carefully place the dough inside, and cover again. Bake covered for 30 minutes.

Carefully remove from oven, and remove lid. Sprinkle the top of the loaf with the remaining cheddar, and the sliced jalapeno (with seeds, if desired) and set slices on top. Bake uncovered for another 10 to 15 minutes until the bread and cheese are golden brown.

Carefully remove loaf from the Dutch oven, place on a rack to cool (for at least an hour before slicing), and enjoy!

There will be bread

I love me a recipe that offers shortcuts and still tastes amazing. So, even though I don’t mind kneading bread, I still eagerly bookmarked the no-knead recipe from Jim Lahey as soon as I came across it.

No-knead bread ingredients. No, the Sodastream water is not bubbly.

Then, I discovered the caveat. There may not be kneading, but it still takes time and a little bit of getting your hands dirty (with sticky dough).

After going through it the first time, I shrugged and said I wasn’t really saving all that much so I wouldn’t make it again. That is, until I tasted it. Readers, it’s worth the time and effort.

And the more I’ve made it, the less the time and minor effort bothers me. I just plan better.

This is also a quintessentially Dutch oven dish.

Part of why the crust crunches so well is you preheat the Dutch oven for long enough that your dough goes into a nice and hot container. (I will admit, however, that I have used this recipe to make a couple of baguettes and it turns out well, just not as crunchy.)

It’s also pretty hard to mess up, since there are so few ingredients. The key is using bread flour, but I have — and I did this time on a whim — thrown in some amount of wheat flour and it’s worked. It’s not quite as fluffy but fiber does a body good.

Now, you can time things out how you want, but with a 12 to 18 hour rise time on the first go, my planning schedule is this:

*Before bed: Mix together the yeast, salt, water, and flour, and stir until blended.

*The next day/evening: When I get home from work, or the afternoon on a weekend, scrape the edges of the mixture and ensure it’s risen; then, turn out onto a lightly floured surface, shape into a boule, and wrap in a well-floured or cornmeal-coated towel, and let rise another 1 to 2 hours, before preparing to bake.

If you’re an early morning riser or an insomniac, a different schedule may work for you. But I’d rather get it started before bed and then deal with it later in the day. And a few hours extra rise time, if it’s a work day, hasn’t made a difference.

Again, it’s pretty hard to mess this up, even if there is an optimal way to make it that will maximize its awesomeness.

My boule isn’t the prettiest and it didn’t rise as much as I thought it would, but it tastes forking great.

Here’s what I did:

Ingredients

  • ¼ t. active dry yeast
  • 1 ⅓ c. cool water
  • 1 ¼ t. salt (I estimate)
  • 3 c. bread flour (OR, 2 c. bread flour, 1 c. wheat flour — which may require slightly more water)
  • Bran, cornmeal, or additional flour, for dusting

Directions

In a large bowl, stir together the flour, salt, and yeast, and then add the water. Use a wooden spoon, rubber dough scraper, or your hands to mix together until a wet, sticky dough forms, about 30 seconds. If it’s not wet and sticky, add more water or flour as necessary.

Cover the bowl — either a tea towel or plastic wrap or a loose lid will work. Let rise in a cool place, out of direct sunlight, for 12 to 18 hours.

When small bubbles dot the surface of the dough and it’s at least doubled in size, dust a work surface with additional flour. Scrape the dough onto the work surface. Use your hands — lightly floured — to shape the dough into a round.

Dust a (non-terry cloth) tea towel with flour or cornmeal, and then place the dough, seam-side down, in the towel, and then gently wrap together. Let the dough rise for another 1 to 2 hours. (It’s ready when it has almost doubled and/or you can poke it with a finger and it holds the impression.)

About a half-hour before the second rise has finished, heat the oven to 475 degrees with a rack in the lower third of the oven. Place the Dutch oven, covered,  in the center of the rack.

When the dough is ready, carefully remove the preheated pot from the oven. Uncover it, and add some cornmeal or wheat bran if desired, to the bottom of the pot. Then, unfold the dough and quickly but gently invert it into the pot with the seam-side up. Cover the pot again.

Bake the dough for 30 minutes.

Remove the lid and continue to bake until the bread is browned but not burnt, another 15 to 30 minutes.

Once the bread is done, carefully remove the loaf from the Dutch oven, and place it on a rack to cool. Let cool for at least an hour before slicing, and enjoy with soup, butter, or all by itself!

Beautiful briny bread

The checkout girl at Target told me not to tell anyone that the bread I made this week had anchovies on it. I didn’t have the heart to tell her that I’d be telling everyone through this blog post. So, let me get it out of the way at the front.

This bread is not for the faint-hearted.

If you can think of everything flavorful and potentially off-putting, this bread has it. Anchovies. Capers. Kalamata olives. Onions (lots of ‘em). Garlic.

Briny bread* ingredients. *Actually called “pissaladiere.”

It’s also got tomatoes, a butt-load of olive oil, and a no-knead yeasty bread.

Basically, me and my sweetie thought it would be perfect. And the recipe didn’t let us down. It’s been amazing.

The recipe comes from the cookbook my brother turned me on to about bread: “Bread, Toast, Crumbs” by Alexandra Stafford. I finally got myself a copy.

Unlike last time, my deviations from the original recipe worked just fine. I mostly stuck to it — including all those delicious toppings — but I have regular yeast, not instant, and I figured there was no harm in swapping. Especially since I spent a year making bread.

To correct, I just upped the amount of yeast and added a little honey to get it kickstarted, but otherwise I stuck close to the original.

My only complaint — and it’s expected — is that it took a long time and dirtied quite a few dishes, including the pain-in-the-ass-to-clean food processor. But I knew all that going in, and a lot of the time is pretty passive and a great time to rewatch this amazing season of “Doctor Who.”

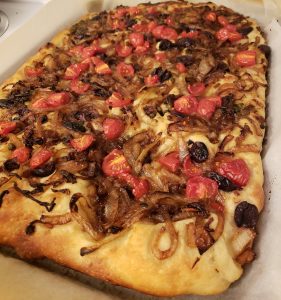
It looks so pretty, and it’s tasty too.

Here’s what I did (with notes to use instant yeast):

Ingredients

For the dough

  • 4 c. all-purpose flour
  • 2 t. salt
  • 2 ½ t. active dry yeast (1 t. If using instant)
  • 2 c. lukewarm water
  • 1 T. honey, optional

For the bread

  • 6 T. olive oil, divided
  • 3 medium onions, halved and thinly sliced
  • 2 cloves garlic
  • 4 anchovies
  • 1 T. capers (I didn’t measure, I love capers)
  • ½ c. kalamata olives, halved
  • 1 c. cherry tomatoes, halved or quartered

Directions

Make the dough. If using active dry yeast, mix together the yeast, warm water, and honey, and let sit for about 10 minutes before stirring in the flour and salt. If using instant, the recipe says to mix together the dry ingredients, and then add the water (and honey). Either way, use a rubber spatula to stir until the mixture combined and you have a sticky dough that’s sort of ball-shaped. Cover the mixture with oiled plastic wrap, and let rise for about 1 ½ hours until the dough has doubled in size.

Just before the dough is ready, heat a large pan on high heat. Add 1 T. olive oil, and then add the onions. Cook on medium heat, stirring every few minutes, until the onions are golden, about 15 minutes. Set aside.

In a food processor, mix together the garlic and anchovies with 2 T. olive oil until pureed. Add the capers and pulse till chopped. Set aside.

Heat the oven to 425 degrees, and set the rack in the middle of the oven. Line a large rimmed sheet pan with parchment paper, and pour on the remaining 3 T. olive oil. Use two forks to deflate the dough by releasing it from the sides of the bowl and pulling it toward the center until you get a rough ball. Lift the dough with the forks or pour it onto the oiled sheet pan. Roll the dough ball in oil to coat it all over, and then let it rest for 20 minutes.

With greased hands, push the dough to stretch it to the edges of the sheet pan, and use fingers to dimple it. When the dough resists stretching, let it rest for about 5 minutes and then stretch again until it fits most of the sheet pan.

To assemble, spread the anchovy paste on the dough. Scatter on the olives, and then the carmelized onions. Top with the tomatoes. Use fingers again to dimple the dough and stretch more if necessary.

Bake for 25 to 30 minutes until the underside of the dough is golden and crisp. Transfer to a cutting board and let cool for at least 10 minutes before cutting into squares, and enjoy!

Extra Post: Let’s celebrate Casimir Pulaski Day

So, I didn’t make this recipe recently, but I couldn’t resist a Polish post to celebrate Casimir Pulaski Day.

Since I grew up in Illinois, there were two extra holidays we got each year. They were Abraham Lincoln’s birthday (of course in the Land of Lincoln, we celebrated the 16th president individually), and Casimir Pulaski Day.

Pulaski isn’t celebrated much outside of Illinois, but he was a Revolutionary War hero from Poland and is credited as a founder of the U.S. cavalry. And he seems like a pretty cool and worldly dude.

Usually I try to make something each year to celebrate my Polish roots and celebrate the Illinois holiday. This year I didn’t have my [expletive deleted] together to get something Polish together in time for today’s holiday.

Fortunately, I made bialys a few years ago in my previous life as a newspaper reporter, and the little not-bagels are made on a sheet pan.

Bialys, a tasty Polish treat

So, here’s a little recipe extra for loyal readers:

Ingredients

For the starter or polish

  • ½ c. all-purpose flour
  • 1/3 c. water
  • ¼ t. active dry yeast

For the bialy dough            

  • 1 starter
  • 1 ½ c. warm water
  • 2 ½ t. active dry yeast (or one package)
  • 1 ½ T. honey
  • 2 T. olive oil
  • 1 ½ t. salt
  • 3 c. bread flour
  • 1 c. all purpose flour

For the bialy filling

  • 5 cloves garlic, minced
  • 2 medium onions, chopped
  • 2 T. oil
  • 2 T. poppy seeds
  • Salt, to taste

Directions

The night before you plan to make the bread, make the starter before going to bed. Stir together the flour and yeast. Mix in the water until a sticky dough forms. Cover and let rest overnight.

When ready to make the dough, mix together the yeast, water and honey. Let the yeast activate for about 15 minutes. Then, add the starter, olive oil, salt, all-purpose flour and about 2 c. of the bread flour.

Turn out on a floured surface, and knead, adding in the remainder of the bread flour as necessary. Knead for about 5 to 10 minutes.

Place dough in a large bowl that has been coated with oil. Over with oiled plastic wrap and let rise in a cool place for about 2 hours.

Once dough has about doubled in size, punch it down in the bowl and then divide it into about 20 even pieces. Roll each dough piece into a ball and then stretch out to about a 3-inch round. Place round on floured baking sheet and indent around the middle, leaving about a 1-inch lip around the edge. Repeat with remaining dough pieces, leaving enough space in between dough rounds so the bialy can rise a second time.

Cover with oiled plastic wrap or a tea towel and let rise for about 1 hour.

Preheat oven to 450 degrees.

During second rise, mince garlic and chop onion. Pour oil into large cast-iron skillet and let warm over medium heat. Once hot, add in onions and garlic and cook for a few minutes before turning heat to medium low. Cook for 20 to 30 minutes over medium-low heat, stirring occasionally until caramelized. Once browned, remove from heat and add in the salt and poppy seeds.

Once second rise is complete, add ½ to 1 T. of the filling into each of the bialy indentations until it’s all used up. Place baking sheet (or sheets) into oven and cook for 12 to 15 minutes. Enjoy warm and with cream cheese!