The Handpie’s Tale

Thanks to my better half — who I’ll celebrate 6 years of marriage with tomorrow — for the title of this week’s blog post. It’s true. I’m making hand pies.
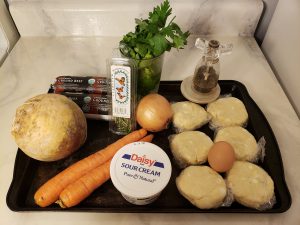
Meat hand pie ingredients.

When he said it, though, it was just one of those dumb puns he always — *always* — makes. But when I made hand pies on Election Day to keep sorta sane, his phrase seemed especially apropos.

Like my feelings about the book, I had some mixed thoughts about the election night. But more than that, it was another election where I had to think about women, and women’s role in our political world.

I promise I’ll get to the hand pies, but first:

All of this was unknown to me as I made my hand pies, but the questions of how it would all turn out was bubbling under the surface. I was full of anxiety, and as I once swore while cooking, my sweetie suggested I shouldn’t have taken on such a complicated project when I was already distracted.

And yet, it was the sort of frustration I could control.

As I reminded him, and myself: I had gone through this before; I knew it’d turn out fine; and even if every bit didn’t turn out perfect, it was going to be OK. As the election results have continued to pour in since Tuesday, I’m starting to feel the same about our country.

Hand pies not handmaids!

Here’s what I did, slightly tweaking Amy Thielen’s recipe from The New Midwestern Table:

Ingredients

  • 24 oz. ground beef (or mix of ground meats, but on a cold evening, trust me, the beef is the perfect level of heartiness)
  • 1 ½ c. rutabaga, diced
  • 1 c. onion, diced (about 1 medium onion)
  • 1 c. carrots, diced (about 2 small, or 1 ½ medium)
  • 2 t. fresh rosemary, minced
  • ¼ c. sour cream
  • ¼ c. fresh parsley, minced
  • Salt and pepper, to taste
  • 2 homemade crust doughs (Amy’s recipe at the bottom, but technically, any pie-like crust would do, though milk is recommended vs water for heartiness)
  • 1 large egg

Directions

Make the crust in advance, and divide into 6 equal disks. Refrigerate at least 1 hour or up to 2 days.

Heat oven to 375 degrees, and line a large sheet pan with parchment paper.

Combine the meat and vegetables in a large bowl. Add salt, pepper, rosemary, parsley, and sour cream. Mix until well combined.

Roll out the chilled dough until you have an 8-inch round. (Save your extras if you cut the edges, as I found I had a little extra meat mixture, so I had 7 hand pies, with one being smaller.)

Place meat mixture on one half of one round, and flip the other half of the dough on top of the meat mixture. Press the edges of the round together to seal in the meat mixture. Repeat with the remaining rounds until the meat and dough is used up.

Place the half-moon, meat-filled crescents on the parchment-paper lined sheet pan. Try to leave room between them, though my sheet pan wasn’t quite big enough, and it turned out OK to leave a very minimal amount of space (this might have been when I swore).

Beat the egg with a bit of water (about 2 T., though I didn’t measure), and brush the tops of the hand pies with the mixture.

Bake for about 45 minutes until golden brown, let cool slightly, and enjoy!

Pie dough crust *for 2 pie doughs * from Amy Thielen:

Use a pastry blender or 2 butter knives or your two fingers to combine 2 ½ c. all-purpose flour with 2 sticks (16 T.) of unsalted butter. Place an egg yolk in a measuring cup, and fill with milk until ⅔ c. full (about ½ c. milk). Mix the eggs and milk, and then pour into the flour mixture. Stir with a fork, and/or your fingers until the dough is combined, adding more milk if necessary. Divide into 6 disks, and refrigerate until ready to use.

Sheet pan mac & cheese the gift that keeps giving

I was looking for something different to try this week and that’s when a new message popped up. My brother Nate came through out of the blue with a mac and cheese recipe for me.

Sheet pan mac and cheese ingredients.

It turned out that the gift of a new, fun recipe just when I needed it came about because he had bought his wife Monique a birthday present of the delightful-sounding book “Bread, Toast, Crumbs” by Alexandra Stafford. BTW, Happy Birthday, Monique!

While I just used the image my brother sent me for this post, it definitely sounds like the type of book that belongs in my kitchen, as I love carbs and crumbs. My test with mac and cheese was mostly positive, if not perfect.

Despite my pronounced love for crumbs, I must have accidentally added more than the recipe, or perhaps because there was a note in the text to another page for homemade crumbs, I ended up with an over-abundance. Don’t get me wrong, the crumbs *tasted* great, but they were a bit overwhelming versus the mac and cheese.

But for that error, I only blame myself and my lack of owning the book.

I also failed to purchase more parchment paper after using it up for last week’s ratatouille, which may have contributed to a drier and darker mac and cheese, though the latter didn’t bother me at all and the former also probably an error I made in adding too much of the mac, defying instructions.

If you’re sensing a theme, it’s that in cooking there’s always a balance between trusting your gut and trusting the expert recipe; and, in this case, I erred toward my own opinions and judgment. But I won’t disavow my gut altogether. There’s some logic in what works for my palate and some room for error in how an item cooks in my oven, but this time, not so much.

Even though my attempt didn’t turn out perfectly, I had no problem eating it as leftovers throughout the week, and I’m adding the book to my cart right now.

So many crumbs. Yet, so much deliciousness.

Here’s what I did (or, more accurately, what I should have done):

Ingredients

  • 12 oz. elbow macaroni (I used 16 to use up the whole box, but in hindsight, it would’ve been better with less)
  • 1 stick (8 T.) unsalted butter, divided
  • ¼ c. all-purpose flour
  • 2 c. whole milk
  • 2 c. store-bought bread crumbs (The recipe called for 3, but also apparently how to make them homemade. Since 3 c. was too much, I’d go to 2 c. but I left all else for the crumb mix the same as the recipe called for, because delicious flavor!)
  • ½ c. fresh parsley, chopped
  • 2 cloves garlic, minced (I used much more because I love garlic, but add to your tastes)
  • 5 oz. grated Parmesan cheese
  • 8 oz. fresh mozzarella, diced
  • Salt and pepper, to taste

Directions

Heat oven to 425 degrees, and bring a large pot of water (salted if desired) to a boil. Add the macaroni and cook to al dente for 5 minutes. Drain but don’t rinse, and set aside.

In the same large pot, melt half the butter over medium high heat. Add the flour, a little at a time, whisking constantly, and continue to stir for about a minute. Add the milk, and 2 c. water, continuing to whisk to ensure nothing is stuck to the bottom. Bring to a boil, and then reduce heat to low. Add salt and pepper to taste. Simmer, stirring occasionally, for 20 to 30 minutes (mine took longer than the recipe stated, closer to 30 than the 20 in the recipe) until the mixture is thickened enough to coat the back of a spoon. Remove from heat and add more salt or pepper to taste.

In a medium bowl, melt the remaining butter. Then, add the bread crumbs, parsley, and garlic. Season with salt and pepper to taste.

In the pot with the sauce, add the Parmesan cheese (I left a little for topping but it’s optional), and then add in the macaroni. Stir until cheese is melted and mac is coated.

Line the bottom of a large rimmed sheet pan with parchment paper (optional but recommended), and spread the mac mixture on top. Add the mozzarella cubes evenly throughout, and then top with the bread crumb mixture, and any leftover Parmesan.

Bake for 25 to 30 minutes until the crumbs are golden and the mac mixture is bubbling. Remove from the oven, let cool for 10 minutes, and enjoy!

Important addendum:

My delightful brother sent the important context for the missing page with the note on bread crumbs. Mystery solved!

Anyone can cook ratatouille

I’ve loved Pixar’s “Ratatouille” since it first came out and I saw it in theaters. But it’s a movie that’s only grown on me since then.

Of course, I’ve come to love cooking even more, so that’s no surprise, but it’s really the movie’s messages that have grown in importance to me.

There is the message (*spoilers ahead*) from the critic at the end of the movie that “Anyone can cook,” which isn’t to say that we can all be great chefs but a great chef can come from even the humblest of beginnings.

But if I’m honest, it’s the message from Remy walking away from his dad to pursue his passion despite his family’s wishes that really gets me.

Screenshot from IMDB.

I won’t get overly sappy here, but I’m coming up on a year since leaving journalism, and that scene has been making me think and challenging me to move forward. That’s no less true of our current political climate as we approach another election. Things can change, as long as we decide to step up.

So, to readers, please vote and convince your friends and family to do the same. And, to myself, who voted last weekend, I am reminded to step up and try to help bring about that change by working for it.

Now, I’ll step off my pedestal and get back to my recipe.

Sheet pan ratatouille ingredients (please note, this is way too much to fit on one sheet pan).

I’m embarrassed to say how many years I’ve wanted to make the eponymous ratatouille from the movie, and I finally did it during my year of casseroles. And while it did not achieve the picturesque quality of the movie, it was a delight.

I thought it could be replicated on a sheet pan, albeit a smaller amount, and I was not wrong. However, I did buy way too much of the required vegetables, and so I had to make it on several sheet pans over multiple days. And yet, I’m not complaining.

I tried a few different methods to see what would work best — sauce on top, sauce on bottom, baked at a slightly lower temperature, and came up with what is my favorite. It’s also pretty easy, to boot, except the slicing, but it’s made easier if you have a mandoline slicer.

It looks classy, but it’s also easy and delicious.

Here’s what I did (using the best version of my tests):

Ingredients

  • About 2 small summer squash, sliced ⅛ to ¼ inch thick
  • About 2 small zucchini, sliced ⅛ to ¼ inch thick
  • About 2 medium Chinese eggplant, sliced ⅛ to ¼ inch thick
  • About 3 medium Roma tomatoes, sliced ⅛ to ¼ inch thick
  • Salt, to taste
  • Olive oil, for coating
  • 1 jar (16 to 20 oz.) arrabbiata sauce
  • Basil, to taste
  • Thyme, to taste
  • Minced garlic (I used dried), to taste

Directions

Heat oven to 450 degrees. Spray or brush olive oil on a large sheet pan (about 15 ½ by 12 inches)

Pour the sauce on top of the oiled pan, enough to coat but not necessarily using it all. Place a layer of vegetables on top of the sauce, slightly overlapping like shingles, and in any pattern you like — I did a row of each except tomatoes and put tomatoes on top but do whatever makes you happy.

Oil the top of the vegetable layer and add some thyme, basil, and minced garlic. Add another layer and repeat with the oil and herbs and garlic. If there’s still room, you can add a third layer (with oil, etc. on top) but my edges are not high so two layers was about all I could handle.

Top with parchment paper.

Bake for 35 to 45 minutes until the vegetables are cooked, with some browning around the edges (trust me, it tastes delightfully smoky). Serve with more sauce, if desired, and enjoy!

Spicy, saucy salmon

If there’s one thing that everyone knows goes with Buffalo sauce, it’s salmon.

OK, wait, that’s not right. And yet, oh my goodness, the combination deserves to be in the same realm as chicken wings. That’s a daring statement, and even I won’t pretend that Buffalo chicken wings can be replaced.

But if you like spicy sauce and something different, this is the recipe for you.

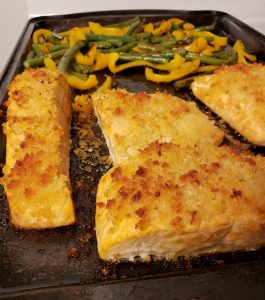
Buffalo salmon ingredients.

If you are skeptical, I understand. I was once among you. My sweetie suggested it several years ago, and I said only I was willing to try it. Salmon was one of the few fish I enjoyed (at the time), and I love Buffalo sauce so much I made it into a deviled egg recipe.

When I took my first bite, though, I was sold. It’s been a staple ever since, and even something I’ve made to impress my foodie family.

Besides tasting great, it’s a simple recipe: few ingredients, hard to mess up, and frankly, the veggies I added could have been anything that you have on hand or suits your tastes. I chose green beans — to ring out the summer season — and a bell pepper that was a leftover garden item from a friend. I didn’t even add anything to them, just the oil the covered the pan.

I served it alongside a pre-made mix of rice and grains to make it a fuller meal, but again, the salmon is the real star so serve it with what seems to fit and whatever makes you happy.

Flaky, spicy, yummy.

Here’s what I did, following a long ago Gourmet recipe:

Ingredients

  • 4 salmon fillets, preferably with skin on
  • 5 T. unsalted butter
  • ¼ c. hot sauce (I prefer Louisiana)
  • ⅓ c. panko crumbs
  • 1 T. vegetable oil, plus more for coating
  • 1 bell pepper, optional for adding vegetables (or pick what you prefer)
  • 12 to 16 oz. green beans, optional for adding vegetables (or pick what you prefer)

Directions

Heat oven to 425 degrees.

Lightly oil a large sheet pan (large if adding vegetables, smaller will work if not). Melt butter in a small bowl (I just nuke it but you can do it in a small saucepan), and add hot sauce. Set aside ¼ c. of the mixture. In a separate small bowl, mix the panko with the 1 T. oil.

Place the salmon skin side down on the sheet pan, and brush on the remaining sauce. Pat on the panko evenly across the salmon fillets.

Add vegetables, if using.

Bake for 16 to 20 minutes until the panko is golden and the fish is cooked through. Serve with the set aside 1/4 c. sauce on the side and a grain mixture, as desired, and enjoy!

Stir Fry-day!!!

You guys, I’m not going to lie, it’s been a bit of a week.

It was one where I could not eat for a day and a half, and that had nothing to do with the sh*tshow in DC that may well decide the future of the court for the next generation.

All of it’s enough to make you want to weep, and believe me, it’s not been easy keeping a straight face. Fortunately, there’s wine.

And, mercifully, this week’s recipe calls for using some white wine, so enjoy the leftovers while trying to hold on to your last bit of sanity. It reminds me of my favorite quote.

My stir fry recipe, I think, is from Cook’s Illustrated. It’s one of those recipes that was printed more than a decade ago, put into a plastic sleeve, and has been used ever since. The Christinia that printed it is quite a bit different from that one. But the recipe persists.

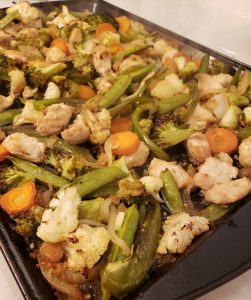
Sheet pan stir fry ingredients.

It’s not quite comfort food. It’s relatively healthy. It’s not something I grew up on. But it’s the kind of recipe that bends to suit what one’s feeling at any given time. Like, this time, I made it with chicken but I’ve enjoyed it with tofu or just the veggies.

I usually cook it on my pseudo wok, but I saw from things I’ve made so far this year that cooking veggies and chicken on a sheet pan would be fine. Basically, it’s hard to mess up

Also, did I mention that the sauce includes wine *and* ginger?! It’s pretty amazing.

Wine *and* ginger, you say? Delicious.

Here’s what I did to enjoy my stir fry on a sheet pan:

Ingredients

For the sauce:

  • 4 T. soy sauce
  • 4 T. dry white wine or cooking sherry
  • 1 T. honey
  • ¼ c. minced ginger (I use the jar, but if you’ve got the patience for ginger root, please do!)
  • 4 to 5 cloves garlic, minced (Again, I’m lazy and used a couple teaspoons of the jar stuff)
  • 4 scallions, sliced white and light green parts

For the stir fry:

  • Combination of veggies, approximating 2 lbs. Mine was a combination of cauliflower, broccoli, carrots, sugar snap peas, green peppers, and onions. (For a better estimate, I used less than a quarter of a cauliflower, 2 heads of broccoli, 1 large carrot, about 1 bag of Dole sugar snap peas, one pepper, and one onion)
  • 1 lb. chicken, cut into ½ inch chunks, marinated in about ⅓ of the sauce
  • Remaining slices of scallions, added near the end of cooking time
  • Oil, for generously greasing the sheet pan
  • Rice, for serving

Directions

Mix the sauce. Prepare the chicken by putting the chicken chunks in a bowl and topping with about a quarter of the sauce.

Meanwhile, chop the remaining vegetables into bite-size pieces.

Heat the oven to 400 degrees, and generously grease a large sheet pan.

Add the vegetables to the sheet pan, and coat with about ½ of the remaining sauce. Cook for about 10 minutes. Create an opening on the sheet pan and add the marinated chicken. Top with more sauce. Bake another 15 to 20 minutes until the chicken is cooked through (I used an electric thermometer and it took longer, but safety first when it comes to eating meat!).  Remove when close to ready to serve, and add the remaining scallions and the rest of the sauce. Bake for another 5 minutes.

Remove from oven, let cool slightly, and enjoy with rice!

A mostly muffaletta

I had been thinking about ways of making a grilled sandwich on a sheet pan when I came across the perfect recipe. As in, Delish had a recipe for sheet pan subs.

But, of course, I wasn’t content with the ingredients that made up the Italian submarine. I waffled for a few days over whether to make it anyway or do reubens/rachels instead, or a combination of each since the sheet pan could fit both. That’s when I remembered the Italian meat-using New Orleans favorite that my brother is enamored with: the muffaletta.

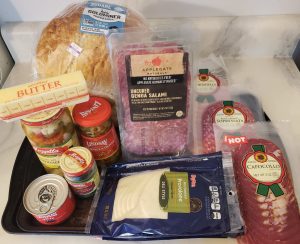
Sheet pan muffaletta ingredients.

It was like the Italian sub, what with Italian meats, some pickled relish, and cheese. But, you know, better. And while the bread appropriate for sheet pans wouldn’t be the traditional muffaletta kind, it was at least pressed to mimic the scooped out recipe of the original. Either way, it’d really let the insides of the sandwich shine.

So, with a pound and half of meat, a pound of cheese, and more than enough pickled items, I set about making the sandwich. I otherwise mostly followed the recipe, using a second sheet pan and an oven-proof weight to press the sandwich together.

It turned out almost perfect. I would say in hindsight that the sandwich could have cooked a while longer just to get the tops more browned. But otherwise, the cheese was melted, the meat was warm, and the sammies tasted great.

I did bring it to a friendly get-together because, well, look at how much meat and cheese it used. Even with eight people eating it — admittedly with other snacks and drinks throughout the day — I still took home about half. I’d say you could skimp on some meat, but the whole point of the sheet pan sandwich seems to be overindulgence, so go ahead and live a little.

Oh, but if the muffaletta doesn’t strike your fancy, I do truly believe this would have worked as a reuben/rachel or any grilled sandwich, just replace the meats and cheeses with your favorites and skip the relish or replace it with something more to your liking.

You mostly see bread, but trust me, there’s a whole lotta delicious meat and cheese inside.

Here’s what I did:

Ingredients

  • 1 stick of melted butter, divided
  • 1 ½ to 2 loaves of sliced bread, I opted for sourdough but pick what works best with your sammy (like, I’d use a seeded rye if making a reuben)
  • 1 ½ lbs. Italian meats, sliced (I did a combination of salamis, capicola, and mortadella, which is traditional, but I’m already stepping on tradition so who am I to judge?)
  • 1 lb. provolone, sliced
  • 8 oz. (about half a jar) of giardiniera, chopped
  • 6 to 8 oz. mix of capers, sliced black olives, and sliced green olives

Directions

Heat an oven to 400 degrees.

Brush about half the butter onto a large rimmed sheet pan. Top with bread, it can be slightly overlapping like shingles, and use your fingers to press it down slightly. Add the giardiniera to the top of the bread. Add half the cheese on top of that. Top the cheese with the meat slices. Add the remaining cheese on top, and then top with the olive, caper mixture, to taste. Place bread on top until covered, again can be slightly overlapping. Brush the bread with the remaining butter.

Place another large baking sheet on top (mine was slightly smaller, which worked fine), and use a cast-iron skillet or the like on top to press down on the bread.

Bake for about 10 minutes until the sandwich is starting to brown. Then, remove the weight and the top sheet pan. Bake for another 15 to 20 minutes or so until the top bread is golden too. Let cool slightly and then cut into sandwich-size servings (friends suggested a pizza cutter would work well here) and enjoy!

Chickity China the Chinese chicken

I like cheese way too much to make Asian food a staple of my diet. But it’s great to occasionally expand my palate and eat (somewhat) healthier fare. So, that is how I came to have a wide variety of Asian condiments in fridge door.

This week’s recipe thankfully allowed me to use so many of them and not add to my collection. I had bought some chicken thighs a weekend earlier when I made my venture to Whole Foods for seafood, so my purchases for this one amounted to three items.

Cauliflower, a sweet potato, and a red pepper were all it took to complete the sheet pan hoisin sriracha chicken recipe I had found a few weeks earlier from Taste of Home.

Hoisin sriracha chicken ingredients.

I mostly followed the recipe, except I’m lazy and used boneless, skinless chicken thighs. I might have added more sriracha because I didn’t measure it but it was damn spicy so add carefully or taste the sauce before pouring on the meat and vegetables.

I have to say I enjoyed it thoroughly, but my favorite thing was perhaps just how simply it came together.

I made it when we had the “fake fall” this past weekend, so I prepped the vegetables, made the sauce, and then sat in front of our firepit for a while before coming back to put it all together. About 45 minutes later, we had dinner, and a couple days worth of leftovers.

Don’t let the cauliflower fool you, this meal is flavorful and delicious.

Here’s what I did:

Ingredients

  • ⅓ c. hoisin sauce
  • ⅓ c. soy sauce (preferably low-sodium but we had regular on hand)
  • 2 T. honey
  • 2 T. sriracha (I didn’t measure but perhaps it’s best to measure on your taste for spicy foods)
  • 1 T. rice vinegar (I was out of rice wine vinegar, which I planned to use, so I used apple cider vinegar)
  • 2 t. sesame oil (I definitely used more but I love sesame oil)
  • 2 cloves garlic, minced
  • 1 t. minced fresh ginger
  • 6 boneless, skinless chicken thighs
  • Salt and pepper, to taste
  • 1 medium sweet potato, cut into cubes
  • 4 c. fresh cauliflower, cut into bite-size pieces
  • 1 red bell pepper, chopped
  • Sesame seeds, optional for topping
  • Oil for coating

Directions

Heat oven to 400 degrees.

Mix together the first eight ingredients, the hoisin sauce through the ginger, in a small bowl. Line a large rimmed sheet pan with aluminum foil and coat with a layer of oil (I use the spray kind). Place the sweet potato and chicken on prepared sheet pan, and add salt and pepper to taste.

Brush on about ⅓ of the hoisin sauce mixture.

Bake for about 15 minutes. Add the cauliflower and red pepper, and brush on another ⅓ of the hoisin mixture.

Bake another 25 to 30 minutes longer, until the chicken is cooked through. Brush on the remaining sauce, add the sesame seeds  (if using), and enjoy!

Saving the planet one shrimpie at a time

I’ve had a love affair with the deep blue sea since childhood. I blame Matt Hooper. I spent nearly a decade growing up wanting to be him, sometimes I still wish I had.

So, I was especially sensitive to a documentary I saw some years ago, The End of the Line, about the worrisome trend of endangered fish populations and what it could mean to our planet. I’m sorry to say that until I saw that documentary, I assumed that the vastness of the ocean meant a nearly endless supply of seafood. I should’ve read my history books.

The film, however, had the desired effect, as I have started paying attention to Seafood Watch ever since and trying to buy the best, most ethically sourced seafood I can. The stores in Ames were iffy at best, so I checked again and learned that Whole Foods is partnering with Seafood Watch so their fish options rank between best choice and good alternative. (Not a paid ad, but seriously, yay!)

That’s a long way of saying that it took a little more time to find a key ingredient in this week’s recipe, the beloved shrimp boil. Only, you know, in a sheet pan.

Sheet pan shrimp boil ingredients.

It was worth the wait.

The sheet pan shrimp boil is exactly as it sounds — take all the ingredients in your typical shrimp boil, spread it out on a sheet pan, pour on Old Bay and butter, bake, and you’ve got an amazing, and quick dinner. The longest part was parboiling the potatoes to ensure they’re cooked along with everything else.

We have one more pound of EZ Peel (no deveining required!), USA made, and ethical shrimpies, and I’ll be honest, I’m considering making this one again.

So much good stuff all on one sheet pan.

Here’s what I did, mostly following the Damn Delicious recipe, except I wanted the fun of peeling the shrimp:

Ingredients

  • 1 lb. medium shrimp (uncooked, EZ peel or peeled)
  • 1 (about 12 oz.) package smoked andouille sausage, sliced (I get ethical meat too, I recommend D’artagnan sausage, which is sold in some Hy-Vees)
  • 1 lb. small yellow potatoes, quartered
  • 3 ears corn, cut crosswise into six pieces each
  • ¼ c. (½ stick) unsalted butter, melted
  • 4-6 cloves garlic, minced
  • 1-2 T. Old Bay seasoning
  • 1 lemon, cut into wedges, for serving (optional)
  • Chopped parsley leaves, for serving (optional)
  • Olive oil, for coating

Directions

Heat oven to 400 degrees. Lightly oil a large rimmed sheet pan (I use the spray kind.)

Bring a large pot of water to a boil, and cook the potatoes until parboiled, about 10 minutes.

Meanwhile, add the sausage, shrimp, and corn onto the greased sheet pan. When the potatoes are ready, drain them and carefully spread on top, trying to keep all items on a single layer.

Stir the garlic and Old Bay into the melted butter, and then pour on top of the shrimp mixture.

Bake the mixture for 12 to 15 minutes, until the shrimp are opaque and the corn is tender. Top each serving with parsley and squeeze on a wedge of lemon, and enjoy!

The most delicious trash mash-up

I’m not proud, but I knew from the moment I found this recipe that I would be making it. Two comfort foods in one is not going to look pretty, but sometimes you just need it.

Unfortunately, I was not expecting to make it so soon. But my super exciting, semi-fancy, fun recipe had to be put on hold for a week because I couldn’t find the appropriate *redacted ingredient* I needed. Research assures me I’ll be able to find *redacted ingredient* in West Des Moines this holiday weekend, so I should have my fun dinner a week later.

In its stead, however, I made chili cheese dog pizza.

Yep, it’s chili cheese dog pizza ingredients.

Yeah.

It was every bit of gloriously trashy and delicious you’d expect.

Even if I felt a bit silly making it, it was not a recipe of my own creation. I found it at “Taste of Home” and basically followed the ingredients except partially baking the crust before adding the toppings, since I used my own Betty Crocker recipe instead of the store-bought stuff.

However, despite following the recipe, it has exactly the ingredients you’d expect. Except one. First, the expected: a can of chili, 6 hot dogs, cheddar cheese, onions, and pizza dough. But it also called for yellow mustard.

Now, I like yellow mustard, and it is my go-to topping for hot dogs, but I wasn’t expecting it to be called for here. I went with it anyway. I have to say, it really brought the dish together so it was a welcome addition.

While I am loathe to admit it, this is one I’ll turn to again in the future.

A sheet pan pizza that needs to be seen in all its glory.

Here’s what I did:

Ingredients

  • 2 Betty Crocker pizza crusts (or store-bought)
  • ½ c. yellow mustard (I didn’t measure, just spread it on until there was a light coating)
  • 1 (15 oz.) can chili of your choice
  • 6 hot dogs, sliced
  • 2 c. shredded cheddar cheese
  • ½ onion, diced (optional)
  • Oil, for coating

Directions

Heat oven to 425 degrees. Coat a large rimmed sheet pan with oil. Spread out the crust.

Spread on the mustard, top with chili and spread throughout, add hot dog slices and onions, and then top with the cheddar cheese.

Bake for about 15 minutes until the crust is browned on the edges and the cheese is melted. Let cool slightly, slice, and enjoy!

Quiche me like you mean it

After two weeks of traveling, I’m finding it nice to be home. And one of the surest signs that we’ve been on the road too much (and that I’m officially grown up) is that I got burnt out on fast food. Yes, I was craving salad and vegetables.

Of course, I do not need to be nudged too hard but the need for healthier fare hit like a craving. So, I was glad I had saved this quiche recipe for a post-travels dinner.

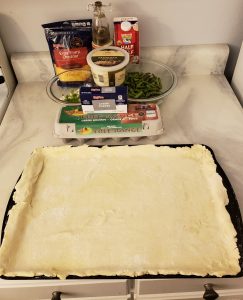
Sheet pan quiche ingredients.

It isn’t all healthy, what with an all-butter crust, cream cheese, and more cheese. But it was topped with my comfort food veggies, marinated artichokes and asparagus. And eggs, well, I think the jury is still out on whether they’re healthy or not. For the sake of this post, let’s say they’re a good source of protein.

Plus, I was happy to have another reason to make a pie crust in this year of sheet pan recipes.

The recipe was adapted from food blogging fave Smitten Kitchen. But I chose my favorite vegetables over spinach (which is a fine green!) and had to tweak to fit my size sheet pan (roughly 11×15 inch). All worked out perfectly and I found a relatively simple recipe I am sure I’ll be returning to again and again.

Look at those beautiful vegetables and that perfect crust.

Here’s what I did:

Ingredients

For crust:

  • 2 sticks butter
  • Scant 2 c. all-purpose flour, plus more for rolling the dough
  • 3 oz. ice water (I used a handy shot glass and shaker, don’t judge)
  • Salt, if desired

Or, feel free to roughly double your favorite pie crust.

For quiche filling:

  • 1 brick (8 oz.) cream cheese, softened
  • 1 c. half and half
  • 7 large eggs
  • 1 bunch scallions, thinly sliced white and light green parts
  • About ¾ bunch asparagus, ends removed and cut into about 1 ½ inch pieces
  • 1 (about 6 oz.) jar of marinated artichokes, drained
  • 1 c. grated sharp cheddar cheese
  • ½ c. grated Parmesan cheese
  • Salt and pepper, to taste
  • Oil, for coating

Directions

Prepare crust. Use a food processor, pastry blender, or hands to mix together the butter and flour until well blended. Add water slowly until dough forms. Pat into a disk, wrap in plastic, and refrigerate for about an hour. When ready, roll out the dough on a lightly floured surface to about ¼ inch thick and slightly larger than the size of your sheet pan. Carefully place the dough in the sheet pan and trim the edges as necessary. Freeze for about 20 minutes.

Heat the oven to 425 degrees. Then, when ready, pierce the cold dough throughout with a fork. Cover dough with a lightly oiled piece of aluminum foil. Add weights. (I forgot this step and all turned out fine.) Bake for about 20 minutes until partially done, and then remove foil (and any pie weights) and bake for another 3 to 5 minutes to lightly golden the crust.

Meanwhile, make the filling. I was lazy here and used my stand mixer, but do what works for you. Beat the cream cheese in a large bowl. Carefully add the half and half. Whisk in eggs one at a time, until combined. Stir in the scallions, cheeses, and salt and pepper.

Once crust is ready, pour on the egg mixture. Do not overtop the crust (this amount of egg mixture worked perfect for my sheet pan, but amounts and sheet pans vary). If you have extra, consider you’ve got breakfast in the morning.

Top egg mixture with asparagus pieces and quartered artichoke hearts.

Reduce oven temperature to 350 degrees, and bake the quiche until the crust is fully golden and the eggy filling is set, about 25 to 30 minutes. Cool for at least 10 minutes or until warmed to desired temperature, and enjoy!