End times call for good steak

I had originally planned for this to be my obligatory spring is here post, but things have changed.

While I had almost balked at springing for a good New York strip for this springtime recipe I found from Bon Appetit, I am now quite glad that I ultimately decided it was worth the cost, as it’s one of the few remaining joys left in a pandemic.

Also, it turns out that good steak is pretty damn good.
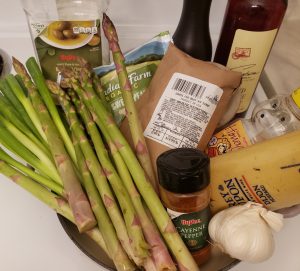
Steak and spring veggies ingredients.

The recipe allowed me to skirt the difficulty of fitting everything in my little skillet by searing the steak to perfection and letting it rest while the veggies cooked in the same dish. It all ultimately comes together when you place the steak (sliced) on top and drizzle on the Dijon mustard sauce, but it’s much easier than trying to stir it all together at the same time.

Plus, with peas, asparagus, and spring onions, it’s perfect for springtime.

Oh, and during these very stressful times, it’s also relatively simple and doesn’t require a lot of ingredients that keep you in close contact with people for too long at the grocery store.

All in all, pretty freakin’ worth it.
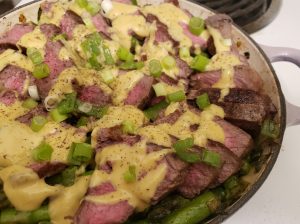
Ignore the dystopian hellscape, dream of steak.

Here’s what I did:

Ingredients

  • 1 lb. boneless New York Strip steak
  • 5 cloves garlic, divided, 1 grate and 4 thinly sliced
  • ⅓ c. Dijon mustard
  • 1 T. red wine vinegar
  • 1 t. honey
  • ¼ to ½ t. cayenne pepper
  • ⅓ c. + 3 T. olive oil, divided
  • 1 bunch scallions (white and green parts), thinly sliced and divided
  • 1 (10 oz.) bag frozen peas
  • 1 bunch asparagus, trimmed and cut into 1 inch pieces
  • Salt and pepper, to taste

Directions 

Pat the steak dry and season with salt and pepper all over. Let rest while you prepare the Dijon mustard sauce.

Whisk together the 1 clove of grated garlic, mustard, vinegar, honey, cayenne, ⅓ c. olive oil, and 1 T. water, in a medium bowl to combine. Add salt and pepper, to taste.

Heat a 9- to 10-inch cast iron skillet over medium high heat. Rub the steak with ~1 T. olive oil, and cook, turning every ~2 minutes, including some searing on edges, until medium-rare, so that a thermometer reads 120 degrees, for about 8 to 10 minutes. Transfer steak to a plate to rest.

Heat remaining 2 T. of olive oil in the same skillet, reducing heat to low. Add the slices of garlic and all but 2 T. of the spring onions, and cook, stirring often, about 3 minutes. Add the peas and a splash of water, and cook until tender, about 5 minutes. Add asparagus, and season with salt and pepper to taste. Cook, stirring regularly, until the asparagus is just tender, another 5 minutes. Remove from heat.

Slice steak and layer on top of the vegetables in the skillet. Drizzle some of the mustard sauce over the steak and top with the remaining spring onions.

Serve with any additional mustard sauce as desired, though be careful not to overdo it, and enjoy even in the end times!

Obligatory Lenten fish dish to happily enjoy year-round

Even though I’ve long since given up on giving up anything for Lent (or practicing Catholicism, for that matter), I still can’t help but mark the time of the year.

So, of course, I know that it’s the time of the year for fish Fridays (or possibly vegetarian, but if you’re my age and Midwestern, the idea of giving up “meat” entirely used to be unacceptable, so fish is not “meat,” but that’s a whole other discussion). I’ve also given up this practice, at least intentionally, but I do like a good excuse to make something with fish.

That is even more true as I practice sustainable fish-eating habits and have been sitting on 2 pounds of frozen haddock from my last trip to Whole Foods, where I can reliably get sustainable seafood. It turns out as much as I’m nostalgic for my Highlands honeymoon, I just don’t eat that much fried food, so it’s sat less used than I imagined when I bought it.

Thankfully, Jamie Oliver’s 5 Ingredients cookbook delivered with a “crazy simple” fish pie.

Fish pie ingredients.

Not only was it an incredibly simple dish, it called for specifically haddock and still managed to recall my Highlands honeymoon even though we never had this particular meal there.

As the cookbook and this recipe’s name suggest, the pie is short on ingredients and crazy simple. It’s perfect for a weeknight meal, and yet still manages to taste like something special.

I even managed to use a much smaller skillet than called for and it all worked out (unlike some of my past plans), though it was slightly more juicy so maybe lay off the soaking water if you’re using a 9-inch skillet, but it still tasted great and I have no regrets.

It was a simpler time when I made this crazy simple (and delicious) fish pie.

Here’s what I did (following the simple recipe other than size of skillet — which was meant to be 30 cm instead of 22 cm, so anything in between should work fine — and I did sneak in an extra phyllo dough sheet):

Ingredients 

  • 1 lb. haddock, skin off
  • ~2 T. olive oil, divided
  • 2 bunches of spring onions, chopped white and light green parts
  • 250 g. baby spinach (about 1 ½ standard bags, though I could’ve fit 2 bags and been happy to enjoy more spinach … so there is some leeway, depending on tastes)
  • 150 g. cheddar cheese (I sprung for the good-ish stuff, and it was slightly less than 1 block of Kerrygold cheddar)
  • Pepper, to taste
  • 5 sheets of phyllo dough (thawed)

Directions

Heat the oven to 400 degrees.

In a large bowl or casserole dish, cover the fish with boiling kettle water.

Meanwhile, heat a 9- to 10-inch skillet (or up to 12-inch) on medium-high heat. Add in 1 T. of olive oil, and then add the spring onions, and pan fry for about 2 minutes. Add in the spinach in batches until all is wilted down, and then remove from heat.

Add a scant ½ c., maybe less if using a smaller skillet, of the fish-soaked water to the skillet, and then drain the remaining water from the fish. Break up the fish fillets using a fork and then place around the skillet. Grate over *most* of the cheddar, and season with black pepper. Layer 4 of the pieces of phyllo dough on top and slightly around the ingredients to form a pie topping. Tear up the last piece in a “nutty fashion,” per the recipe, sprinkle the top with the remaining cheese, and drizzle on the remaining olive oil.

Bake the pie for 15 to 17 minutes until golden and crisp, and enjoy!

Honest artichoke dip

One of my go-to cookbooks since I discovered it is Amy Thielen’s The New Midwestern Table cookbook. As a nearly life-long Midwesterner, it’s perfect. Its recipes are rustic, delicious, mostly not that healthy, and not terribly pretentious, kind of like most Midwesterners.

As I was looking for a simple appetizer for something to share with friends, I was ecstatic to find a recipe that also fit my little Le Creuset/small skillet mission. It also happened to have artichokes, wine, and a butt-ton of cheese, aka, most of my diet.

So, basically, I moved the artichoke fondue dip to the top of my queue.

Artichoke fondue dip ingredients.

Two things about it appealed to me specifically — OK, OK, in addition to the aforementioned wine, cheese, and artichokes.

The first was that she correctly labels it a fondue dip; let’s be honest about what a Midwesterner’s (or really, everyone’s) idea of spinach artichoke dip is, mostly cheese. The second thing is not so much that it ditched the spinach, which I enjoy, though it does have a tendency to get stuck in between one’s teeth, but that there was a note about her choice in an alternative.

She not only replaced spinach with edamame, which has an entirely different texture and reasonably different taste, but noted that she’d been called out for how egregious it was to add to the point that she makes the edamame optional in her recipe.

I couldn’t resist seeing what the fuss was about.

My assessment, it was pretty good with it, and it didn’t scare off any of my friends who tried it.

All in all, it’s a damn good, and incredibly easy dip.

I wish there was more.

Here’s what I did, following the recipe (edamame and all):

Ingredients

  • 1 (14 oz.) can brined, quartered artichoke hearts
  • ½ c. heavy cream
  • 1 c. shredded Parmesan cheese
  • 1 c. shredded aged Gouda cheese
  • 3 T. dry white wine (preferably Sauvignon Blanc)
  • 2 T. chopped parsley
  • Salt and pepper, to taste
  • 2 t. cornstarch
  • ½ c. shelled edamame, fresh or frozen (optional, but come on, you want to try it!)
  • A baguette, sliced, or crackers for serving

Directions

Heat the oven to 325 degrees.

Drain the artichokes, and preferably, give each a little squeeze to release excess brine. Chop the artichokes roughly.

In a medium bowl, combine the artichoke hearts, cream, both cheeses, wine, parsley, salt and pepper, and cornstarch. Stir until well mixed. If using frozen edamame, ensure there are no ice particles on them, or rinse until they’re removed, and shake off any excess water, and add to the artichoke mixture.

Pour the mixture into a 9-inch skillet, and bake until the dip begins to brown at the edges and is bubbly, about 35 to 40 minutes. Serve with bread or crackers, or both, and enjoy!

Any equipment fits chicken cacciatore

Once I started enjoying cooking, chicken cacciatore was one of the first things I asked my mom to teach me how to make, even though the recipe came from my paternal grandmother. Mom’s way has always been the way I knew it.

Chicken cacciatore ingredients*. (*Wine and oregano not pictured because I forgot.)

I’ve also found ways to incorporate it into pretty much every dish that I’ve used since starting to make it into a weekly blog. It’s been in a casserole. It’s been in a Dutch oven. OK, it never made it into a bread or a pie. But this year, thanks to Rachael Ray, I had a way to make it into a small skillet.

Her recipe wasn’t too different from how it’s traditionally made, in that it had mushrooms that I’ll never use. However, because it’s meant to be a sandwich, it skipped the less common sandwich topping of artichoke hearts. I refused to use mushrooms or skip out on one of my favorite vegetables.

So, mine was a little different, and used slightly smaller amounts so that I could have it all fit in my little Le Creuset. It was, like some of my previous attempts, a bit close to full, but workable. My little skillet is 9 inches; this is perfect for 10, but 9 inches will work with some more careful stirring.

Since I made it my way, and my sweetie tested it first, it was no surprise that this worked and tasted delightful. However, it was no less delicious for being one of my favorite meals and working according to plan.

Steam for effect. Or, really because I needed the pic so I could eat it sooner.

Here’s what I did:

Ingredients

  • 1 lb. chicken, sliced or chopped
  • ~2 T. olive oil
  • 6 to 7 oz. marinated quartered artichoke hearts
  • 1 bell pepper, seeded and sliced
  • 1 large onion, peeled and sliced
  • ½ c. red wine (or broth)
  • 1 (14 oz.) can crushed tomatoes
  • 2 to 4 cloves garlic, minced
  • 2 t. dried oregano
  • 1 t. crushed red pepper flakes
  • 2 to 3 T. flat-leaf parsley, chopped
  • Salt and pepper, to taste
  • 4 sub rolls, for serving, or some cooked pasta, for serving
  • Provolone cheese, for topping the rolls (or frankly the pasta, if preferred, provolone is never bad)

Directions

Heat oven to broil if making sandwiches. Alternatively, prepare pasta if using.

Heat half the oil in a 9- to 10-inch skillet on a stove over medium heat. Add the chicken, and season with salt and pepper. Cook for 3 to 5 minutes until mostly cooked through. Add the remaining oil, and then the onions, peppers, and artichokes, and cook until the vegetables have softened, about another 3 to 5 minutes. Add the garlic, oregano, crushed red peppers, and cook for another minute.

Add the wine to deglaze the pan, and then add the crushed tomatoes and parsley. Cook for another few minutes until the tomatoes are simmering and the flavors have melded. Once ready, remove from heat.

Pile about a quarter of the chicken mixture into a sliced sub roll, and cover with one to two slices of provolone (as preferred). Repeat with as many sandwiches as you’re planning to serve immediately. Place the sandwiches on a sheet pan or aluminum foil or both, and place in the oven on the top rack, and broil for 1 to 2 minutes (keep watch!) until the cheese has melted and the edges of the bread have turned golden, and enjoy!

But there’s time now … for caramelized onions

I still can’t get over the fact that since the caucuses have ended, my weekends seem freer. Sure, I’m doing my damnedest to fill them up still, but it’s nothing compared to the anxiety of door-knocking, waiting for door knocks, ignoring the multiple calls and texts a day, and all the ways that I worried about the results. (Going to resist a joke about being careful what I wish for here, but needless to say, it’s not like the weeks since have been any smoother for this recovering political reporter.)

So, with an entire extra day of my weekend to do nothing but clean, go to the library, and talk to my mom, I decided it was a good use of my time to once again try to caramelize onions. It has never once turned out the way it looks on TV and in magazines, but it has continued to taste pretty good. This time was no exception.

Surprise, caramelized onions ingredients include mostly onions.

Also, thanks to a picture-filled guide from Food & Wine, I had more guidance, and a good use for my finished product in a quiche.

That’s right. This is a two-fer.

Caramelized onion quiche ingredients.

However, I quickly disposed of the quiche recipe provided and substituted my own version that mirrored something my sweetie had made before. I learned the joys of adding walnuts to a pie crust, of the potentially overwhelming flavor of moldy cheese, and of the fact that a braiser is an amazing pie dish (As a long-time pie lady, I will remember that last one!).

Even if the onions overcooked, didn’t get as moist, and blackened the bottom of my pan, it really only sped up the process of cooking the onions (and reminding me again to adapt!), and they tasted fine. My only regret on the onions is halving the recipe that means we ended up with just enough left over after the cup that went into the quiche to add to the top of two veggie burgers.

For the quiche, I skipped the 1 c. of diced ham, and replaced it with walnuts and Gorgonzola, about a cup-ish of each. However, the 4 oz. of Gorgonzola was a tiny bit overwhelming for me, even as my sweetie adored its flavor. In addition, I added some parsley and some pepper, and tested adding about a half cup of ground walnuts into the pie crust for extra walnut flavor.

The crust was an extra joy, and I have plans for doing that again already. Everything else was also a joy, though YMMV with the Gorgonzola.

It actually couldn’t have been a better way to celebrate the day off than to spend it in the kitchen making something this special.

Couldn’t resist eating some before taking a picture. Oops.

Here’s what I did:

Ingredients 

For the caramelized onions

  • 2 lb. yellow onions, halved and sliced vertically
  • 2 t. vegetable oil
  • 2 t. salt
  • ~¼ to ½ c. water

For the quiche

  • 1 pie crust (my typical is 1 ¼ c. flour, 8 T. butter, 1 t. salt, ice water to form; with this I used ¾ c. flour and added ½ c. ground walnuts… but any crust will due)
  • 1 c. caramelized onions
  • 6 eggs
  • 1 c. heavy cream
  • 2 to 4 oz. Gorgonzola (use according to your love of Gorgonzola; 4 oz. was a bit much for me)
  • 1 c. chopped walnuts
  • 2 T. chopped parsley
  • Salt and pepper, to taste

Directions

For the caramelized onions

Heat the oil in a 9- to 10-inch skillet or braiser on the stove top over medium-high heat. Add half the onions, turning to coat them in oil. Cook for about 2 minutes, and then add the remaining onions by the handful, using tongs to continue to coat the onions. The pan will be kind of full, but the onions will reduce, and continue to reduce. Once the onions are added, continue to cook for about 3 more minutes, adding salt to draw more moisture out. Reduce heat to medium, cover the skillet (braiser), and cook about 10 more minutes, when hopefully a pool of liquid will have collected (it didn’t for me). Remove lid, and continue to cook the onions, folding them over each other and scraping the bottom of the pan as necessary. Cook until liquid has evaporated, about 35 minutes. (If like me, there’s not much liquid, just keep stirring and cooking and gauge by color, not by time.) Scrape the bottom of the pan and shape the onions into a patty; add water as/if they stick to the pan, until the browned bits are loosened as much as possible. Keep cooking, stirring often, until the onions look the color of bourbon (that’s from the recipe but good advice!), up to another 35 to 45 minutes, as needed. Remove from heat and use/serve as desired.

For the quiche

Heat the oven to 350 degrees.

Roll out the pie dough to fit in a 9- to 10-inch braiser, or skillet. Lay the dough into the braiser/skillet, pressing around the edges, and shaping the ends as desired. Poke with a fork, layer with pie weights or aluminum foil and dried beans. Bake for about 15 minutes, until parboiled.

Meanwhile, in a large boil, mix together the eggs, cream, onions, gorgonzola, walnuts, parsley, and salt and pepper.

When the crust is ready, remove pie weights, and pour in the egg mixture.

Carefully place braiser/skillet back in the oven, and bake for about 35 minutes until the eggs have set and the top is browned, and enjoy!

A tortilla by any other name

It’s been nearly a decade since my family made a trip to Spain. It was, as many family trips, an experience filled with unforgettable moments, both good and bad. I’m thinking Vacation here, but like, scaled-to-reality levels of joys and traumas.

Among my favorite memories, though, was our cooking class with Josetxo.

I learned about drinking wine to cure hangovers, how to make mayonnaise from scratch, and the joys of anchovies. I also learned how to make a tortilla.

Frittata (*cough cough* tortilla) ingredients.

To American ears, this is not what you’d expect. It’s like a large frittata, not a flat flour- or corn-based wrapper for tacos or burritos. It was also the simplest and most satisfactory meal I knew immediately I’d be bringing to my kitchen at home.

My only issue with it is that it’s an egg dish that requires flipping, which usually results in a kind of eggy plate. Of course, in Spain, they make matching skillets that take care of this with ease. I never sprung for one, so I do it the difficult way.

That is, until I found a frittata — the French version of the Spanish dish — that had all the Spanish flavors I was hoping for … and some greens too.

Thanks to Bon Appetit I could make this at home easier.

However, I still am no expert in using my own broiler. The recipe said to cook in the broiler for 5 minutes; it was brown after 2 and not jiggly, but cutting in to the eggy dish revealed it was not finished yet. Trial and error minutes later it was ready. Thankfully, it never got browner but it was touch and go there for a bit.

Either way, it was worth it. I got a cleaner plate but still got my fix of eggs, potatoes, and Spanish chorizo.

Seriously, eggs, potatoes, and chorizo (and sure, greens) are the simplest but most incredible meal.

Here’s what I did:

Ingredients

  • 8 large eggs
  • 1 c. Manchego cheese, grated
  • 1 T. flat-leaf parsley, chopped
  • 1 T. chives, chopped
  • 4 oz. Spanish chorizo, thinly sliced (I used D’Artangnan chorizo, and 1 sausage link was 1 oz, shy but I went with it because I used extra cheese)
  • ½ small onion, diced
  • 6 fingerling potatoes, thinly sliced
  • 1 small bunch Swiss chard, ribs and stems removed and leaves coarsely chopped
  • 1 T. olive oil
  • Salt and pepper, to taste

Directions

Heat broiler.

Whisk eggs in a large bowl, and whisk in the cheese and herbs. Season with salt and pepper.

On the stove top, add the oil and cook the chorizo in a 9- to 10-inch cast iron skillet, over medium heat. After the chorizo is crisped, about 3 minutes, transfer to plate. Then, add the onion to the oiled skillet (or braiser), and season with salt, stirring often. Cook for about 1 minute, and then add the potatoes, until they are just softened, about 5 more minutes. Add the chard in batches, and cook each batch until wilted and fits in the skillet. Add salt and pepper, and mix back in the chorizo.

Pour the egg mixture on top of the sausage mix, tilting to ensure even distribution. Cook for about 2 minutes on the stove top, and then transfer to the oven and broil until the egg is cooked through, about 5 minutes. (Again, it seemed to me to be done after about 2 and then wasn’t so keep a close eye to ensure it’s not burnt but the eggs are also cooked through.)

Run a spatula around the edges to loosen, and slide on to a plate (or cut into wedges), and enjoy!

Broccoli and cheese recipe goes a-rye

Welp, I finally did it. It only took a month. I was finally too ambitious for my small skillet.

It was, admittedly, sketchy to begin with. Even though the recipe called for a 9-inch dish, it did specify that it should be square and deep, so I was already cutting it close.

But I figured I’d give this broccoli and cheese casserole with toasted rye a shot anyway, because it sounded so good, and everything else had worked so far, right?

Broccoli and cheese casserole with rye ingredients.

Well, it turned out that making the cheese sauce nearly filled my skillet to the brim. That made it pretty hard to fit in lots of broccoli, let alone top it with anything.

I nearly decided to scrap it as a blog post entirely since it went so far off the rails. But as I thought about it, I realized it all actually worked out and showed the importance of adapting in cooking.

Sure the recipe said some things, but as I read the signs of what was happening my braiser, I knew I needed to change. And so often when I actually fail at making something it’s because I ignore the signs. Something isn’t working early on but I press on anyway.

This time, I saw how much cheese sauce I had and not only was it too much for my braiser, but it was also too much for the amount of broccoli I had. So, thankfully, I had and added a head (the recipe called for 3, and I had 4). I also saw that the slices of bread weren’t enough, so I doubled that as well.

I didn’t even attempt to fit it in my skillet; I just found a casserole dish that was more than large enough.

And, honestly, it ended up working out well. I had to adapt, sure, and it was frustrating at times to realize my recipe wasn’t working as expected, but I’m infinitely happier for recognizing where things were going a-rye (sorry, I had to), and making changes.

Braiser in the back, casserole in the front.

So, here’s what I did, using my little skillet for the sauce only:

Ingredients

  • 4 large broccoli heads, roughly chopped, stems discarded
  • 1 ½ stick (12 T.) butter, divided
  • 1 small onion, finely chopped
  • ⅔ c. all-purpose flour
  • 1 (12 oz.) can/bottle of beer
  • 1 c. half and half
  • 12 oz. sharp cheddar cheese, shredded
  • 1 t. Worcestershire sauce
  • 1 t. dry mustard
  • ~4 slices rye bread, torn or cut into about ½ in. pieces
  • Salt and pepper, to taste
  • Cooking spray

Directions

Heat oven to 425 degrees.

Lightly coat an 8-inch by 11-inch casserole or larger with the cooking spray.

Meanwhile, add water to a large pot and bring to a boil on the stove, with enough water to cover the broccoli pieces. Add some salt, and then cook the broccoli until just tender, about 3 to 5 minutes. Drain and then let stand in ice water for about 5 minutes or until the sauce is prepared.

Meanwhile, melt 1 stick (8 T.) in a skillet or braiser on the stove top over medium heat. Add the onion, and cook until softened, about 8 minutes. Whisk in flour gradually and stir until incorporated and lightly browned, about 2 minutes. Whisk in beer and half and half. Cook until sauce thickens and begins to bubble, about 3 minutes. Add the cheese, Worcestershire sauce, mustard, and salt and pepper, and stir until smooth, adding cheese in batches as appropriate. Remove sauce from heat.

Meanwhile, melt the remaining half stick (4 T.) butter in a medium bowl, and add the rye slices, mixing until butter coats the bread.

To bring it all together, add the broccoli to the prepared casserole dish, pour on the cheese sauce, and then finally add the coated bread slices on top. Bake the mixture, uncovered, until the bread is golden brown and the cheese is bubbly, about 15 to 20 minutes, and enjoy!

Have your pudding, and eat your meat too

This recipe was recommended to me, and as soon as I saw it, I had to move it to the top of the queue. And not just because I was too lazy to come up with anything else on my own.

Mostly, the breakfast Yorkshire pudding recipe won me over with bacon, a limited ingredient list, and, of course, a specific skillet size. Like last week, it did say 10 inches, but I was hoping that 9 inches would work Spoiler: It was fine.

Yorkshire pudding with eggs ingredients.

Aside from the skillet size, I pretty much obediently followed the recipe from Serious Eats. Since I was using a slightly smaller dish, I did start checking the oven a little sooner, but unlike last week, the change in size didn’t seem to affect the cooking time.

Overall, I frickin’ loved this recipe.

I am glad I read it the night before I planned to make the Yorkshire pudding, because the batter should be made the night before (and up to three nights before). It was really quick, so it wasn’t a problem, but it would have been had I checked it Saturday morning.

My only two notes for the next time (or, more importantly, for readers):

  • The recipe recommends cooking the bacon for about 8 minutes before adding the batter. It didn’t look quite done so I did it for a minute or two longer … but I didn’t realize that much of the bacon would continue to cook slightly in the oven, so it was quite well done and this is coming from someone who likes her bacon extra crunchy. Next time, let it cook for 8 minutes (or until mostly done) and call it good enough.
  • Honestly, and this is just a taste thing for me, I would skip making the fried eggs to serve on top, and instead use the optional Hollandaise sauce that I skipped. I enjoy a fried egg just fine, but it’s nothing special to me (unless served on top of fried potatoes with hot sauce), and I also frickin’ love Hollandaise. I should have included it, but it was optional and I was lazy. But for my tastes, I’d rather enjoy this bread-y treat with an eggy sauce than with just eggs.

The only other thing I know for next time is that there will be a next time.

Eggy pudding with 2 eggs. So good, but so lacking in Hollandaise.

Here’s what I did:

Ingredients 

  • 3 large eggs (plus 4 more for serving, if desired)
  • ~¾ c. flour
  • ~½ c. plus 1 T. whole milk
  • ~1 ½ T. water
  • ½ t. salt
  • 8 oz. bacon, diced (I used kitchen shears)
  • 2 oz. grated Parmesan (optional, but not for me)
  • Hollandaise sauce (optional, but not for me in the future)

Directions

Combine (3) eggs, flour, milk, water, and a half teaspoon of salt in a medium bowl, and whisk until a smooth batter is formed. Refrigerate overnight (and up to three days). Remove from refrigerator during preparation.

Heat oven to 450 degrees.

Meanwhile, heat the 9- to 10-inch skillet on the stovetop. Once warmed, add the diced bacon. Cook over medium heat, stirring frequently, until crisp and mostly browned, about 8 minutes (don’t overcook; it will continue to cook a bit in the oven).

Pour prepared batter into the skillet once bacon is ready and immediately transfer to oven.

Bake until the batter is puffed, and deep brown and crispy, about 20 to 25 minutes (I started checking at 15 minutes for my 9-inch braiser; it was fine but best to err on the side of caution and check earlier if using 9-inch skillet).

About 5 minutes before pudding is ready, sprinkle on the Parmesan (if using). At about the same time, begin to prepare the (4) fried eggs to your liking (if using) and/or the Hollandaise sauce (if using). Enjoy!

Bless you, bing bread

As I scoured for recipes that may work in my little Le Creuset, I was so grateful to come across the first one that I noticed that specified an exact size for a skillet. Now, sure, it said 10 inches, but 9 inches is close enough for comfort.

So, I tried my hand at bing bread.

Bing bread ingredients.

In addition to its specified size, it is bread (good) stuffed with potatoes (good), scallions (good), bacon (amazing), and cheese (amazing), and then slightly fried and also baked. It was also supposed to incorporate sesame oil, which I love, but I forgot to put it in the rolled-up dough, and stupidly thought it’d be OK to add it with the frying oil. Don’t do that. It didn’t ruin it, but it didn’t help any either.

If I make it again, and I will make it again, I will be remembering to brush the dough with sesame oil and skimping on the frying oil. Also, I need to remember that a smaller pan is going to reduce cooking time.

Since this makes two bread rounds, I was lazy and made one in my Le Creuset and the other in the 10-inch Lodge skillet, and (I am loathe to admit) the larger pan definitely worked better. However, I think it’s mainly because I failed to account for the fact that smaller pans could cook faster.

While the fried side of both definitely looked a bit charred, they both ended up tasting just fine. I think the extra oil mostly made the edges a little chewier, but it didn’t taste burnt at all. Proof that presentation isn’t everything, especially when you have bacon and can top it with sour cream butter.

Deliciously decadent. And not too burnt.

Here’s what I did, following the thankfully specific Bon Appetit recipe:

Ingredients

  • 2 ¼ t. active dry yeast (1 package)
  • 2 T. plus 2 t. honey, divided
  • 2 ½ t. salt, divided
  • 2 c. plus 2 T. warm water, divided
  • 4 c. all-purpose flour, plus more for coating
  • 1 large potato, baked and diced
  • 3 T. vegetable oil, divided
  • 1 lb. bacon, cooked (I baked mine on a grate) and diced
  • 2 T. toasted sesame oil, divided (sort of optional since I mostly forgot, but it is delicious)
  • 8 oz. white cheddar, grated (about 2 c.)
  • 1 bunch scallions, thinly sliced
  • 1 T. soy sauce
  • 2 T. sesame seeds, divided

For sour cream butter (not strictly necessary but recommended)

  • 1 stick butter, room temperature
  • 2 T. sour cream
  • Scant 1 t. salt

Directions

Combine the yeast with the 2 T. honey, 2 t. salt, and 2 c. warm water in a large bowl, and whisk to dissolve the honey. Let sit until the yeast activates and becomes foamy, 5 to 10 minutes. Add 3 c. of water and mix with a wooden spoon until a dough begins to form, adding flour (up to about another cup) until a shaggy ball begins to form. Cover and let rise until doubled, about 50 to 70 minutes.

Meanwhile, prepare the bacon and potatoes if you haven’t already (I did mine early and just chopped while I waited). Also, while waiting, whisk together the soy sauce, 2 t. honey, and 2 T. water in a small bowl until the honey is dissolved.

Heat oven to 400 degrees.

Once dough has doubled in size, gently push it down and transfer to a floured surface, kneading and adding flour as necessary until a sticky, smooth dough is formed. Divide the dough in half, and cover one half in plastic wrap so it doesn’t dry out while you prepare the first.

Roll out the half of a dough into about a 13-inch round that’s about ¼ inch thick. Brush with 1 T. sesame oil (don’t forget!), and then sprinkle on the round half the potato, bacon, cheese, and scallions. Roll dough up like a jelly roll, and then pinch ends and seams together to seal. Then, squeeze and press from the center toward the ends to elongate the roll slightly and even out the thickness. Then, starting from one end, coil like a rope to form a large spiral. Flatten the spiral to form a 9-inch round.

Cover the round and repeat with the remaining dough, using up the rest of the sesame oil, potato, bacon, cheese, and scallion.

Heat a 9- to 10-inch cast iron skillet over medium heat. Add 1 T. vegetable oil, swirling to coat. Carefully place one spiral in the hot skillet, and brush with the soy glaze. Cover with lid (or aluminum foil) and cook until the underside is golden brown between 5 and 10 minutes. Uncover and carefully flip bread over. Brush the browned top with soy glaze and sprinkle with 1 T. sesame seeds. Transfer to oven and cook, uncovered, until underside is also golden brown, about 15 minutes. Remove to wire rack and let cool 15 minutes.

Repeat with second round (or use 2 9- to 10-inch skillets), and don’t forget the glaze and seeds. Once cooled, cut into wedges and serve with sour cream butter, which can be made ahead, and enjoy! To make butter, whisk 1 stick room temperature butter, 2 T. sour cream, and scant 1 t. salt.

Mustard mashup with smashed potatoes

Week two brings another test of what my little Le Creuset can hold.

And once again, I turned to Jamie Oliver’s wonderful “5 Ingredients” cookbook. So, I know, I know, I keep going on about it, but this week especially demonstrates how versatile and useful it is. Because, scandal, I used way more than 5 ingredients in this list. In fact, I mashed up two recipes, and then still added more. I’m calling it a mustard chicken mashup.

Mustard chicken mashup ingredients.

In doing so, I also tested the limits of the 9-inch braiser.

Tl; dr, I might have gone a tad overboard, but it all still worked out.

If you have a 10-inch skillet, this will be fine; if you are using a 9-incher, perhaps do scant amounts or stir very carefully.

As its name suggests, this recipe has some mustard and chicken. It also has some veggies, some cream, and Worcestershire. I stole the carrots and Worcestershire sauce from a 5-ingredient beef recipe that also called for mustard, but the chicken recipe sounded easier, and creamier.

And aside from some careful stirring, it all worked out really well. My only regret, actually, is that the stone ground mustard was rather mild and I had hoped for it to be stronger. If you love mustard like we do, I recommend getting a stronger mustard or mixing stone ground and Dijon mustards. I liked the way the stone ground looked mixed with heavy cream, but I wanted more of a kick.

Other than that, it was a perfectly wonderful and quick two- to three-serving dinner, especially when served with the smashed potatoes my sweetie made in our new Instant Pot. I also thought about serving it with rice, but potatoes were perfect; plus, then I get to have a mashup and smashed potatoes.

Easy as pie, but tastes like creamy mustard. Noms.

Here’s what I did:

Ingredients

  • 1 lb. chicken, sliced into thin strips
  • 1 carrot, thinly chopped
  • 1 onion, thinly sliced
  • 6 oz. Brussels sprouts
  • ⅔ c. heavy cream
  • ½ c. water
  • 1 T. Worcestershire sauce
  • 2 T. stone ground mustard (or to taste)
  • Pepper, to taste
  • Olive oil

Directions

Add some oil to your Le Creuset (or 9- to 10-inch skillet), and stir in the carrot, onion, and Brussels sprouts. Cook over medium heat about 3 to 5 minutes, stirring occasionally, to slightly soften. Add the chicken slices, and cook another 3 to 5 minutes until the chicken is mostly cooked through.

Then, add the mustard, cream, water, and Worcestershire. Add pepper to taste.

Bring to a boil, and then simmer, uncovered, stirring occasionally, until the liquid thickens slightly into a sauce and the chicken is cooked through.

Season with additional pepper or mustard as desired. Serve with smashed potatoes or rice, or on its own, and enjoy!