End times call for good steak

I had originally planned for this to be my obligatory spring is here post, but things have changed.

While I had almost balked at springing for a good New York strip for this springtime recipe I found from Bon Appetit, I am now quite glad that I ultimately decided it was worth the cost, as it’s one of the few remaining joys left in a pandemic.

Also, it turns out that good steak is pretty damn good.
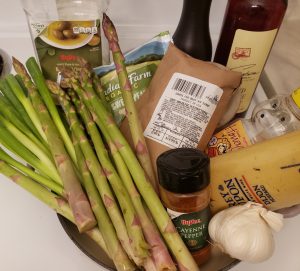
Steak and spring veggies ingredients.

The recipe allowed me to skirt the difficulty of fitting everything in my little skillet by searing the steak to perfection and letting it rest while the veggies cooked in the same dish. It all ultimately comes together when you place the steak (sliced) on top and drizzle on the Dijon mustard sauce, but it’s much easier than trying to stir it all together at the same time.

Plus, with peas, asparagus, and spring onions, it’s perfect for springtime.

Oh, and during these very stressful times, it’s also relatively simple and doesn’t require a lot of ingredients that keep you in close contact with people for too long at the grocery store.

All in all, pretty freakin’ worth it.
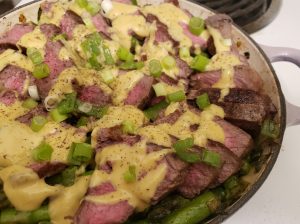
Ignore the dystopian hellscape, dream of steak.

Here’s what I did:

Ingredients

  • 1 lb. boneless New York Strip steak
  • 5 cloves garlic, divided, 1 grate and 4 thinly sliced
  • ⅓ c. Dijon mustard
  • 1 T. red wine vinegar
  • 1 t. honey
  • ¼ to ½ t. cayenne pepper
  • ⅓ c. + 3 T. olive oil, divided
  • 1 bunch scallions (white and green parts), thinly sliced and divided
  • 1 (10 oz.) bag frozen peas
  • 1 bunch asparagus, trimmed and cut into 1 inch pieces
  • Salt and pepper, to taste

Directions 

Pat the steak dry and season with salt and pepper all over. Let rest while you prepare the Dijon mustard sauce.

Whisk together the 1 clove of grated garlic, mustard, vinegar, honey, cayenne, ⅓ c. olive oil, and 1 T. water, in a medium bowl to combine. Add salt and pepper, to taste.

Heat a 9- to 10-inch cast iron skillet over medium high heat. Rub the steak with ~1 T. olive oil, and cook, turning every ~2 minutes, including some searing on edges, until medium-rare, so that a thermometer reads 120 degrees, for about 8 to 10 minutes. Transfer steak to a plate to rest.

Heat remaining 2 T. of olive oil in the same skillet, reducing heat to low. Add the slices of garlic and all but 2 T. of the spring onions, and cook, stirring often, about 3 minutes. Add the peas and a splash of water, and cook until tender, about 5 minutes. Add asparagus, and season with salt and pepper to taste. Cook, stirring regularly, until the asparagus is just tender, another 5 minutes. Remove from heat.

Slice steak and layer on top of the vegetables in the skillet. Drizzle some of the mustard sauce over the steak and top with the remaining spring onions.

Serve with any additional mustard sauce as desired, though be careful not to overdo it, and enjoy even in the end times!

Obligatory Lenten fish dish to happily enjoy year-round

Even though I’ve long since given up on giving up anything for Lent (or practicing Catholicism, for that matter), I still can’t help but mark the time of the year.

So, of course, I know that it’s the time of the year for fish Fridays (or possibly vegetarian, but if you’re my age and Midwestern, the idea of giving up “meat” entirely used to be unacceptable, so fish is not “meat,” but that’s a whole other discussion). I’ve also given up this practice, at least intentionally, but I do like a good excuse to make something with fish.

That is even more true as I practice sustainable fish-eating habits and have been sitting on 2 pounds of frozen haddock from my last trip to Whole Foods, where I can reliably get sustainable seafood. It turns out as much as I’m nostalgic for my Highlands honeymoon, I just don’t eat that much fried food, so it’s sat less used than I imagined when I bought it.

Thankfully, Jamie Oliver’s 5 Ingredients cookbook delivered with a “crazy simple” fish pie.

Fish pie ingredients.

Not only was it an incredibly simple dish, it called for specifically haddock and still managed to recall my Highlands honeymoon even though we never had this particular meal there.

As the cookbook and this recipe’s name suggest, the pie is short on ingredients and crazy simple. It’s perfect for a weeknight meal, and yet still manages to taste like something special.

I even managed to use a much smaller skillet than called for and it all worked out (unlike some of my past plans), though it was slightly more juicy so maybe lay off the soaking water if you’re using a 9-inch skillet, but it still tasted great and I have no regrets.

It was a simpler time when I made this crazy simple (and delicious) fish pie.

Here’s what I did (following the simple recipe other than size of skillet — which was meant to be 30 cm instead of 22 cm, so anything in between should work fine — and I did sneak in an extra phyllo dough sheet):

Ingredients 

  • 1 lb. haddock, skin off
  • ~2 T. olive oil, divided
  • 2 bunches of spring onions, chopped white and light green parts
  • 250 g. baby spinach (about 1 ½ standard bags, though I could’ve fit 2 bags and been happy to enjoy more spinach … so there is some leeway, depending on tastes)
  • 150 g. cheddar cheese (I sprung for the good-ish stuff, and it was slightly less than 1 block of Kerrygold cheddar)
  • Pepper, to taste
  • 5 sheets of phyllo dough (thawed)

Directions

Heat the oven to 400 degrees.

In a large bowl or casserole dish, cover the fish with boiling kettle water.

Meanwhile, heat a 9- to 10-inch skillet (or up to 12-inch) on medium-high heat. Add in 1 T. of olive oil, and then add the spring onions, and pan fry for about 2 minutes. Add in the spinach in batches until all is wilted down, and then remove from heat.

Add a scant ½ c., maybe less if using a smaller skillet, of the fish-soaked water to the skillet, and then drain the remaining water from the fish. Break up the fish fillets using a fork and then place around the skillet. Grate over *most* of the cheddar, and season with black pepper. Layer 4 of the pieces of phyllo dough on top and slightly around the ingredients to form a pie topping. Tear up the last piece in a “nutty fashion,” per the recipe, sprinkle the top with the remaining cheese, and drizzle on the remaining olive oil.

Bake the pie for 15 to 17 minutes until golden and crisp, and enjoy!

Any equipment fits chicken cacciatore

Once I started enjoying cooking, chicken cacciatore was one of the first things I asked my mom to teach me how to make, even though the recipe came from my paternal grandmother. Mom’s way has always been the way I knew it.

Chicken cacciatore ingredients*. (*Wine and oregano not pictured because I forgot.)

I’ve also found ways to incorporate it into pretty much every dish that I’ve used since starting to make it into a weekly blog. It’s been in a casserole. It’s been in a Dutch oven. OK, it never made it into a bread or a pie. But this year, thanks to Rachael Ray, I had a way to make it into a small skillet.

Her recipe wasn’t too different from how it’s traditionally made, in that it had mushrooms that I’ll never use. However, because it’s meant to be a sandwich, it skipped the less common sandwich topping of artichoke hearts. I refused to use mushrooms or skip out on one of my favorite vegetables.

So, mine was a little different, and used slightly smaller amounts so that I could have it all fit in my little Le Creuset. It was, like some of my previous attempts, a bit close to full, but workable. My little skillet is 9 inches; this is perfect for 10, but 9 inches will work with some more careful stirring.

Since I made it my way, and my sweetie tested it first, it was no surprise that this worked and tasted delightful. However, it was no less delicious for being one of my favorite meals and working according to plan.

Steam for effect. Or, really because I needed the pic so I could eat it sooner.

Here’s what I did:

Ingredients

  • 1 lb. chicken, sliced or chopped
  • ~2 T. olive oil
  • 6 to 7 oz. marinated quartered artichoke hearts
  • 1 bell pepper, seeded and sliced
  • 1 large onion, peeled and sliced
  • ½ c. red wine (or broth)
  • 1 (14 oz.) can crushed tomatoes
  • 2 to 4 cloves garlic, minced
  • 2 t. dried oregano
  • 1 t. crushed red pepper flakes
  • 2 to 3 T. flat-leaf parsley, chopped
  • Salt and pepper, to taste
  • 4 sub rolls, for serving, or some cooked pasta, for serving
  • Provolone cheese, for topping the rolls (or frankly the pasta, if preferred, provolone is never bad)

Directions

Heat oven to broil if making sandwiches. Alternatively, prepare pasta if using.

Heat half the oil in a 9- to 10-inch skillet on a stove over medium heat. Add the chicken, and season with salt and pepper. Cook for 3 to 5 minutes until mostly cooked through. Add the remaining oil, and then the onions, peppers, and artichokes, and cook until the vegetables have softened, about another 3 to 5 minutes. Add the garlic, oregano, crushed red peppers, and cook for another minute.

Add the wine to deglaze the pan, and then add the crushed tomatoes and parsley. Cook for another few minutes until the tomatoes are simmering and the flavors have melded. Once ready, remove from heat.

Pile about a quarter of the chicken mixture into a sliced sub roll, and cover with one to two slices of provolone (as preferred). Repeat with as many sandwiches as you’re planning to serve immediately. Place the sandwiches on a sheet pan or aluminum foil or both, and place in the oven on the top rack, and broil for 1 to 2 minutes (keep watch!) until the cheese has melted and the edges of the bread have turned golden, and enjoy!

But there’s time now … for caramelized onions

I still can’t get over the fact that since the caucuses have ended, my weekends seem freer. Sure, I’m doing my damnedest to fill them up still, but it’s nothing compared to the anxiety of door-knocking, waiting for door knocks, ignoring the multiple calls and texts a day, and all the ways that I worried about the results. (Going to resist a joke about being careful what I wish for here, but needless to say, it’s not like the weeks since have been any smoother for this recovering political reporter.)

So, with an entire extra day of my weekend to do nothing but clean, go to the library, and talk to my mom, I decided it was a good use of my time to once again try to caramelize onions. It has never once turned out the way it looks on TV and in magazines, but it has continued to taste pretty good. This time was no exception.

Surprise, caramelized onions ingredients include mostly onions.

Also, thanks to a picture-filled guide from Food & Wine, I had more guidance, and a good use for my finished product in a quiche.

That’s right. This is a two-fer.

Caramelized onion quiche ingredients.

However, I quickly disposed of the quiche recipe provided and substituted my own version that mirrored something my sweetie had made before. I learned the joys of adding walnuts to a pie crust, of the potentially overwhelming flavor of moldy cheese, and of the fact that a braiser is an amazing pie dish (As a long-time pie lady, I will remember that last one!).

Even if the onions overcooked, didn’t get as moist, and blackened the bottom of my pan, it really only sped up the process of cooking the onions (and reminding me again to adapt!), and they tasted fine. My only regret on the onions is halving the recipe that means we ended up with just enough left over after the cup that went into the quiche to add to the top of two veggie burgers.

For the quiche, I skipped the 1 c. of diced ham, and replaced it with walnuts and Gorgonzola, about a cup-ish of each. However, the 4 oz. of Gorgonzola was a tiny bit overwhelming for me, even as my sweetie adored its flavor. In addition, I added some parsley and some pepper, and tested adding about a half cup of ground walnuts into the pie crust for extra walnut flavor.

The crust was an extra joy, and I have plans for doing that again already. Everything else was also a joy, though YMMV with the Gorgonzola.

It actually couldn’t have been a better way to celebrate the day off than to spend it in the kitchen making something this special.

Couldn’t resist eating some before taking a picture. Oops.

Here’s what I did:

Ingredients 

For the caramelized onions

  • 2 lb. yellow onions, halved and sliced vertically
  • 2 t. vegetable oil
  • 2 t. salt
  • ~¼ to ½ c. water

For the quiche

  • 1 pie crust (my typical is 1 ¼ c. flour, 8 T. butter, 1 t. salt, ice water to form; with this I used ¾ c. flour and added ½ c. ground walnuts… but any crust will due)
  • 1 c. caramelized onions
  • 6 eggs
  • 1 c. heavy cream
  • 2 to 4 oz. Gorgonzola (use according to your love of Gorgonzola; 4 oz. was a bit much for me)
  • 1 c. chopped walnuts
  • 2 T. chopped parsley
  • Salt and pepper, to taste

Directions

For the caramelized onions

Heat the oil in a 9- to 10-inch skillet or braiser on the stove top over medium-high heat. Add half the onions, turning to coat them in oil. Cook for about 2 minutes, and then add the remaining onions by the handful, using tongs to continue to coat the onions. The pan will be kind of full, but the onions will reduce, and continue to reduce. Once the onions are added, continue to cook for about 3 more minutes, adding salt to draw more moisture out. Reduce heat to medium, cover the skillet (braiser), and cook about 10 more minutes, when hopefully a pool of liquid will have collected (it didn’t for me). Remove lid, and continue to cook the onions, folding them over each other and scraping the bottom of the pan as necessary. Cook until liquid has evaporated, about 35 minutes. (If like me, there’s not much liquid, just keep stirring and cooking and gauge by color, not by time.) Scrape the bottom of the pan and shape the onions into a patty; add water as/if they stick to the pan, until the browned bits are loosened as much as possible. Keep cooking, stirring often, until the onions look the color of bourbon (that’s from the recipe but good advice!), up to another 35 to 45 minutes, as needed. Remove from heat and use/serve as desired.

For the quiche

Heat the oven to 350 degrees.

Roll out the pie dough to fit in a 9- to 10-inch braiser, or skillet. Lay the dough into the braiser/skillet, pressing around the edges, and shaping the ends as desired. Poke with a fork, layer with pie weights or aluminum foil and dried beans. Bake for about 15 minutes, until parboiled.

Meanwhile, in a large boil, mix together the eggs, cream, onions, gorgonzola, walnuts, parsley, and salt and pepper.

When the crust is ready, remove pie weights, and pour in the egg mixture.

Carefully place braiser/skillet back in the oven, and bake for about 35 minutes until the eggs have set and the top is browned, and enjoy!

A tortilla by any other name

It’s been nearly a decade since my family made a trip to Spain. It was, as many family trips, an experience filled with unforgettable moments, both good and bad. I’m thinking Vacation here, but like, scaled-to-reality levels of joys and traumas.

Among my favorite memories, though, was our cooking class with Josetxo.

I learned about drinking wine to cure hangovers, how to make mayonnaise from scratch, and the joys of anchovies. I also learned how to make a tortilla.

Frittata (*cough cough* tortilla) ingredients.

To American ears, this is not what you’d expect. It’s like a large frittata, not a flat flour- or corn-based wrapper for tacos or burritos. It was also the simplest and most satisfactory meal I knew immediately I’d be bringing to my kitchen at home.

My only issue with it is that it’s an egg dish that requires flipping, which usually results in a kind of eggy plate. Of course, in Spain, they make matching skillets that take care of this with ease. I never sprung for one, so I do it the difficult way.

That is, until I found a frittata — the French version of the Spanish dish — that had all the Spanish flavors I was hoping for … and some greens too.

Thanks to Bon Appetit I could make this at home easier.

However, I still am no expert in using my own broiler. The recipe said to cook in the broiler for 5 minutes; it was brown after 2 and not jiggly, but cutting in to the eggy dish revealed it was not finished yet. Trial and error minutes later it was ready. Thankfully, it never got browner but it was touch and go there for a bit.

Either way, it was worth it. I got a cleaner plate but still got my fix of eggs, potatoes, and Spanish chorizo.

Seriously, eggs, potatoes, and chorizo (and sure, greens) are the simplest but most incredible meal.

Here’s what I did:

Ingredients

  • 8 large eggs
  • 1 c. Manchego cheese, grated
  • 1 T. flat-leaf parsley, chopped
  • 1 T. chives, chopped
  • 4 oz. Spanish chorizo, thinly sliced (I used D’Artangnan chorizo, and 1 sausage link was 1 oz, shy but I went with it because I used extra cheese)
  • ½ small onion, diced
  • 6 fingerling potatoes, thinly sliced
  • 1 small bunch Swiss chard, ribs and stems removed and leaves coarsely chopped
  • 1 T. olive oil
  • Salt and pepper, to taste

Directions

Heat broiler.

Whisk eggs in a large bowl, and whisk in the cheese and herbs. Season with salt and pepper.

On the stove top, add the oil and cook the chorizo in a 9- to 10-inch cast iron skillet, over medium heat. After the chorizo is crisped, about 3 minutes, transfer to plate. Then, add the onion to the oiled skillet (or braiser), and season with salt, stirring often. Cook for about 1 minute, and then add the potatoes, until they are just softened, about 5 more minutes. Add the chard in batches, and cook each batch until wilted and fits in the skillet. Add salt and pepper, and mix back in the chorizo.

Pour the egg mixture on top of the sausage mix, tilting to ensure even distribution. Cook for about 2 minutes on the stove top, and then transfer to the oven and broil until the egg is cooked through, about 5 minutes. (Again, it seemed to me to be done after about 2 and then wasn’t so keep a close eye to ensure it’s not burnt but the eggs are also cooked through.)

Run a spatula around the edges to loosen, and slide on to a plate (or cut into wedges), and enjoy!

Broccoli and cheese recipe goes a-rye

Welp, I finally did it. It only took a month. I was finally too ambitious for my small skillet.

It was, admittedly, sketchy to begin with. Even though the recipe called for a 9-inch dish, it did specify that it should be square and deep, so I was already cutting it close.

But I figured I’d give this broccoli and cheese casserole with toasted rye a shot anyway, because it sounded so good, and everything else had worked so far, right?

Broccoli and cheese casserole with rye ingredients.

Well, it turned out that making the cheese sauce nearly filled my skillet to the brim. That made it pretty hard to fit in lots of broccoli, let alone top it with anything.

I nearly decided to scrap it as a blog post entirely since it went so far off the rails. But as I thought about it, I realized it all actually worked out and showed the importance of adapting in cooking.

Sure the recipe said some things, but as I read the signs of what was happening my braiser, I knew I needed to change. And so often when I actually fail at making something it’s because I ignore the signs. Something isn’t working early on but I press on anyway.

This time, I saw how much cheese sauce I had and not only was it too much for my braiser, but it was also too much for the amount of broccoli I had. So, thankfully, I had and added a head (the recipe called for 3, and I had 4). I also saw that the slices of bread weren’t enough, so I doubled that as well.

I didn’t even attempt to fit it in my skillet; I just found a casserole dish that was more than large enough.

And, honestly, it ended up working out well. I had to adapt, sure, and it was frustrating at times to realize my recipe wasn’t working as expected, but I’m infinitely happier for recognizing where things were going a-rye (sorry, I had to), and making changes.

Braiser in the back, casserole in the front.

So, here’s what I did, using my little skillet for the sauce only:

Ingredients

  • 4 large broccoli heads, roughly chopped, stems discarded
  • 1 ½ stick (12 T.) butter, divided
  • 1 small onion, finely chopped
  • ⅔ c. all-purpose flour
  • 1 (12 oz.) can/bottle of beer
  • 1 c. half and half
  • 12 oz. sharp cheddar cheese, shredded
  • 1 t. Worcestershire sauce
  • 1 t. dry mustard
  • ~4 slices rye bread, torn or cut into about ½ in. pieces
  • Salt and pepper, to taste
  • Cooking spray

Directions

Heat oven to 425 degrees.

Lightly coat an 8-inch by 11-inch casserole or larger with the cooking spray.

Meanwhile, add water to a large pot and bring to a boil on the stove, with enough water to cover the broccoli pieces. Add some salt, and then cook the broccoli until just tender, about 3 to 5 minutes. Drain and then let stand in ice water for about 5 minutes or until the sauce is prepared.

Meanwhile, melt 1 stick (8 T.) in a skillet or braiser on the stove top over medium heat. Add the onion, and cook until softened, about 8 minutes. Whisk in flour gradually and stir until incorporated and lightly browned, about 2 minutes. Whisk in beer and half and half. Cook until sauce thickens and begins to bubble, about 3 minutes. Add the cheese, Worcestershire sauce, mustard, and salt and pepper, and stir until smooth, adding cheese in batches as appropriate. Remove sauce from heat.

Meanwhile, melt the remaining half stick (4 T.) butter in a medium bowl, and add the rye slices, mixing until butter coats the bread.

To bring it all together, add the broccoli to the prepared casserole dish, pour on the cheese sauce, and then finally add the coated bread slices on top. Bake the mixture, uncovered, until the bread is golden brown and the cheese is bubbly, about 15 to 20 minutes, and enjoy!

Mustard mashup with smashed potatoes

Week two brings another test of what my little Le Creuset can hold.

And once again, I turned to Jamie Oliver’s wonderful “5 Ingredients” cookbook. So, I know, I know, I keep going on about it, but this week especially demonstrates how versatile and useful it is. Because, scandal, I used way more than 5 ingredients in this list. In fact, I mashed up two recipes, and then still added more. I’m calling it a mustard chicken mashup.

Mustard chicken mashup ingredients.

In doing so, I also tested the limits of the 9-inch braiser.

Tl; dr, I might have gone a tad overboard, but it all still worked out.

If you have a 10-inch skillet, this will be fine; if you are using a 9-incher, perhaps do scant amounts or stir very carefully.

As its name suggests, this recipe has some mustard and chicken. It also has some veggies, some cream, and Worcestershire. I stole the carrots and Worcestershire sauce from a 5-ingredient beef recipe that also called for mustard, but the chicken recipe sounded easier, and creamier.

And aside from some careful stirring, it all worked out really well. My only regret, actually, is that the stone ground mustard was rather mild and I had hoped for it to be stronger. If you love mustard like we do, I recommend getting a stronger mustard or mixing stone ground and Dijon mustards. I liked the way the stone ground looked mixed with heavy cream, but I wanted more of a kick.

Other than that, it was a perfectly wonderful and quick two- to three-serving dinner, especially when served with the smashed potatoes my sweetie made in our new Instant Pot. I also thought about serving it with rice, but potatoes were perfect; plus, then I get to have a mashup and smashed potatoes.

Easy as pie, but tastes like creamy mustard. Noms.

Here’s what I did:

Ingredients

  • 1 lb. chicken, sliced into thin strips
  • 1 carrot, thinly chopped
  • 1 onion, thinly sliced
  • 6 oz. Brussels sprouts
  • ⅔ c. heavy cream
  • ½ c. water
  • 1 T. Worcestershire sauce
  • 2 T. stone ground mustard (or to taste)
  • Pepper, to taste
  • Olive oil

Directions

Add some oil to your Le Creuset (or 9- to 10-inch skillet), and stir in the carrot, onion, and Brussels sprouts. Cook over medium heat about 3 to 5 minutes, stirring occasionally, to slightly soften. Add the chicken slices, and cook another 3 to 5 minutes until the chicken is mostly cooked through.

Then, add the mustard, cream, water, and Worcestershire. Add pepper to taste.

Bring to a boil, and then simmer, uncovered, stirring occasionally, until the liquid thickens slightly into a sauce and the chicken is cooked through.

Season with additional pepper or mustard as desired. Serve with smashed potatoes or rice, or on its own, and enjoy!

Just ducky end to Dutch oven year

With my final Dutch oven post, there could be really only one option. A recipe perfect for the season, for doing something special while also simple, and for something a little different.

I’ve wanted to make this duck rice recipe ever since returning from Portugal. There were, however, a couple of hangups. Mostly, that duck isn’t super easy to find in the US.

Duck rice ingredients.

The delay also helped me get a preferred recipe from one of our guides and also recoup from the trip, which in hindsight took a lot longer than expected.

Duck rice, I don’t think, was supposed to be one of our best meals, just given its simplicity but it thrilled our family. Only the seafood outshined it. It is, as its name suggests, duck in rice. It also has some Spanish chorizo, ham, port, a couple veggies, but really it’s very much rice and duck forward.

The duck I ordered from D’artagnan. If you really can’t find it or don’t want to spend the money, I think chicken thighs would do in a pinch. (Don’t tell the traditional version I said so!)

Everything turned out dandy and the work wasn’t too bad. My only regret is that I dared to make it a one-pot meal. I think the first two steps work well in one pot but to get the required crispy crunch on the edges, it needs a new and newly coated casserole dish. If you’ve got two Dutch ovens, that’s just ducky. For everyone else, I’d revise this one to cook the duck and rice separately in the Dutch oven and bring it all together in a duck fat or butter coated 9 x 13 casserole dish.

Deee-licious duck rice.

Here’s what I did, following a translated recipe as best I could:

Ingredients 

For meats and broth

  • 4 duck breasts (or ½ duck cut into pieces, or 6 boneless, skinless chicken thighs)
  • 1 large onion, chopped
  • 2 garlic cloves, minced
  • 1 carrot, chopped
  • 1 bay leaf
  • 12 oz. Spanish chorizo, sliced
  • 1 ham steak (about 100 g), cubed
  • ½ c. port wine
  • Pepper, to taste

For rice

  • 2 c. dry rice
  • 1 onion, chopped
  • 4 c. duck broth (from the cooking above, with some additional water or broth, as needed)
  • Duck fat, to taste (or butter)
  • Salt, to taste

Directions

For meats and broth

In a large Dutch oven, add the duck meat, chorizo, and ham. Add carrots, onions, garlic, and bay leaf. Over medium heat, slightly brown the duck. Add the port, and water to cover the meats (I added about 2 c. total and then used homemade broth for the rest in the rice, but if you prefer, add about 3 ½ c. to get the amount you need for broth for the rice.). Bring to a boil, lower the heat, and simmer the meats in liquids, covered, for about 45 minutes until the duck is cooked through.

Once the meat is finished, remove the Dutch oven from heat, and then use tongs or a slotted spoon to remove the duck, chorizo, and ham (along with any vegetables). Reserve the broth in a separate bowl or large measuring cup.

Once the duck is cool enough to handle, shred it or cut it into cubes, removing any fat or skin as appropriate.

For the rice

In the same Dutch oven, or separately, heat the duck fat over medium heat. Add the onion and saute for about 5 minutes. Add the rice in and fry slightly. Add in the broth, seasoning with salt, and bring to a boil. Once boiling, reduce heat, and cover. Cook to package instructions, or between 15 to 20 minutes, until the rice is cooked through.

To finish

Heat oven to 425 degrees.

Once rice is finished, you can stir the meats back into the rice, cover the Dutch oven, and bake the mixture for about 20 minutes uncovered to let the flavors combine.

Or, for more crunch, (but dirtying another dish), you can (and dare I say, should) coat a large casserole dish or second Dutch oven in additional duck fat and then pour in about half the rice, mix in the duck, top with the remaining rice, and then top with chorizo and ham pieces, before baking for about 20 to 25 minutes uncovered.

Either way, I do hope you enjoy this treat, and have a Happy New Year! I’ll be back in 2020 with something completely different.

Chicken soup for the solstice

As we wind down the year, I have to admit 2019 has not been the best. There have been some highs for sure but, man, the daily slog of life has taken its toll this year.

But as we approach the shortest day of the year, and then the day after when the sun shines a little more each day, I’m reminded to be grateful for all the little things that add up to big stuff.

This week that meant taking a mental break from the news. My podcasts were mostly pop culture and holiday themed. My television viewing mostly consisted of Rifftrax and MST3K. The little bit of news that did seep through included the fact that we finally impeached the motherfucker.

One other thing that helped keep my mind off of it all was the days-long process to make the most epic of comfort foods, chicken noodle soup.

Chicken noodle soup ingredients.

Don’t let the “days-long” scare you. The first day was making a broth, which was about 5 minutes of effort and an hour of down time, and can be done in advance (I often make it and freeze for future use). The second day was baking a whole chicken, which was about 10 minutes of effort (including deglazing) and 1 ½ hours of down time, which can also be done in advance.

The last day was a little more labor intensive (I watched most of the Grumpy Cat Christmas movie while I cooked), but that included some cleaning, my required blogging pictures, and some dawdling. Still, picking apart a whole chicken takes time and so does chopping the extra vegetables that make my ideal chicken noodle soup.

The recipe is based off of a very fancy Saveur recipe that I’ve made before but I added some things to make it fit my ideal of the dish. Including the fact that it is mostly a chicken noodle stew by the time I’m finished. I still kept their parts, just also added some of my own.

There’s a little bit of broth poking through. Right?

Here’s what I did:

Ingredients

  • 1 whole chicken, about 3-4 lbs.
  • 2 T. olive oil, plus more for sauteing
  • Salt and pepper, to taste
  • 12 c. chicken stock, divided
  • 1 large onion, chopped
  • 3 stalks celery, chopped
  • 2 carrots, chopped
  • 3 c. frozen corn kernels
  • 1 t. crushed saffron threads
  • 12 oz. egg noodles (I had a 14 oz. package and threw in the whole thing plus an additional cup of broth)
  • Crusty bread, for serving (optional)

Directions

Heat oven to 400 degrees. In a 9 x 13 inch dish (a Dutch oven would probably work, but a casserole dish is what I used), rub the chicken with the olive oil and then season well with salt and pepper. Bake the chicken until golden brown and tender, about 1 hour and 15 minutes. Carefully transfer the chicken to a cutting board and reserve the oil, etc, in the baking dish.

Once dish is slightly cooled, pour 2 c. of the stock into the baking dish and scrape with a wooden spoon to deglaze the bottom. (I waited until both broth and dish were pretty cool, and still had no problems, and then poured it into a separate container than the rest of the broth before bringing the whole dish together the next day.)

Once chicken is cool enough to handle or the next day, pick meat from the chicken and tear or chop into bite-sized pieces. You can discard the skin and bones, or freeze them, like I do, for a future chicken stock.

When ready to complete the soup, saute the onions, celery, and carrots in a little bit of oil for about 5 minutes in a large Dutch oven over medium heat. Then, pour in the remaining 10 cups of stock and add in the 2 c. from the deglaze (which will look like gravy if you’ve refrigerated it overnight, like I did) as well as the chicken pieces. Add the corn and saffron to the broth and bring to a boil. Reduce heat to maintain a simmer and continue to cook, uncovered, for about 15 minutes until the stock is slightly reduced.

Add the egg noodles and cook for an additional 10 to 12 minutes, until cooked through. Season the soup with more salt and pepper, if desired. Enjoy, and happy holidays, dear readers!

She’s got to have gumbo

With this post, I have only two more weeks with the Dutch oven, and I’ve had those last two recipes planned for a little while now.

The only question was what to do for my third to last post of the year. And as I searched through my list, and knowing that I had a recent shipment of Cajun meats, there really could only be one answer: Gumbo.

Gumbo ingredients.

Ever since I first tried this stew/soup, this Midwestern gal has loved every bit of it. The meat, the vegetables, the fat, the roux, the way the flavors combine, and the way it all comes together in a beautiful presentation.

I’ve made it several different ways over the years, one time cheekily making it vegetarian by using fake chicken meat and sausage. My typical method, though, involves actual chicken and andouille sausage.

But this time I’d ordered some tasso ham (and, of course, some andouille sausage) from my favorite D’artagnan along with some other meat I need for my last Dutch oven meal of the year. And I happened to have about a pound of shrimp in my freezer. I’d never made it with seafood or ham but gumbo is nothing if not adaptable.

Readers, I think it was my finest attempt yet. Of course, I probably say that every time (OK, the vegetarian one was not the best). It’s just amazing.

It doesn’t look delicious, but trust me, this is some of the best tasting food in the world. And I have leftovers.

Here’s what I did:

Ingredients

  • ½ c. oil/fat (lard or butter are my preferences)
  • ½ c. flour
  • 1 onion, chopped
  • 1 ½ bell pepper, chopped
  • 2-3 stalks celery, chopped
  • 10 oz. okra, chopped
  • 4 cloves garlic, minced
  • 2 quarts chicken stock (preferably homemade, and most stocks would work … maybe not beef)
  • ½ T. paprika (I like a combo of smoked and hot)
  • Cayenne pepper, to taste
  • 2 t. garlic powder
  • 2 t. oregano
  • 1 t. celery seeds (optional)
  • 1 t. dried thyme
  • Salt and pepper, to taste
  • 1 lb. peeled and deveined shrimp
  • 1 lb. andouille sausage, sliced
  • ~1 lb. tasso ham, chopped (or other ham)
  • 1 bunch scallions, sliced, for serving
  • Chopped parsley, to taste, for serving
  • Cooked white rice, for about 6 servings

Note: The spices can be substituted with creole seasoning if preferred.

Directions

Brown the sausage and ham in your Dutch oven. Then remove the meat but keep as much schmutz as possible.

Add the oil/butter/lard to the Dutch oven and melt or warm (I’m partial to a mix of bacon fat and butter). Slowly add the flour and whisk to form a roux.

Cook the mixture until it’s somewhere between golden brown to coffee brown, depending on desired thickness and flavor profile. (This link provides a good explainer on how to make a roux and the pros and cons of cooking shorter or longer.)

Add the bell pepper, onion, and celery, and cook for about 5 minutes until slightly softened, stirring often. Add the garlic and cook for another minute, continuing to stir.

Add the okra, herbs, spices, salt and pepper, and then slowly add the stock, stirring frequently. Add back in the sausage and ham. Bring to a boil, then cover, and simmer for about an hour.

Prepare the rice while the soup cooks. Just before serving, add the shrimp, and cook for about another 5 minutes. Meanwhile, slice the scallions and chop the parsley. Spoon rice into a bowl and then ladle on the soup. Top with scallions and parsley and enjoy!