Medium-shelf margarita cheesecake

One of the greatest — and most me — gifts I ever got was a cookbook called Booze Cakes.

As its name suggests, it’s cakes made with booze. Shocking, I know. It could have been just a novelty, but it actually has some great cake recipes, and ones that have clever ways of adapting classic alcoholic drinks into a cake.

Among my favorites are eggnog cupcakes. They have the eggnog ingredients in the cake, of course, but the cupcakes also have their centers cut out, and topped with a rummy eggnog pudding and a rummy whipped topping, that makes them actually resemble little cups filled with eggnog. Their tea cakes become Long Island ice tea cakes.

What I’m saying is, it’s inventive, and tasty.

Yet, even after the many years I’ve had it, I still haven’t tried them all, and I do tend to stick to my favorites. This year offers a chance to try some more. Even though, as cake, most recipes call for either a springform pan, or a pair of 9-inch pans, I figured this year is about making the most of what you have so I would give my little Le Creuset a shot.

I started easy enough, with a margarita cheesecake.

Margarita cheesecake ingredients.

Or so, I thought.

While (spoiler alert!) the end result was still amazingly tasty and did manage to taste like both margaritas and cheesecake, the vessel was not as ideal as it seemed. I think partially because I pre-baked the crust too near the bottom of the oven but also because cast iron cooks hotter, much of the wonderful cornmeal crust stuck to the bottom of the skillet. Then, a 9-inch springform is a little different than a 9-inch pie plate so I ended up having way too much filling compared to the area I had left to fill.

I made a second all cheesecake bake but haven’t dared eat it yet so it will likely almost all go to waste. I guess what I’m saying is this might still be OK if not ideal for a cast iron (given the way it holds heat) but it’d work better in a 10-inch skillet than a little 9-inch braiser.

Either way, I’m pretty sure I’m going to make it again, because that cornmeal crust and the lime flavor (with a dash of tequila and triple sec) was just too good to only have once.

A note on the booze: I’m not much for buying top-shelf stuff to use for cooking even though the recipe was technically called a top-shelf margarita cheesecake. I’m cheap and already pay for good whiskey, so I went with what I’m calling the medium-shelf level. Kind of like the Medium Place, there are worse tequilas and triple secs, but I couldn’t talk myself into the good stuff. Besides, I’m no tequila aficionado so mediocre is fine by me. And it all worked out fine so don’t stress if you want to go cheap; the flavors will mix just fine without splurging on the good stuff (unless you really want to!).

TEQUILA!

Here’s what I did (following the recipe, except the garnishes, even though it is a little off for a 9-inch pie plate/braiser):

Ingredients 

For the crust: 

  • 1 stick (½ c.) unsalted butter (plus more for coating pan)
  • ¼ c. sugar
  • ½ c. all-purpose flour
  • ½ c. yellow cornmeal
  • ¼ t. salt (about a hefty pinch)

For the cheesecake filling: 

  • 3 (8 oz.) packages cream cheese (I softened mine but the recipe doesn’t specifically call for it)
  • 1 c. sugar
  • 4 eggs
  • ¼ c. fresh lime juice
  • 2 T. tequila
  • 2 T. triple sec
  • Zest of 1 lime (the recipe called for zest of half a lime, but I really like lime flavor)

For the whipped cream: 

  • 1 c. heavy cream
  • ½ c. confectioners’ sugar
  • 1 T. fresh lime juice
  • 2 T. tequila
  • 2 T. triple sec

Directions 

For the crust: 

Heat oven to 350 and grease the bottom and sides of a 9- to 10-inch skillet (or other container as appropriate).

In a mixing bowl, cream butter and sugar until light and fluffy, 3 to 5 minutes. Gradually add flour, cornmeal, and salt, and mix to combine. Press the mixture into the bottom of the pan and up the sides as much as possible, and bake 15 to 20 minutes until golden brown. Let cool.

For the cheesecake filling: 

In a mixing bowl, combine the cream cheese and sugar and beat until smooth, 3 to 5 minutes. Beat in eggs one at a time. Then, add in the lime juice, tequila, triple sec, and lime zest, and stir or beat to combine.

Pour mixture over the cooled crust, and bake for 45 to 50 minutes, until the filling is cooked through (still at 350 degrees). Remove from oven once done and let cool for about an hour; then, refrigerate at least 6 hours or overnight.

For the whipped cream: 

In a mixing bowl, combine the cream, confectioners’ sugar, lime juice, tequila, and triple sec, starting on low speed but gradually increasing until peaks form.

To finish: 

Spread the margarita cream on top of the chilled cheesecake, and enjoy (preferably with a good, homemade classic margarita)!

The un-pearable lightness of being

OK, now that we’ve survived the Iowa caucus, if not unscathed, and it’s a holiday of sorts, I think it’s time for a light, easy dessert that includes strong alcohol.

A few weeks ago, my sweetie turned me on to a French dessert called clafoutis as a possible option for my little braiser. Once I started looking at the options, they appeared endless. And delicious.

Cherries are traditional, which are fine if unexciting. Chocolate and nuts sound like something to save for later, as is the one with raspberries for a more summer seasonal option. This endless winter calls for pears.

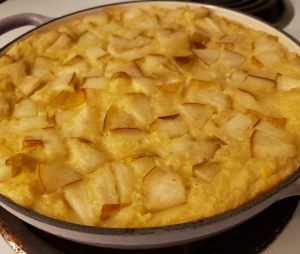
Pear clafoutis recipe.

I don’t know why I associate pears with this season, but I do. Even better, my sweetie found a pear eau de vie liqueur that is meant to be served with and on top of the clafoutis. It was a bit pricey so I’m grateful he didn’t look at the cost until after he was home with it in hand. It’s also quite good, and I’ll probably be splurging on a raspberry one later to go with the summer version of this.

The process of making clafoutis is so easy that Epicurious has a base recipe it compares to waffle batter, and then includes some common ways to make it, that mostly includes adding 2 c. of some kind of fruit. To be honest, as much as I have enjoyed the eau de vie, it’d be fine without adding 2 T. on top.

The flan-like finale with fruit is just fine on its own. However, as with so much these last three years, the alcohol helps.

Despite this, I admit I did forget the melted butter the first time. I was not disappointed I had to make it again. It also didn’t taste that much different, just fluffed more with the addition of butter, and still stuck to the bottom of my braiser either way. It was also delicious both ways.

Basically, it’s almost impossible to mess up, and it’s a perfect way to celebrate the end of all the texts, calls, and door-knocks, and if you’re into that sort of thing, Valentine’s Day.

So close … I can practically taste it.

Here’s what I did, following the Epicurious recipe, but adding some ginger for a tiny kick:

Ingredients 

  • 1 c. whole milk
  • 3 eggs
  • ½ c. sugar
  • 1 t. vanilla extract
  • 3 t. grated ginger, optional
  • 2 T. butter, melted (I guess also optional, but I’d stick with it)
  • ½ c. all-purpose flour
  • 1 pear, cored and cut into pieces
  • 2 T. pear eau de vie liqueur, optional, and more for serving, if using

Directions

Preheat oven to 325 degrees. In a large bowl, whisk together the milk, eggs, sugar, vanilla, ginger if using, and butter. Mix until sugar is dissolved. Add in the flour and whisk until smooth.

Pour into a 9- to 10-inch skillet or braiser.

Scatter the fruit on top.

Bake until the clafoutis is puffed and golden, about 35 to 40 minutes. Just before serving (immediately), drizzle on 2 T. of the eau de vie, and enjoy!

It’s summer, time for fruit cobbler

As soon as summer hits, it’s only a matter of time before I start buying up berries (and also often peaches). As much as I love vegetables, I’m not overly fond of fruit. Sure, I like it OK, but most fruit items in my cupboard or refrigerator are as likely to go bad as I am to eat them before they rot.

But I have my favorites.

I love on-sale cherries, too-hard white peaches, and berries in the summertime.

So, I couldn’t help but buy up blackberries when they were on sale and make it into a Dutch oven cobbler.

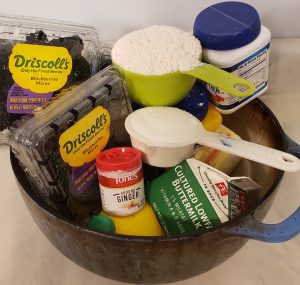
Blackberry cobbler ingredients.

I consulted no fewer than three recipes to come up with my perfect summer dessert, but none of them were exactly what I was looking for. My sweetie suggested blackberries among the berries, and none of the recipes quite worked. Most were, of course, for peach cobblers, which called for cinnamon and often nutmeg. Betty Crocker wisely suggested skipping that step (hers only called for cinnamon) if one were making blueberry cobbler. I felt the same should be true of blackberries.

But I also thought it needed a little something more. Maybe true, maybe not, but I have to say I quite liked my ultimate addition: a small sprinkling of ground ginger.

I admit this cobbler won’t be for everyone. I skimped on the sweet, leaned into the tartness, and added the spice. But my sweetie and I devoured the whole thing with glee and in record time for us two savory-food lovers. It was a real treat.

*drool*

Here’s what I did:

Ingredients

  • 8 T. (1 stick) butter, divided
  • 4 pints (about 5 c.) blackberries
  • 6 T. sugar, divided
  • 1 T. lemon juice
  • 2 t. cornstarch
  • 1 t. salt, divided
  • 1 t. ground ginger
  • 1 c. flour
  • 2 t. baking powder
  • ½ to ¾ c. buttermilk

Directions

Heat oven to 400 degrees.

On the stovetop, melt 4 T. butter in a large Dutch oven over medium heat. Add the blackberries, 2 T. sugar, ½ t. salt, and the ginger, and cook, stirring occasionally for 5 to 6 minutes. Meanwhile, mix together the lemon juice and cornstarch in a small bowl or large measuring cup. Once the blackberries have started to break down, add the cornstarch mixture and stir to combine. Turn off or remove from heat.

Mix together the flour, baking powder, 2 T. sugar, and remaining ½ t. salt. Cut in the remaining 4 T. of butter using a pastry blender or 2 knives or your fingers, until small chickpea-sized chunks form. Add ½ c. buttermilk and stir with a fork until combined to form a wet shaggy dough, adding more buttermilk as necessary.

Drop spoonfuls of the dough on top of the blackberry mixture (it’s OK if some open spots show through). Sprinkle the remaining 2 T. on top of the mixture, and carefully place the Dutch oven, uncovered, in the oven. Bake for about 20 to 22 minutes, until the cobbler on top is lightly golden brown. Remove from oven, let mostly cool, and enjoy (a la mode, if desired)!

Breaking babka

During my year of bread, babka — or the similar povitica — was always on my list but I was too afraid to spend the time needed to make this beautiful treat.

Fate tempted me back when I found a wonderful looking babka recipe in my Cook It In Your Dutch Oven cookbook from America’s Test Kitchen.

I won’t lie, it’s a multi-day affair. That bothers me less now that I work your standard 9 to 5 with weekends free. But it does take some planning, say, when you’re scheduled to have 3 hours of your afternoon spent at the theater with Avengers: Endgame.

Forgot an ingredients photo but here’s my table with the 18 x 24 dough covered in filling, pre-roll.

Even with that, I found it to be worth the effort. So much so that I made it two weeks in a row. (I may have also seen Endgame two weeks in a row.)

Mostly I just wanted to try to redo the recipe with my favorite filling. I know, I know it’s sacrilege to think there’s something better than chocolate, but I frickin’ love cream cheese filling.

The second time worked slightly better in some ways, but I think that’s mostly just the nature of breads. Sometimes the mix needs some tweaking.

My first attempt had the stand mixer get the dough perfectly concocted in well short of the 10 to 12 minutes recommended, so I stopped it. But that meant that I had to let my dough rise for longer because the yeast didn’t activate as well. The second time it was sticky and slow like it was supposed to so everything rose well.

The second time my filling was softer because I probably could have used a little more cream cheese. (I replaced 12 oz. of chocolate chunks/cocoa with 8 oz. cream cheese, and I think 12 oz. may have made a better, thicker consistency, but it still worked.) The first time it was smooth and just stiff enough to spread and keep a nice firm shape.

Either way, as long as you’ve done a handful of breads before, I think anyone can make this one. It wasn’t even *that* hard to make it look pretty.

The creamy cream cheese one.
The gooey chocolate one.

Here’s what I did:

Ingredients

For Dough

  • 4 c. all-purpose flour
  • 1 T. yeast (The recipe calls for instant or rapid-rise, which I didn’t use. If you knead well in the stand mixer, it didn’t seem to matter. I had a good rise the second time.)
  • 1 t. salt
  • 1 c. whole milk (I used 2% the second time and didn’t notice any major differences.)
  • ½ c. granulated sugar
  • 4 large egg yolks
  • 2 t. vanilla extract
  • 2 sticks (16 T.) butter, softened

For Chocolate Filling

  • 4 oz. bittersweet chocolate, chopped
  • 1 stick (8 T.) butter
  • 6 T. unsweetened cocoa powder
  • ½ c. confectioners’ sugar
  • 2 large egg whites

For Cream Cheese Filling

  • 8 to 12 oz. cream cheese, softened
  • 1 stick (8 T.) butter
  • ½ c. confectioners’ sugar
  • 2 large egg whites

For Finishing

  • 1 large egg, lightly beaten, with 1 T. water and pinch of salt

Directions

For Dough

Whisk together flour, yeast, and salt, in the bowl of a stand mixer. In a separate bowl (that holds at least 4 c.), mix together the milk, sugar, egg yolks, and vanilla, until the sugar has dissolved. Use a dough hook attachment on low, and begin to slowly add the milk mixture to the flour mixture, and continue to mix until the dough starts to form.

Increase the speed on the stand mixer to medium-low, and add the 2 sticks of butter 1 T. at a time, until the butter is fully incorporated, about 3 to 4 minutes. Continue to knead in the stand mixer for another 10 to 12 minutes until the dough is smooth, elastic, and clears the sides of the bowls. (Like I said, this happened within a couple minutes the first time, and I should have kneaded by hand for longer instead of stopping when a clump formed, but the second time it was definitely too sticky to handle until about 10 to 12 minutes, and I even added a titch more flour.)

Transfer the dough to a lightly floured counter and knead by hand for about 30 seconds and form a smooth, round ball. Place the dough, seam side down, in a large greased bowl. Cover and let rise by about half for 1 ½ to 2 hours. Once risen, refrigerate dough until it is firm, at least 1 hour to up to 24 hours (an ideal time to go watch a long action-packed superhero movie). Let rest at room temperature for 15 minutes if you refrigerate for much longer than an hour.

For (either) Filling

Microwave the chocolate chunks, cocoa, and butter OR the cream cheese and butter in a medium bowl for about 3 minutes at 50 percent power, stirring often, until the mixture has melted and a smooth, soft filling forms. Add the confectioners’ sugar, and then let cool for about 30 minutes. Then, whisk in the egg whites, until fully combined and the mixture looks glossy (less noticeable with the cream cheese filling, so mix well).

To Combine

Press the dough down to deflate, and then transfer to a lightly floured counter (I had to use my whole damn kitchen table so make sure you have space). Roll dough into an 18 inch by 24 inch rectangle, keeping the shorter side parallel to the counter. Once rolled out, spread the filling on the dough, leaving about a ½ inch border around the edge.

Roll the dough away from you into a firm, taut cylinder. Pinch to close the seam. Wrap in plastic and refrigerate (on a large baking sheet if possible but mine weren’t big enough so I just cleared a space on a shelf) for about 30 minutes.

To Finish

Meanwhile, make a foil sling for the Dutch oven by folding in half 2 long sheets of aluminum foil, so you have 2 long, roughly 7 inch sheets. Place sheets perpendicular to each other, like a lowercase t, and carefully smooth down into the Dutch oven bowl. Spray with a little bit of oil.

When dough is ready, transfer the log back to the lightly floured counter with the short end facing you. Carefully cut the dough in half lengthwise so that you will have the swirls of filling facing up to you. Pinch together the two dough halves and then braid end over end, as tightly as possible. Pinch the second end together, and then wrap into a spiral with the ends tucked underneath.

Put the dough in the prepared Dutch oven, and let rise for another 1 ½ to 2 hours.

Heat the oven to 350 degrees, and brush the egg mixture on top of the dough.

Cover pot, and bake for about 20 minutes. Uncover, rotate pot, and continue to bake for another 35 to 45 minutes, until the loaf is a deep golden brown.

Lift dough out of pot using the foil overhang, and let cool completely (about 3 hours) on a wire rack, and then finally, enjoy!

You’ll love a Yule log for Christmas

Long before I called a sheet pan a sheet pan, it was a jelly roll pan. I think it almost certainly stems from my mom making a Yule log regularly throughout my childhood.

Yule log ingredients.

I had no idea why my mom made the Christmas cake annually or what a log has to do with Christmas, and a quick perusal of Wikipedia doesn’t offer any clear answers to the latter.

Mom tells me she started making it for her dad, my Papa, and he liked it so much, she kept doing it. Wikipedia also says the cake originated in the region that includes his ancestral home of Belgium, but apparently that’s a coincidence.

Which is fair, it’s just a damn good cake.

The Yule log, also called a buche de Noel, has few ingredients but they’re used to make three separate parts that make it time-consuming if not difficult. There’s the eggy chocolate cake. There’s the vanilla cream filling. There’s the mocha buttercream frosting. And then, there’s the assembly.

Despite the difficulty, though, my sweetie rightly describes it as similar but easier tiramisu.

And besides, it’s a Christmas cake, so you make it just once a year. That makes it totally worth it.

A cake so good I’m disappointed Christmas comes once a year.

Here’s what I did following Mom’s recipe:

Ingredients

Cake

  • 5 eggs, separated
  • 2/3 c. sugar
  • 3 T. unsweetened cocoa
  • 2 T. flour, plus more for sheet pan

Filling

  • 1 c. heavy cream
  • 1 t. vanilla
  • 1 T. confectioner’s sugar

Mocha buttercream frosting

  • 1 c. unsalted butter, softened, plus more for greasing sheet pan
  • 1/2 confectioner’s sugar
  • 1 T. unsweetened cocoa
  • 1 T. instant coffee
  • 1 t. warm water

To finish

  • Confectioner’s sugar
  • 2 T. finely-chopped pistachio nuts

Directions

Cake

Heat oven to 350 degrees. Grease a 15 x 10 x 1 inch jelly roll (sheet) pan and line bottom with parchment paper. Grease and lightly flour paper, tapping off excess flour.

Beat egg whites in a small bowl until soft peaks form.

Separately, beat egg yolks in a large bowl at high speed until light and fluffy. Gradually add sugar and continue to beat until mixture is thick and pale in color. Beat in cocoa and flour at low speed.

Fold beaten egg whites into yolk mixture until no streaks of white remain.

Spread batter evenly in the prepared pan. Bake for about 15 minutes. Remove from oven when cake springs back to a light touch

Let cool completely on a wire rack before removing from the pan.

Mocha buttercream frosting

While cake bakes, prepare the frosting. Beat the softened butter until fluffy in a small bowl. Beat in sugar and cocoa.

Dissolve coffee in water, and beat into butter mixture.

Store in cool (but not cold) place as you don’t want the butter to melt, but you don’t want the frosting to get too solid to spread.

Filling

When cake is cool, remove it from the pan by inverting onto a towel or *carefully* lifting using parchment paper.

Cut off 1/2 to 1 inch from the edges of all four sides of the cake (to remove the crunchier bits) and reserve for later use.

Beat heavy cream until thickened. Add confectioner’s sugar and vanilla. Continue beating until stiff enough to spread.

Spread mixture evenly across the cake. Roll up the cake, starting with one of the shorter sides. Place cake roll seam-side down on a serving tray.

Finishing

Frost the cake roll all over (including ends) with the mocha buttercream frosting. Roll up some or all of the reserved cake ends and set onto the frosted cake (these are supposed to look like cut-off branches). Frost these well.

Run a fork across the frosted cake to mimic bark lines. Use the fork to create the same lines along the sides of the “branches” to create “age rings” in the center of these “branches.”

Press some of the chopped pistachios into the “cut” ends of the log (ends and the circular “branches) to mimic some moss/lichens.

Dust with confectioner’s sugar (to mimic dusting of snow). Enjoy and Merry Christmas/happy holidays to all who celebrate the season.

My favorite mistake

I’m going to say right up front that I forked this one up royally from beginning to end. So, I can’t say that it was a great recipe, but I do think that it’s salvageable, as in, the blame lies with me.

And, to be honest, I still had a lot of fun making it.

It’s been a stressful week, and I came home grumpy. But once I started to make this week’s poppy seed streusel and listening to podcasts about “Doctor Who” (*nerd alert*), I felt immensely better. I didn’t even really care that I was forking up.

Streusel ingredients. Notably not pictured is the milk I should have used.

I have loved my Amy Thielen “The New Midwestern Table” cookbook, so the fact that this recipe didn’t turn out I think is a fluke. I have made a lot of things from it, including hand pies this year.

And, seriously, it has a butt-ton of butter, sugar, and flour, so it should have been perfect.

Also, while her recipe said to bake for a half hour, I knew it looked done about 7 minutes early, and instead of trusting my gut, I let it go for another 5.

So, the fact that it’s hard as a rock, is on me.

Then, the second page of the recipe really spends a lot of time on the importance of grinding the poppy seeds well. This was after I had, uh, not done that. See, I bought a bunch of cream and figured there was not harm in replacing whole milk with cream. Except that, obviously, cream whips quite quickly. So, when I mixed them together in the blender, there was whipped cream well before poppy seed broke and bruised.

I made up for it by adding water instead of more cream later … but the damage (or lack thereof to the poppy seeds) was done.

So, the fact that the poppy seeds are intact and the innards of the streusel didn’t turn out as expected, is also on me.

Again, though, it was an adventure to make, and I’m pretty sure if I follow the recipe, and trust my gut, I’ll nail it next time.

It doesn’t look that bad until you noticed the blackened edges and that that ain’t *lightly* golden.

Here’s what I did. Actually, scratch that, here’s what I should have done:

Ingredients

  • ¾ c. poppy seeds
  • ¾ c. whole milk (DO NOT SUBSTITUTE)
  • 1 c. raisins
  • 3 c. sugar, divided
  • ½ c. heavy cream
  • 2 t. apple cider vinegar
  • 3 c. all-purpose flour
  • ½ t. sea salt
  • 3 sticks butter (the recipe calls for salted; I used un- so hopefully that didn’t mess things up), and more for coating the pan, all at room temperature

Directions

Combine poppy seeds and MILK in a blender and process on high until the poppy seeds have broken down down. Add the raisins, 1 c. sugar, the cream, and the vinegar. Process until smooth.

Pour the mixture into a medium skillet and bring to a simmer over medium heat. Stir often to prevent it from sticking, and continue reducing heat to keep the mixture at a slow bubble. Keep cooking until the mixture thickens to like jam, about 30 minutes. I’d say a little less but that might just be because I overcooked the thing from top to bottom in the oven.

Meanwhile, heat the oven to 375 degrees, and lightly butter a 9-inch by 13-inch sheet pan.

In a large bowl, combine the flour, the remaining 2 c. sugar, salt, and the butter. Use your fingers to work the butter into the flour mixture until well combined, and the mixture holds its shape when squeezed together.

Scoop 5 loose cups of the butter mixture onto the sheet pan, and use your hands to spread evenly, and then gently press down. Bake for about 10 minutes, and then let cool for about 10 minutes.

Then, pour the poppy seed mixture on top, and spread until smooth. Then squeeze the remaining butter mixture on top of the poppy seed mix to make decorative nuggets, leaving some space for the filling to show through.

Bake for about 30 minutes, or until LIGHTLY golden brown, *checking often*, and then cool in the pan before cutting into squares. Enjoy, if you got this far and succeeded!


Giving thanks and baking cookies

As promised, I am posting this week’s recipe pre-Thanksgiving early so people can enjoy their loved ones. Or, at least tune out of the world wide web for a few days.

My recipe this week is my Grandma Crippes’ pumpkin chocolate chip cookies. I’ve made them many, many times before, and I almost get them wrong every time.

Grandma’s pumpkin chocolate chip cookie ingredients.

That’s because the recipe I use is on an index card my grandma gave me years ago when I asked for some of her favorites. It’s carefully hand-written before her arthritis got too bad for her to even cook anymore.

But her wonderful absent-mindedness that I have frustratingly inherited means that the ingredient list doesn’t mention eggs, even though one of the first directions is to cream crisco and sugar, and then add eggs. It doesn’t even say how many.

Since it’s plural, I’ve assumed two eggs for years, and the recipe comes out right so it works either way.

Now that grandma’s gone, those recipes are among my most prized possessions. Especially since these days, most loving notes are typed instead of carefully — or not-so-carefully — handwritten. (And get off my lawn, you kids.)

As I think about this year, and because of my natural pessimism (another Crippes trait), I mostly remember the worst things about it. There’s no doubt it’s been a challenging year, not just for the country but also for my loved ones and for myself.

But this Thanksgiving as we’re literally giving thanks, I am also reminded that it hasn’t been all bad. My sweetie, myself, my Pookie, and a couple of our kitties have had some health scares this year, but everyone’s mostly OK managing chronic conditions. Not everyone is still with us, but so many still are.

Not every goal for the year has been achieved, but there’s still time. So, I’ll stop wasting my readers’ time, and let them get to work giving thanks, visiting loved ones, remembering those who are gone, and — hopefully — baking cookies.

Nom nom noms.

Happy Thanksgiving!

Here’s what I did:

Ingredients

  • ½ c. crisco
  • 1 c. sugar
  • 2 eggs
  • 1 c. Libby’s pumpkin
  • 2 c. all-purpose flour
  • 4 t. baking powder
  • 1 t. salt
  • 2 ½ t. cinnamon
  • ½ t. nutmeg
  • ¼ t. ground ginger (I used more)
  • 1 ½ c. chocolate chips (I used semisweet)

Directions

Heat oven to 350 degrees, and grease a large sheet pan. (This makes about 3 dozen cookies so you should grease multiple sheet pans or plan to grease/reuse the pan.)

In a medium bowl, mix together the dry ingredients: flour, baking powder, salt, and spices.

Cream the crisco; and add sugar gradually. Cream until light and fluffy. Add the eggs, and pumpkin, and mix well. Add the mixed dry ingredients, and mix until blended.

Add the chocolate chips.

Drop by teaspoonfuls onto the greased sheet pan (leaving a little room between them), and bake for 15 minutes — they don’t change shape much so I usually touch lightly to make sure they’re puffy, and then take out of the oven. Repeat as necessary to use up all the dough, and enjoy!

On S’mores and stupid, stupid ideas

So, one year on a whim, and because it was summer, I made a S’mores pie to share with my sweets-loving family. It was so well received that I decided to do it again the next year.

Since I’m doing sheet pans this year, I wanted to try something different. Pretty early in the year, well before cookout season, I Googled to ensure that sheet pan S’mores recipes abounded. No surprise, they did.

My plan was set. When we had our Crippes clan get together, I would surprise everyone — particularly my cousin Madison who raves about the S’mores pie — with sheet pan S’mores.

Sheet pan S’mores ingredients, except I think I skipped the salt.

When I finally started looking before the mini-family reunion, I of course, saw several recipes that were simply laying graham crackers onto a sheet pan, topping with Hershey’s, and a marshmallow, and calling it good. I couldn’t do that. I had to impress. So, I found something that was a little more effort. A pseudo graham cracker crust, semi-sweet chocolate chips for ease of melting, and a beautiful broil to make the mallows just right.

What an idiot.

I was nervous from the outset. Despite following the recipe — a random site I won’t link to so as not to besmirch a recipe that didn’t work for me or to discredit them where I deviated slightly from the recipe — the crust didn’t seem like it came together all that well. Oh well, I said, once it bakes, it’ll probably be better. I baked it, and it looked fine. So far, so good.

Then, I added the chips, and let them sit. They didn’t melt well. Then, I put them back in the oven to melt better and for ease of spreading. No dice. OK, use up some more mini chips from my Aunt Sue’s supply. Give up on spreading when still nothing worked.

Finally, broil the marshmallows on top. Perfection.

Cut into the monstrosity I’d created, and &#*S@%#, the crust didn’t really work after all.

The good news is that no one cared. My aunt who is a professional caterer and foodie like myself gave encouraging tips and troubleshooting advice. My cousin Maddy couldn’t have been more pleased no matter how messy, and everyone else, enjoyed them as well.

I guess it turns out that no matter how badly you mess up S’mores, they’re impossible to screw up. For that, I’m quite grateful. But next time, I’ll stick to the campfire.

OK, OK, it looks pretty good, and OK, it tastes pretty good too. But it’s even more messy than the ones made by campfire.

Here’s what I did for any adventuring souls, or those who want to figure out what I did wrong:

Ingredients

  • 1 (13.5 oz.) box graham cracker crumbs
  • ¼ c. (½ stick) unsalted butter
  • ½ t. cinnamon
  • ¼ c. sugar
  • 2 eggs
  • 1 ½ (~12 oz.) bags semi-sweet chocolate chips
  • 36 marshmallows (they make square S’mores-specific ones now!)

Directions

Heat oven to 350 degrees.

Mix together the graham cracker crumbs, butter, cinnamon, sugar, and the two eggs. Pour and press mixture into a large, rimmed sheet pan. Bake for about 10 minutes until golden.

Spread on the chocolate chip pieces, and allow to melt. Perhaps by putting in the oven if spreading isn’t going well?

Let cool for 30 minutes or until close to ready to serve.

Heat oven to broil.

Place marshmallows on top of the chocolate, and cook for 1 to 2 minutes until the mallows are cooked to desired brownness, watching constantly. Serve immediately, and enjoy the mess!

Piece of (strawberry short) cake

I’m starting to sound like a broken record, but for the third week in a row, I was in search of a recipe that was easy and quick. In fact, this is the first time this year that I made this week’s recipe on the same day I posted my blog.

Like any (recovering) journalist, I live for a deadline.

Thankfully, I picked another recipe this week that not only was as simple as it seemed but came together with little effort. I needed the latter after losing an altercation with a cat that has left my right hand only partially usable.

Strawberry shortcake bars also happen to be delicious and the kind of treat that will please my in-laws as we head to St. Louis this weekend to see them.

Strawberry shortcake bars ingredients (sans flour because I keep it in a big honkin’ container because I use that much).

Everything’s coming up Christinia!

Because I’m cutting it down to the wire (again), two quick notes on this recipe:

  • It’s pretty strong on the shortcake, which I like, but it may be a bit dry for others’ tastes. If that’s not your thing, maybe cut down on the flour or add a little more whipped cream to the topping.
  • It doesn’t specifically call for it, but a stand mixer works really well for this recipe. Creaming both the cake and the topping is enough of a pain when one’s hand is healthy but it was pretty much a requirement for me this week. A hand mixer would also work, but I really appreciated saving the labor this week.
Fresh from the oven (and cooled) and it was amazing.

Here’s what I did, mostly following a recipe I found randomly online:

Ingredients

For the bars:

  • 1 c. (or 2 sticks) unsalted butter, plus a little more for coating the sheet pan (I used to use salted but we’re *trying* to be healthier)
  • 2 c. sugar (like I said, trying)
  • 4 large eggs
  • 2 t. vanilla
  • 5 c. all-purpose flour
  • 1 t. salt
  • ½ t. baking soda

For the topping:

  • 8 oz. cream cheese, softened
  • 1 c. powdered sugar
  • 1 t. vanilla
  • 1 c. heavy whipping cream, whipped (or 8 oz Cool Whip but I like real cream, again, trying)
  • About 1 lb. strawberries, sliced

Directions

Heat oven to 375 degrees, and grease a large rimmed sheet pan.

In a large bowl, cream the butter and sugar until fluffy. Then, add the eggs one at a time until well incorporated. Add in vanilla and stir until combined.

In a separate large bowl, mix together the flour, salt, and baking soda. Add to the wet mixture and beat until combined. (The dough will look like cookie dough.)

Spread the mixture on the sheet pan, using greased hands to spread evenly onto the pan.

Bake shortcake for 10 to 15 minutes until golden.

Remove from oven and let cool.

Meanwhile, mix together the cream cheese, powdered sugar, and remaining vanilla. Beat until smooth. Fold in the whipped cream, and chill until the bars are cool.

Spread the cream mixture on top of the shortcake, and then cover with the sliced strawberries. Eat immediately, or chill until ready to serve to in-laws, and enjoy!

Sweet simple sumptuous scones

A week late but I found the perfect “I don’t have time for this” sheet pan recipe.

The good news is it’s been another hectic week that meant I also didn’t have a lot of time to make something this week either; the bad news is, well, it’s been another hectic week. Please someone older than me tell me that life gets less stressful eventually.

Since I’m doubtful that someone will reach out to me, I’ll take solace in the fact that simple sumptuous scones exist and help make life worth living.

Lavender scone ingredients.

Lavender and lemon combine to make the perfect airy, floral, summery breakfast.

And as I might have mentioned, they’re fairly simple.

I’m not super picky when it comes to scones, and one of my favorites is Betty Crocker’s, but these had a nice fluffy texture that made it almost cake-like, while not really having more sugar than any other scone. They were a delight, and I’m absolutely sure I’ll make them again. I might even try to change it up and use different flavors, like my favorite raspberry and white chocolate chip.

Three quick notes:

  • The recipe calls for 2 sheet pans. I almost didn’t but decided to trust the recipe, especially since it’s from the the typically trustworthy Epicurious, and I’m glad I did. The scones don’t look so big but they expand, so use 2 sheet pans or bake in batches.
  • It also suggests serving with store-bought lemon curd. While lemon curd is a treat and does go well with the scones, lavender is such a subtle flavor that the lemon tends to overpower it, especially when lemon zest is already in the scones. So, use with that warning or feel free to pass if you love lavender.
  • Lavender made sound hard to come by, but my favorite spice shop Allspice in Des Moines has lavender flowers, and they ship if you can’t get to Iowa’s capital. And, if you don’t want to include them, I’m sure they’d be OK without it, if less exciting.
So delicious they help make bad days better.

Did I mention these were simple and amazing? OK, here’s what I did:

Ingredients

  • 3 c. all-purpose flour, plus more for light kneading
  • ¾ c. granulated sugar
  • 1 T. baking powder
  • 2 t. dried lavender buds (recipe called for 1 t., but like I said, subtle; I also sprinkled just a few on top of each scone for plating purposes and for a bit more taste, but you do you)
  • 1 t. salt
  • ½ t. baking soda
  • 1 ½ sticks butter (preferably unsalted), cut into ¼-inch cubes
  • 1 c. buttermilk, plus more for brushing (2-4 T.)
  • Zest from one lemon
  • 1 t. vanilla extract
  • 2 T. demerara sugar, or granulated sugar, for topping
  • Lemon curd, optional and to taste

Directions

Heat oven to 425 degrees, and arrange racks on upper and lower thirds of oven. Line 2 sheet pans with parchment paper.

In a large bowl, mix together the 3 c. flour, granulated sugar, baking powder, lavender buds, salt, and baking soda. Cut in the butter, using two knives, your fingers, or a pastry blender. Stir in the lemon zest.

Make a well in the dried ingredients and add the buttermilk and vanilla.

Stir slowly to mix. I found a fork worked really well.

Once a shaggy dough forms, turn out onto a floured surface and lightly knead until the dough forms together.

Use your hands to pat into an about 10-inch by 6-inch rectangle. Cut the rectangle in half lengthwise, and then cut each square into four squares. Cut each square into two triangles, so you have 16 triangles of dough.

Divide the triangles between the prepared baking sheets. Brush with the buttermilk and then sprinkle with the additional sugar.

Bake until scones are golden, about 13 to 15 minutes. Enjoy warm or at room temperature with lemon curd, if desired.